Filters in Boxly let you narrow down your Pipeline View, whether you need to check on a specific stage, review leads from a particular location, or dig into data from your connected PMS.
Instead of manually scrolling through every lead in a box, filters let you slice your pipeline by virtually any attribute and view the exact information you need.
Filters do not permanently change your pipeline. They are temporary views that say:
"Show me only the leads that match these criteria."
Remove a filter at any time to return to your full pipeline.
Managing a busy pipeline across multiple stages, locations, and lead sources makes it easy for important leads to get lost. Without filtering, every user sees the same view regardless of what they need to focus on.
✅ Filters are designed to solve this problem. Instead of reviewing every lead in a box, you can instantly surface the ones that match your exact criteria.
This helps teams:
Focus on specific stages or lead categories without distraction
Segment leads by location, practitioner, or channel
Use PMS data to filter by appointment status.
Surface leads based on custom question responses
Save time with reusable filter combinations
Because filters work in real time, the pipeline updates instantly as you apply and adjust them.
The Pipeline View has received a significant update to its filtering capabilities. Filters are displayed in a bar across the top of the Pipeline View, and more can be added using the + Filter button.
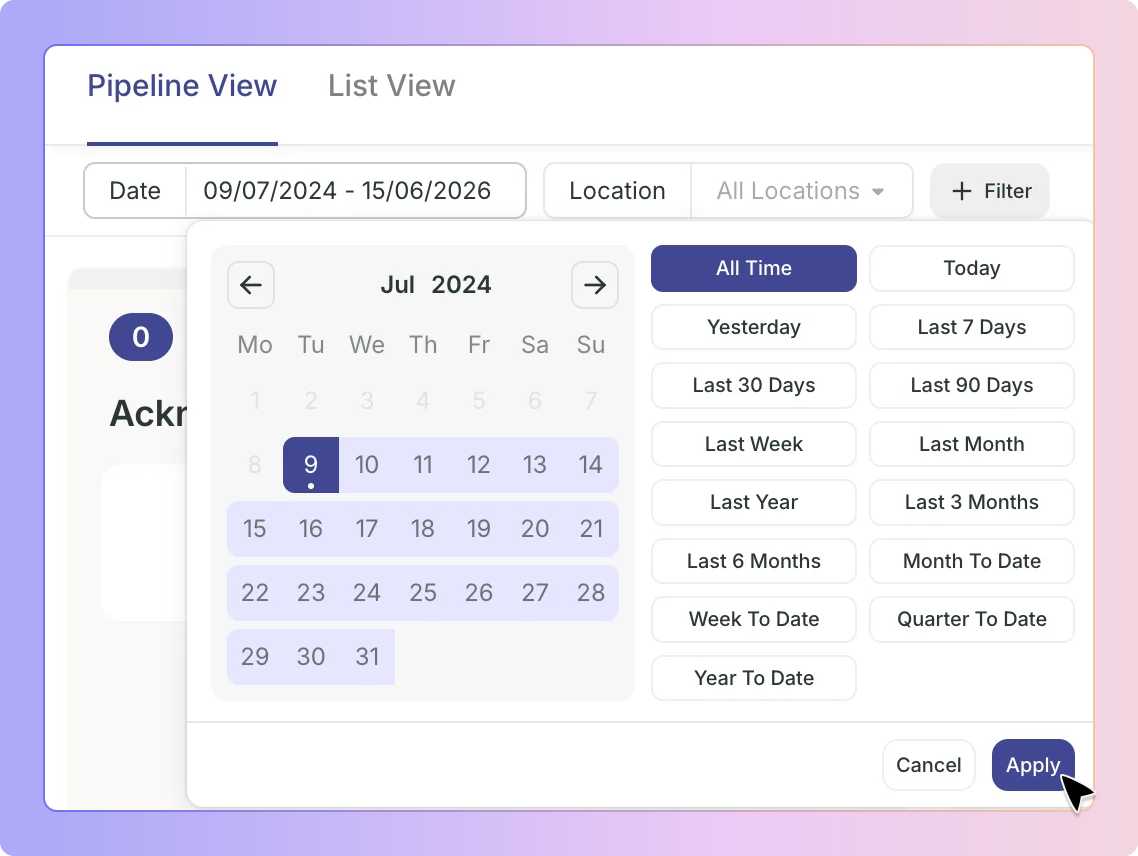
The Date filter appears by default in the top filter bar and has been updated with a new interface.
You can choose from the following preset ranges:
Today
Yesterday
Last 7 Days
Last 30 Days
Last 90 Days
All Time
Or select a custom date range using the calendar picker, which lets you define a precise start and end date.

The Location filter appears in the top filter bar for accounts on a Location plan.
Click Location to open the location selector
Search for a specific location using the search bar
Select one or more locations to include them

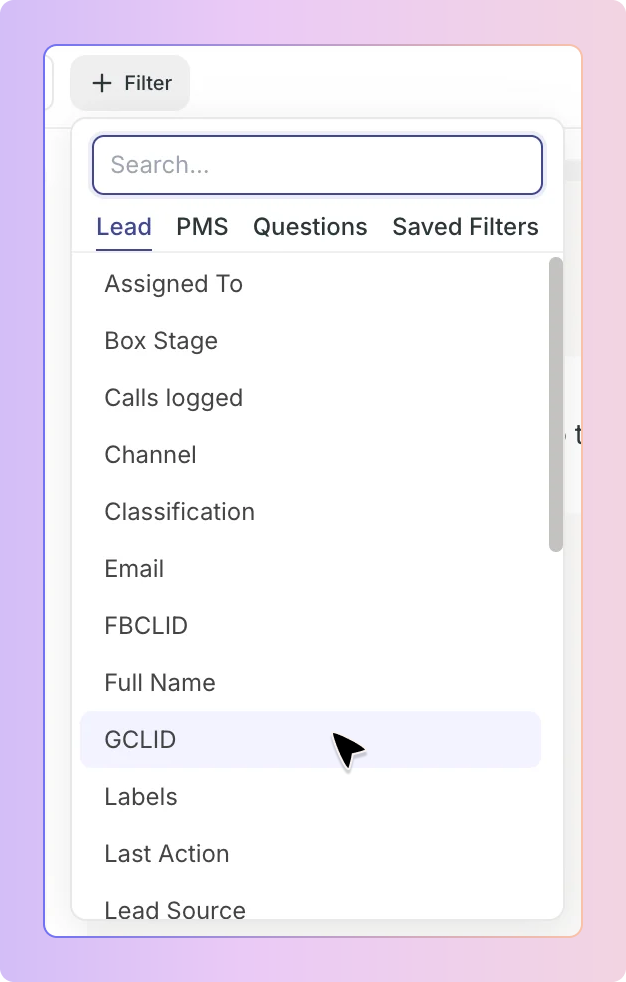
Click + Filter to open the filter panel. This is where you can add any number of additional filters to narrow your pipeline further.
The filter panel is organised into four tabs: Lead, PMS, Questions, and Saved Filters.
You can also use the search bar at the top of the panel to find a specific filter quickly without scrolling.
The Lead tab contains all filters based on lead data stored within Boxly.
The full list of available Lead filters is:
• Assigned To
• Box Stage
• Calls Logged
• Channel
• Classification
• FBCLID
• Full Name
• GCLID
• Labels
• Last Action
• Lead Status
• Lost Reasons
• Milestone
• Closed
• Phone Number
• Practitioner
• Referral Practice
• Referring Dentist
• Referring Practitioner Email
• Referring Practitioner Phone Number
• Referring Practitioner Phone Number Prefix
• Submission Page
• Task Status
• UTM Campaign
• UTM Content
• UTM Medium
• UTM Source
• UTM Term
• Value
When you select a filter, you are prompted to choose an operator — this defines how Boxly matches leads against your chosen value. Different filter types use different sets of operators.
Used for filters with a defined list of options, such as Labels, Location, Channel, Milestone, and Lead Status.
Simply select one or more values from the list , the pipeline will update to show leads matching your selection.
Used for filters with a number value, such as Calls Logged and Value.
Operator | What it does |
Example
Calls Logged filter: Select more than → enter 3 → the pipeline shows only leads that have had more than 3 calls logged.

Used for filters with free-text fields, such as Phone Number, Email, GCLID, Full Name, and FBCLID.
Operator | What it does |
Example — Phone Number filter: Select is empty → the pipeline shows only leads that have no phone number recorded — useful for identifying leads with incomplete contact details.
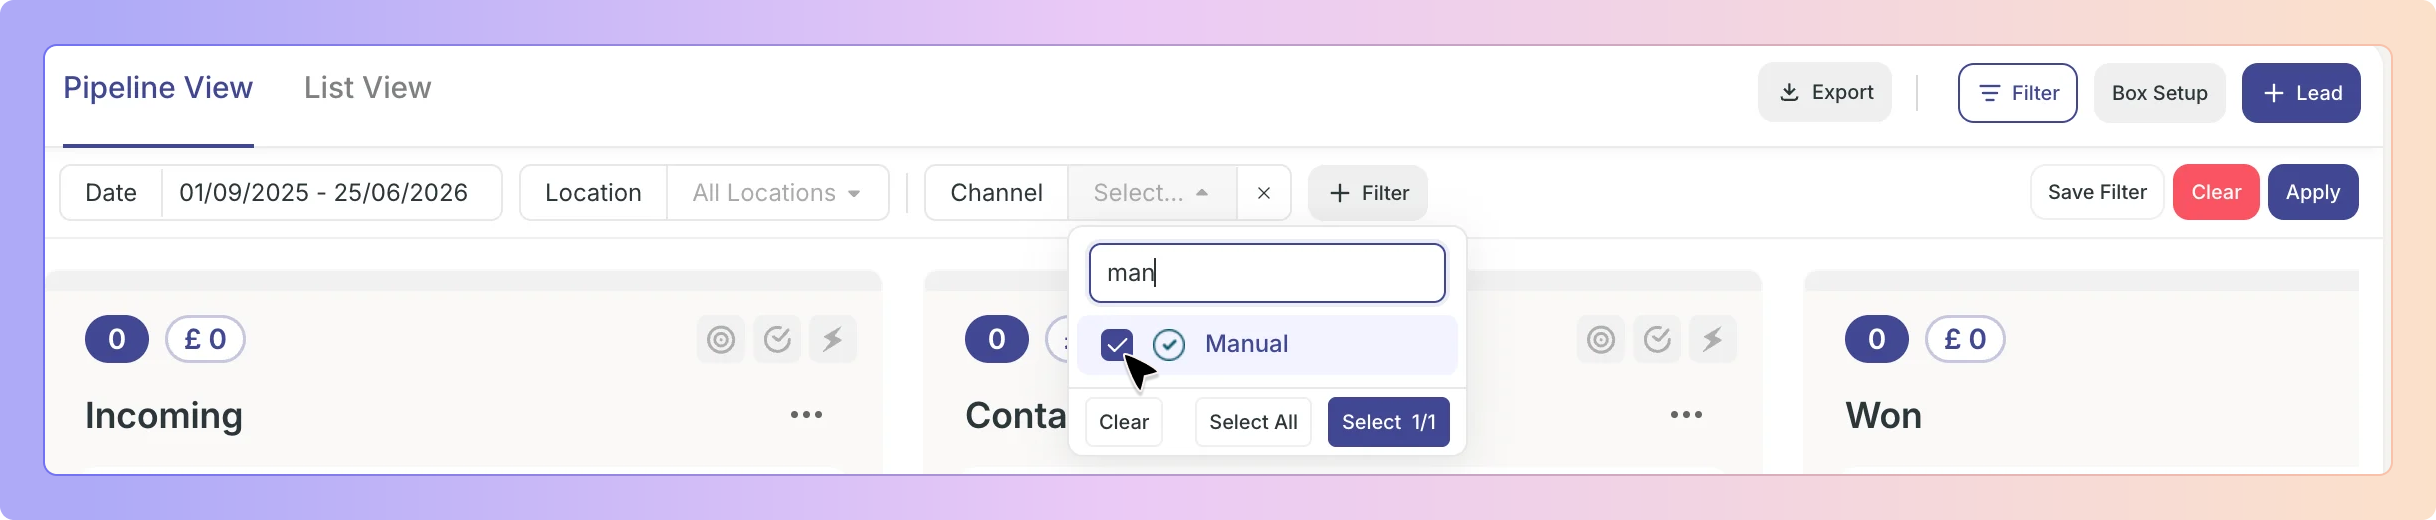
The Channel filter allows you to segment leads by how they entered your system. Options include external channels such as Webform, Facebook, Instagram, Email, and others, as well as Manual - a channel used for leads that have been created manually within Boxly or uploaded via CSV.
Select one or more channels to show only leads from those sources. You can combine multiple channels at once to create flexible views across different lead sources.
Example — Manual Channel: Select Channel → tick Manual → the pipeline shows only leads that were created manually or uploaded by CSV, helping you identify and manage manually entered enquiries.
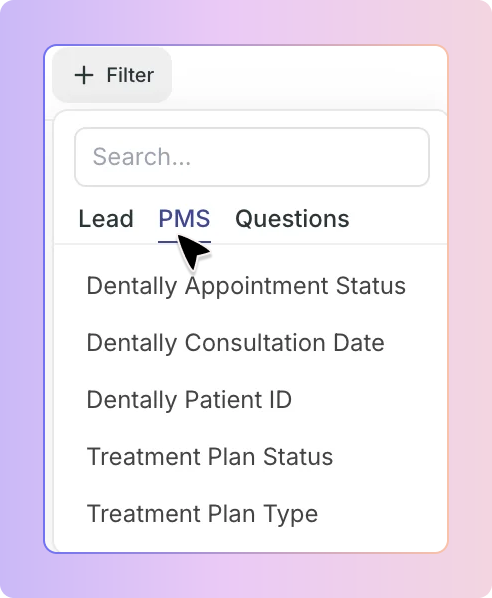
The PMS tab is available when your Boxly account has a Practice Management System (PMS) connected. It lets you filter leads using data pulled directly from your PMS.
PMS filters include fields such as:
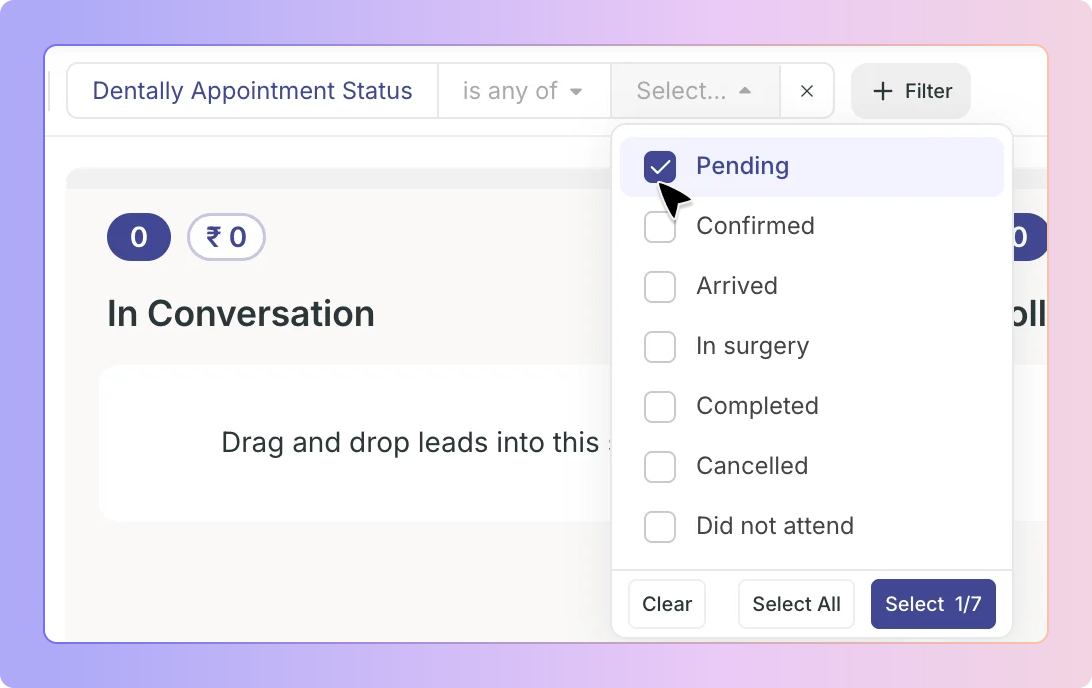
Appointment Status - filter leads by the status of their appointment in your PMS
Additional PMS-specific fields depending on your integration
Appointment Status uses a selector - simply choose one or more statuses from the list (e.g. Confirmed, Arrived, Pending) to show leads whose appointment matches your selection.
Example: Select Appointment Status → tick Confirmed and Arrived → the pipeline shows only leads whose appointments are confirmed or have arrived.
The Questions tab lets you filter leads based on their responses to custom questions that have been created in your Boxly settings.
Questions are set up in: Settings → Lead Management → Fields
Once questions have been created, they appear in the Questions tab and can be used to filter your pipeline based on how leads answered them.
Questions use text-style operators:
Contains: shows leads whose answer to the question includes your entered text
Does not contain: shows leads whose answer does not include your entered text
Example: Select a question such as "Are you an existing patient?" → contains → enter No → the pipeline shows only leads who answered "No" to that question.
The Saved Filters tab allows you to save a combination of filters so you can reapply them instantly in future without setting them up from scratch each time.
Once you have applied the filters you want, click Save Filter in the top filter bar to save the current combination under a name of your choice.
Once you have selected your filters:
Click Apply to update the pipeline view with your selected filters
The pipeline will refresh to show only leads matching your criteria
Active filters remain visible in the top filter bar so you can see what is currently applied
Click the × next to any individual filter to remove it
Click Clear to remove all active filters at once and return to the full pipeline view
Here's how Pipeline View Filters play out in a typical week at a dental clinic.
James is a practice manager at Bright Smile Dental, which operates across two locations in Bristol and Bath. On Monday morning, he wants to review all leads in the "In Conversation" stage who are classified as Qualified and have had more than two calls logged, specifically at the Bristol location.
James opens the Pipeline View and applies three filters:
Location → Bristol; Classification → Qualified; Calls Logged → more than → 2. The pipeline instantly updates to show only the leads matching all three criteria.
He then asks his receptionist Sophie to focus on leads who responded "Yes" to the question "Are you an existing patient?" She applies a Questions filter for that field and gets a focused list in seconds.
At the end of the week, James saves this combination as "Bristol Qualified , Existing Patients" in Saved Filters, so the whole team can apply it in one click going forward.
Without Pipeline View Filters, James and Sophie would need to scroll through every lead manually. With them, they surface exactly what they need in seconds.
Can I apply multiple filters at the same time?
Yes. You can apply as many filters as you need simultaneously. The pipeline will show only leads that match all active filters at once. Use the search bar in the filter panel to find specific filters quickly.
Do filters affect other users' views?
No. Filters are personal to your session. Applying a filter in your Pipeline View does not change what another user sees in theirs.
What is the difference between "contains" and "is exactly" for text filters?
"Contains" will match any lead where the field includes your text anywhere — for example, "contains → John" would return "John Smith" and "Mary Johnson". "Is exactly" will only match leads where the field is precisely your entered text, with no additional characters.
Can I save a filter combination to reuse later?
Yes. Once your filters are applied, click Save Filter in the top bar and give the combination a name. It will appear under the Saved Filters tab for you to reapply at any time.
The PMS tab is not showing in my filter panel. Why?
The PMS tab only appears if your account has a PMS integration connected. Contact your admin or reach out to support to discuss connecting your practice management system.
Do filters apply to the List View as well as the Pipeline View?
Yes. Filters applied in the Pipeline View also carry across to the List View when you switch between the two.
What happens if I clear all my filters?
Clicking Clear removes all active filters and returns the pipeline to its default view showing all leads within the selected date range.
What is the Manual channel?
The Manual channel shows leads that have been created manually within Boxly or uploaded via CSV file. Use this filter to isolate manually entered enquiries for reports, manually added leads,etc.
Need Help?
If you have questions about Pipeline View Filters or need help setting them up, our support team is happy to help. Reach out to us at [email protected].
Boxly's Power user guide
Video Walkthroughs to Keep your Momentum Powered up!