All your enquiries in one place
View all conversations in one place instead of across multiple platforms. This saves time versus switching between systems. You can WhatsApp your webform enquiries, Facebook Lead ads and more
Mass message customers without limits
Send targeted mass messages to large groups of customers based on their stage or activity in Boxly without the 256 contact limit.
Setup powerful time saving automations
Setup automated replies for incoming messages or target automated messages when customers reach a stage in a process such as a booking or sale.
Know who and when the team are replying
Clearly see what team member is replying to WhatsApp messages and track the response times in a report
Secure messaging and team access
If a team member leaves the team, simply remove them as a user in Boxly and their access to your WhatsApp account is removed.
To connect WhatsApp to Boxly:
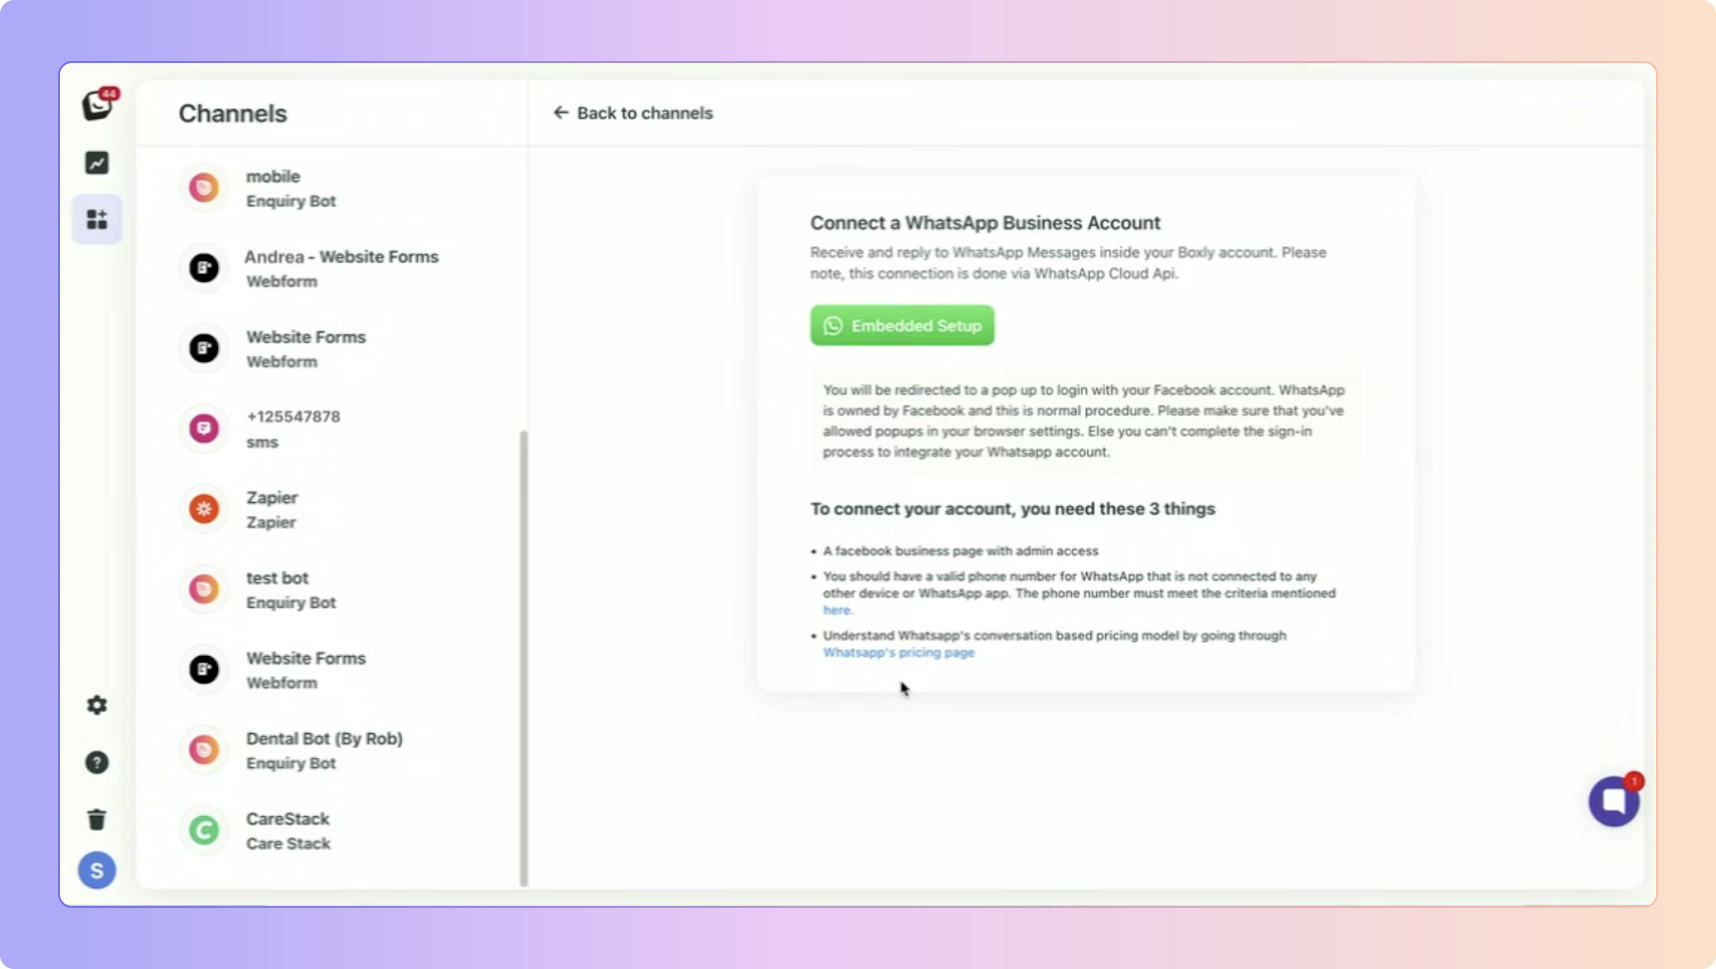
✅ Go to Channels, → then Lead Channels, → then click Connect WhatsApp
✅ You will see: Connect Embedded WhatsApp
Click on "Connect Embedded Setup"
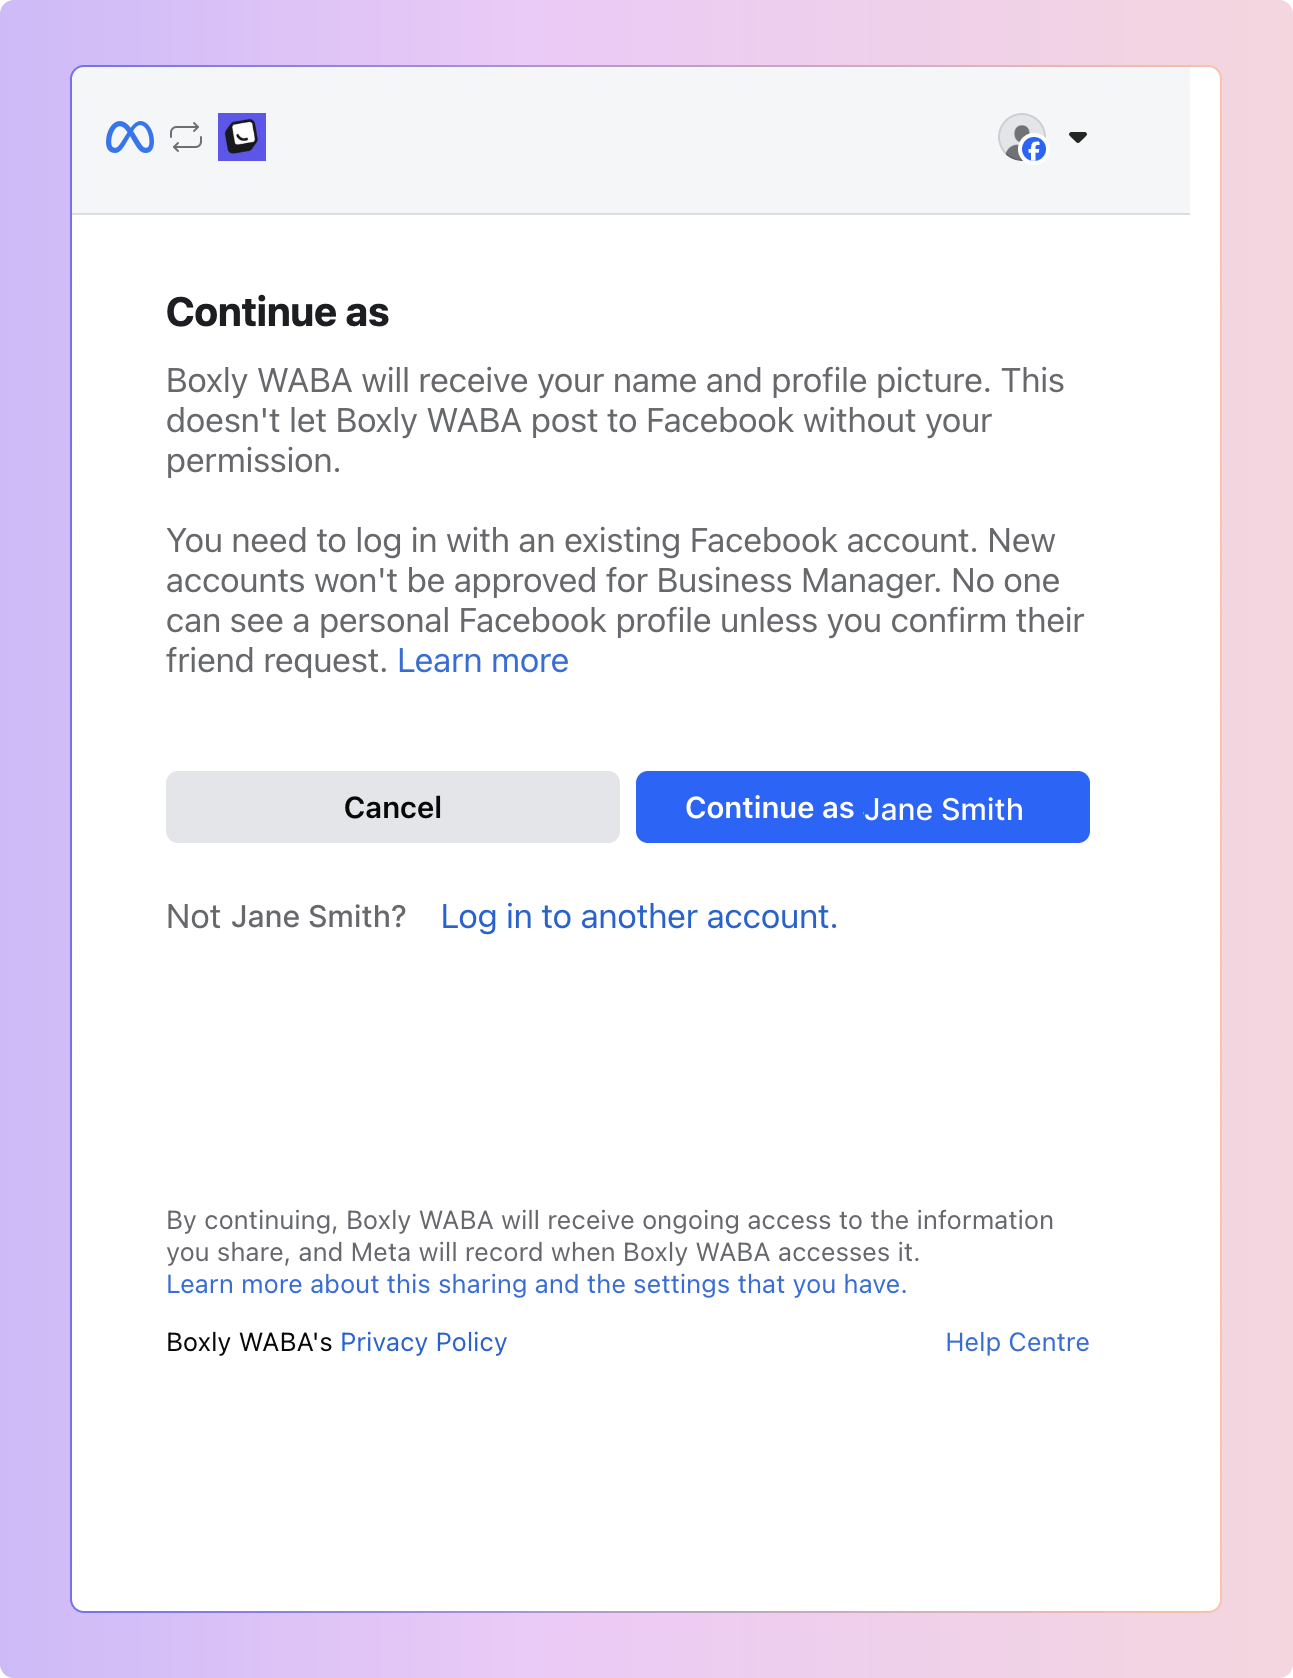
Login to Your Facebook Account
If you are not already logged in, sign in to continue.
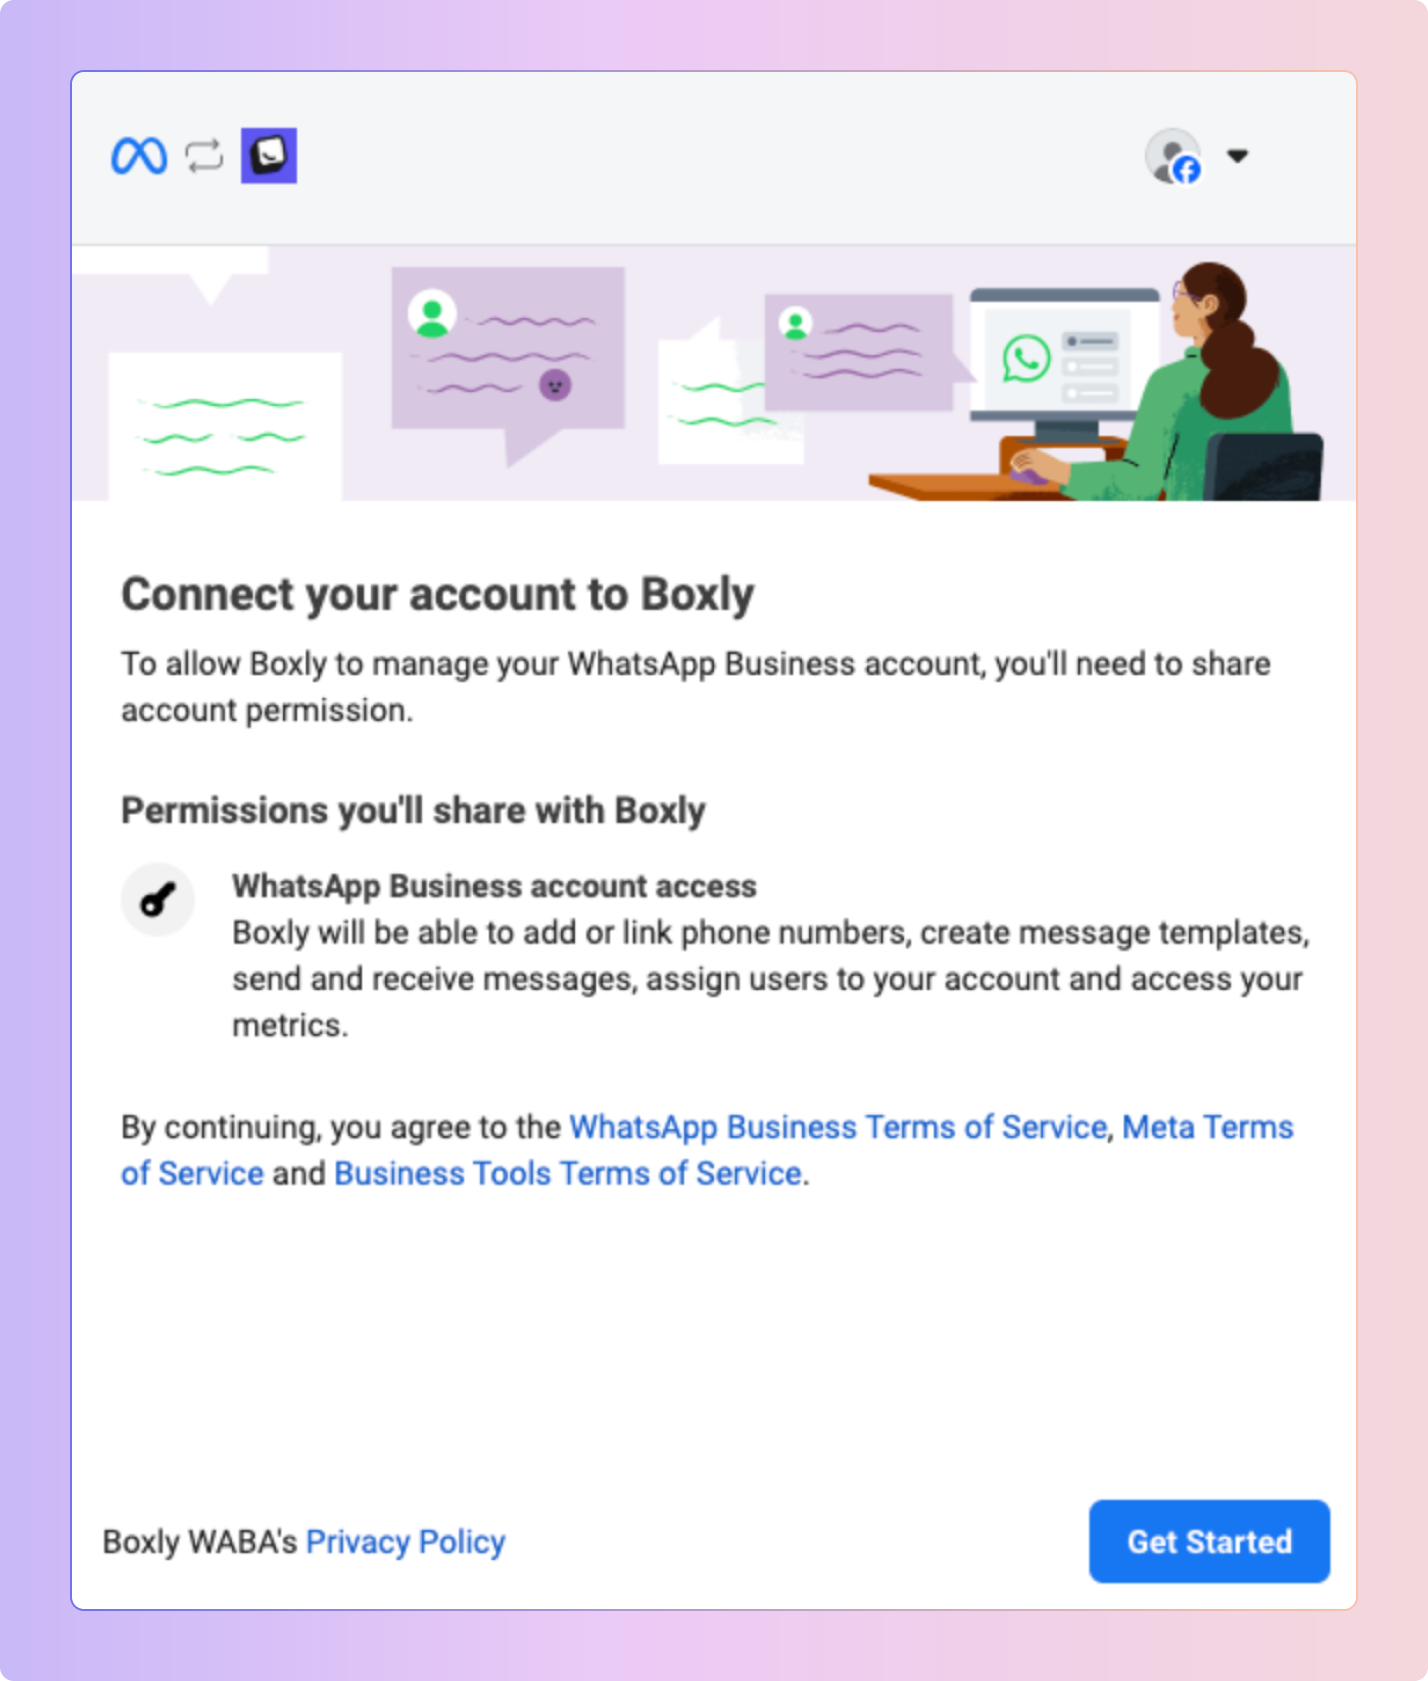
Click on “Get started”
Choose your Meta Business Account
✅ Select your existing Meta Business Account.
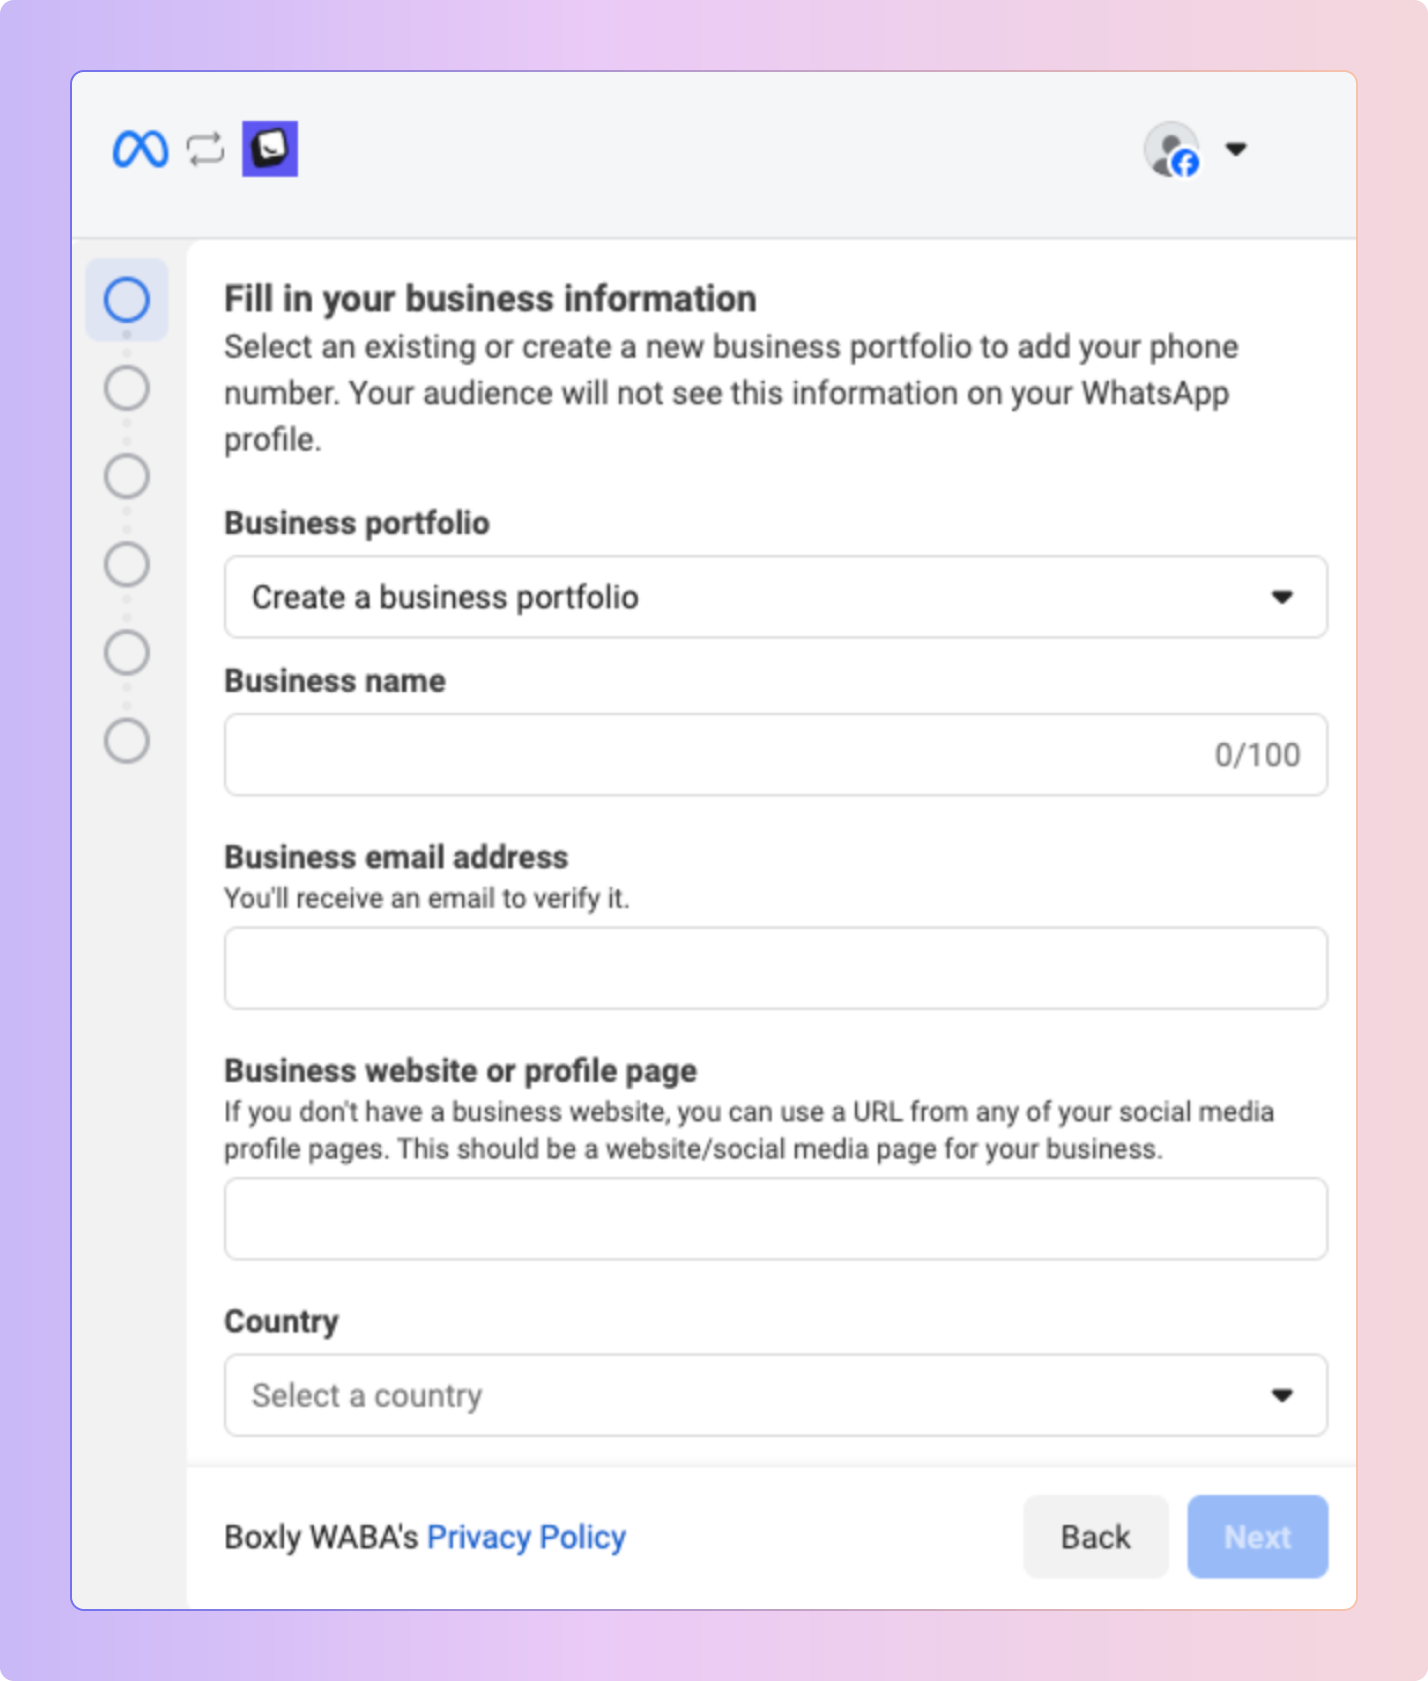
✅ Fill in Your Business Details, including:
Business Portfolio
Business Name
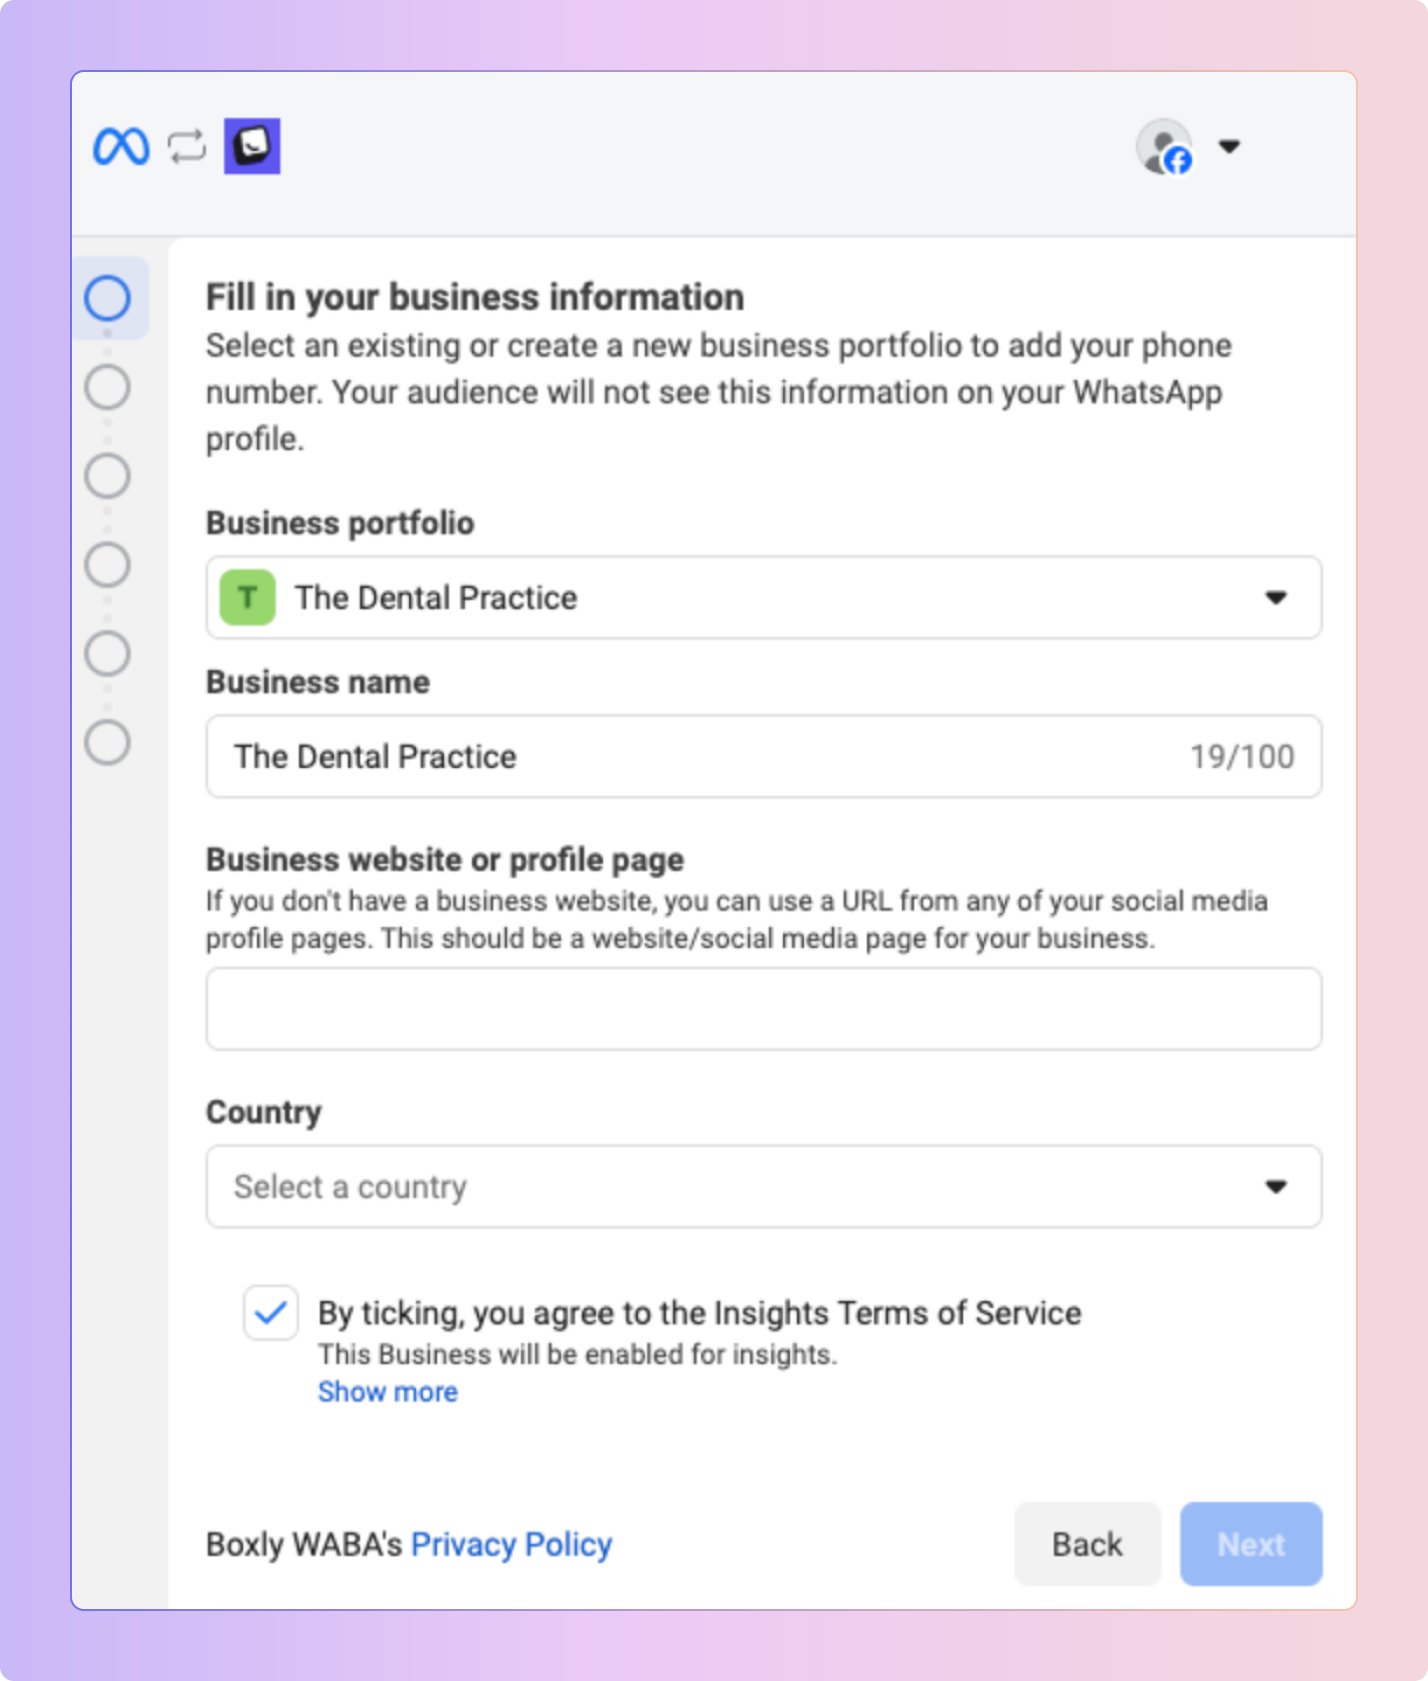
If you do not have a Business Portfolio, select "Create a Business Portfolio" from the dropdown menu and add the required details.
Create a New WhatsApp Business Account (if applicable)
✅ If you are using Embedded Signup for the first time, you must create a new WhatsApp Business Account.
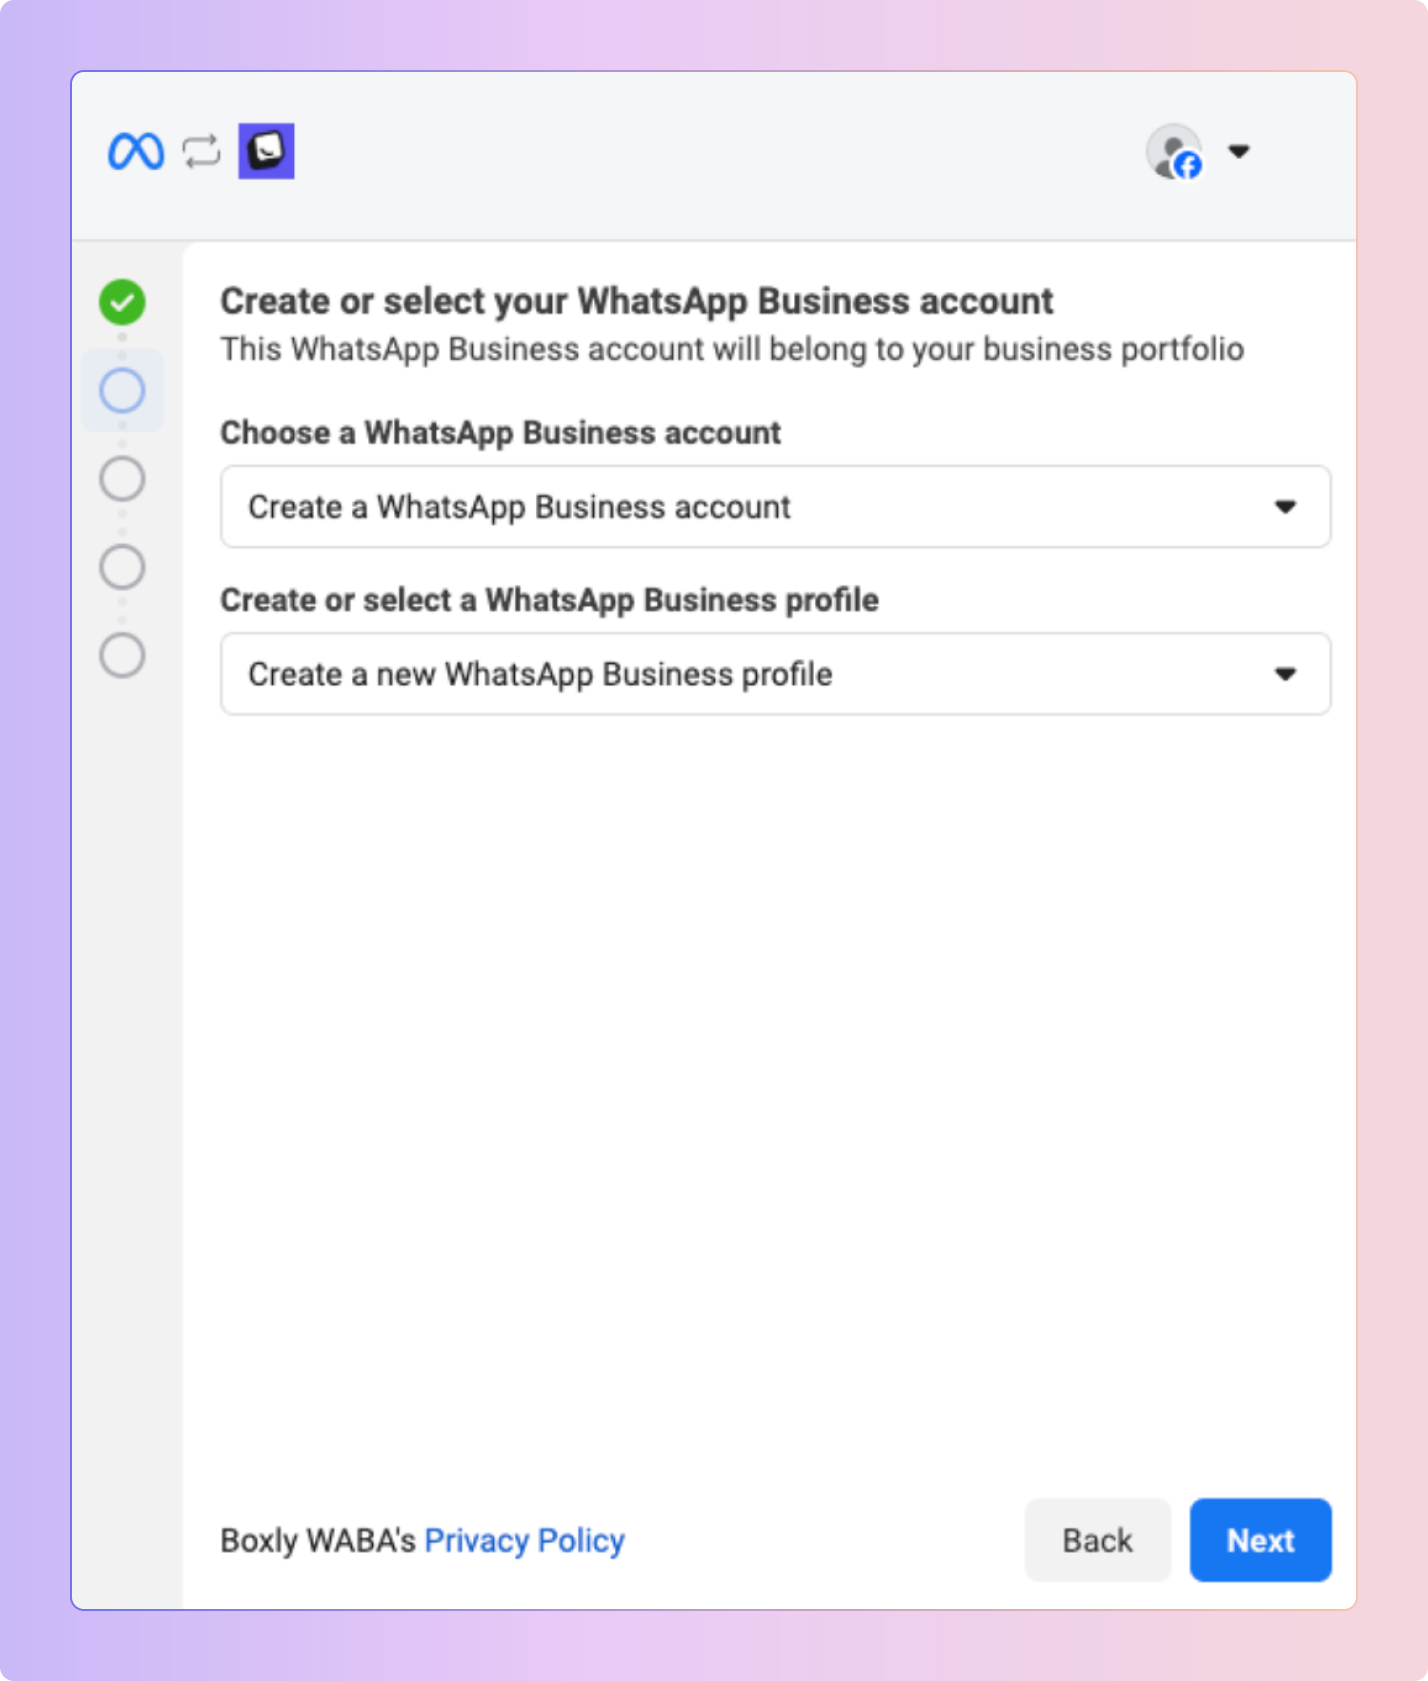
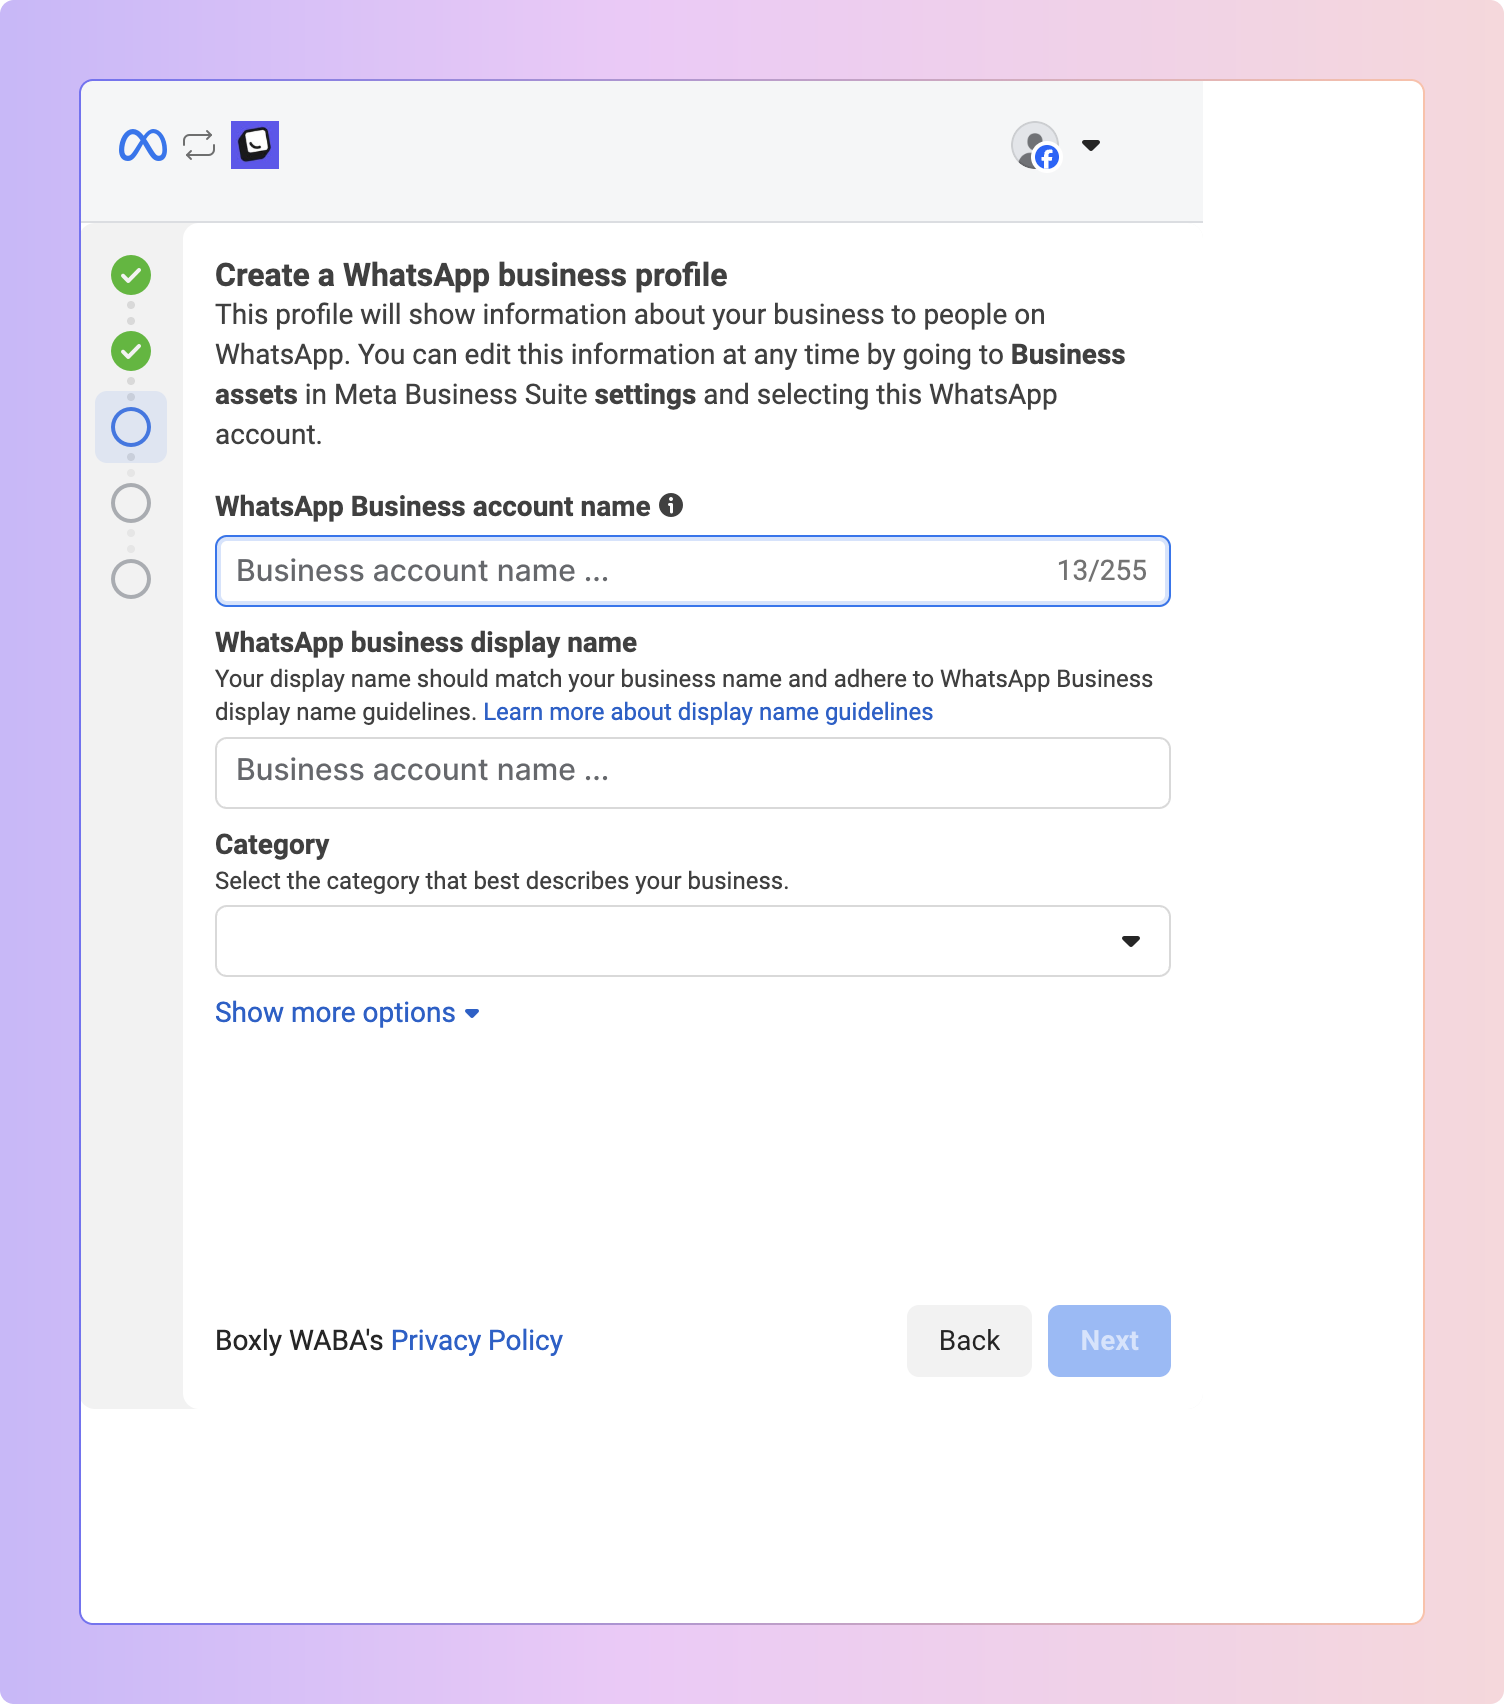
If you already have an existing WhatsApp Business Account, select it, fill in the required business information, and click "Next."
Add and Verify Your WhatsApp Business Number
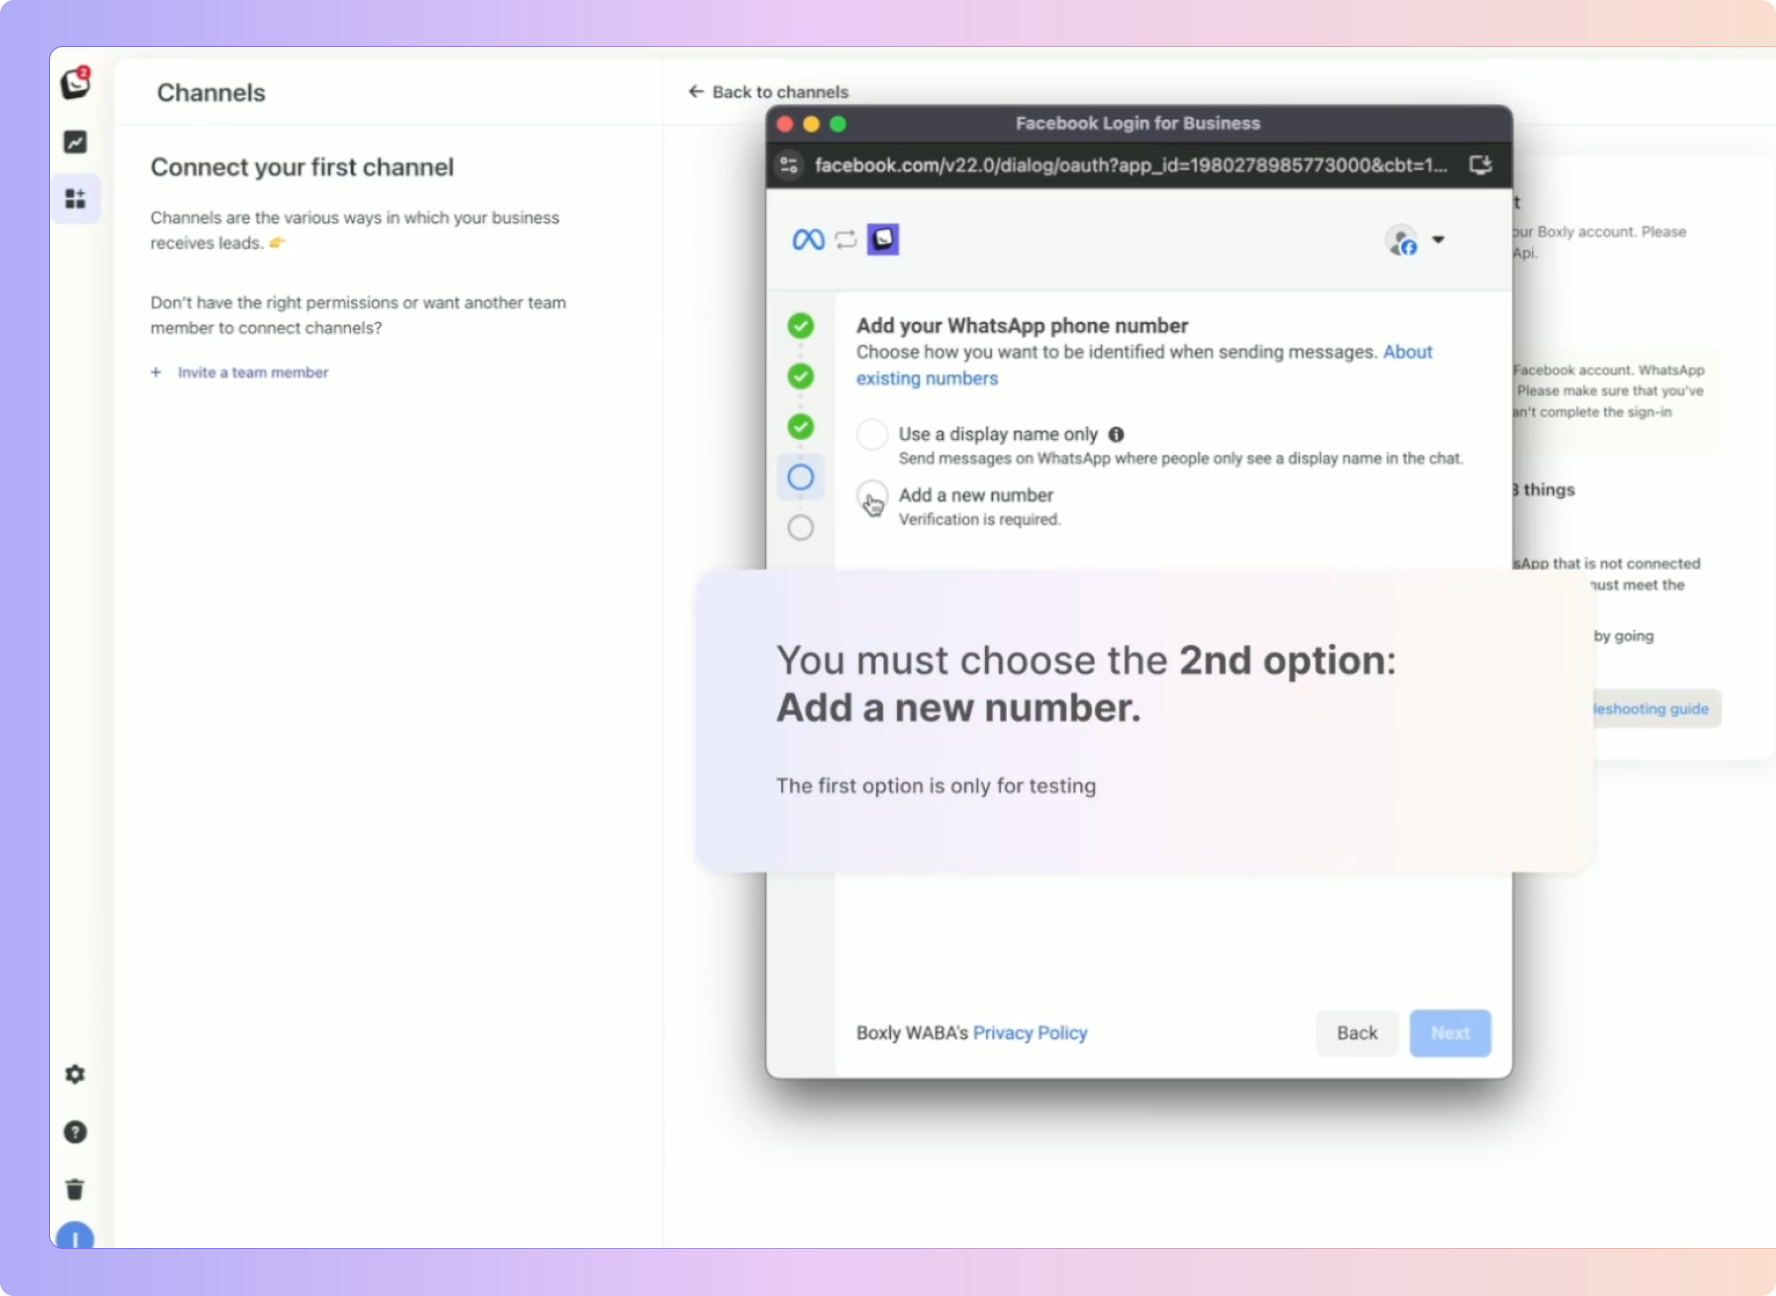
✅ Choose a verification method (SMS or Phone Call).
⚠ Ensure the number meets the following requirements:
The number must be valid and active during the verification process.
Businesses cannot register a number that is currently active on WhatsApp Messenger or the WhatsApp Business App.
If you need to use an existing WhatsApp number, you must first deactivate it from WhatsApp Messenger or WhatsApp Business App.
You must use your own (unique) WhatsApp number when connecting WhatsApp to Boxly - any numbers used in this guide is for example purposes only.
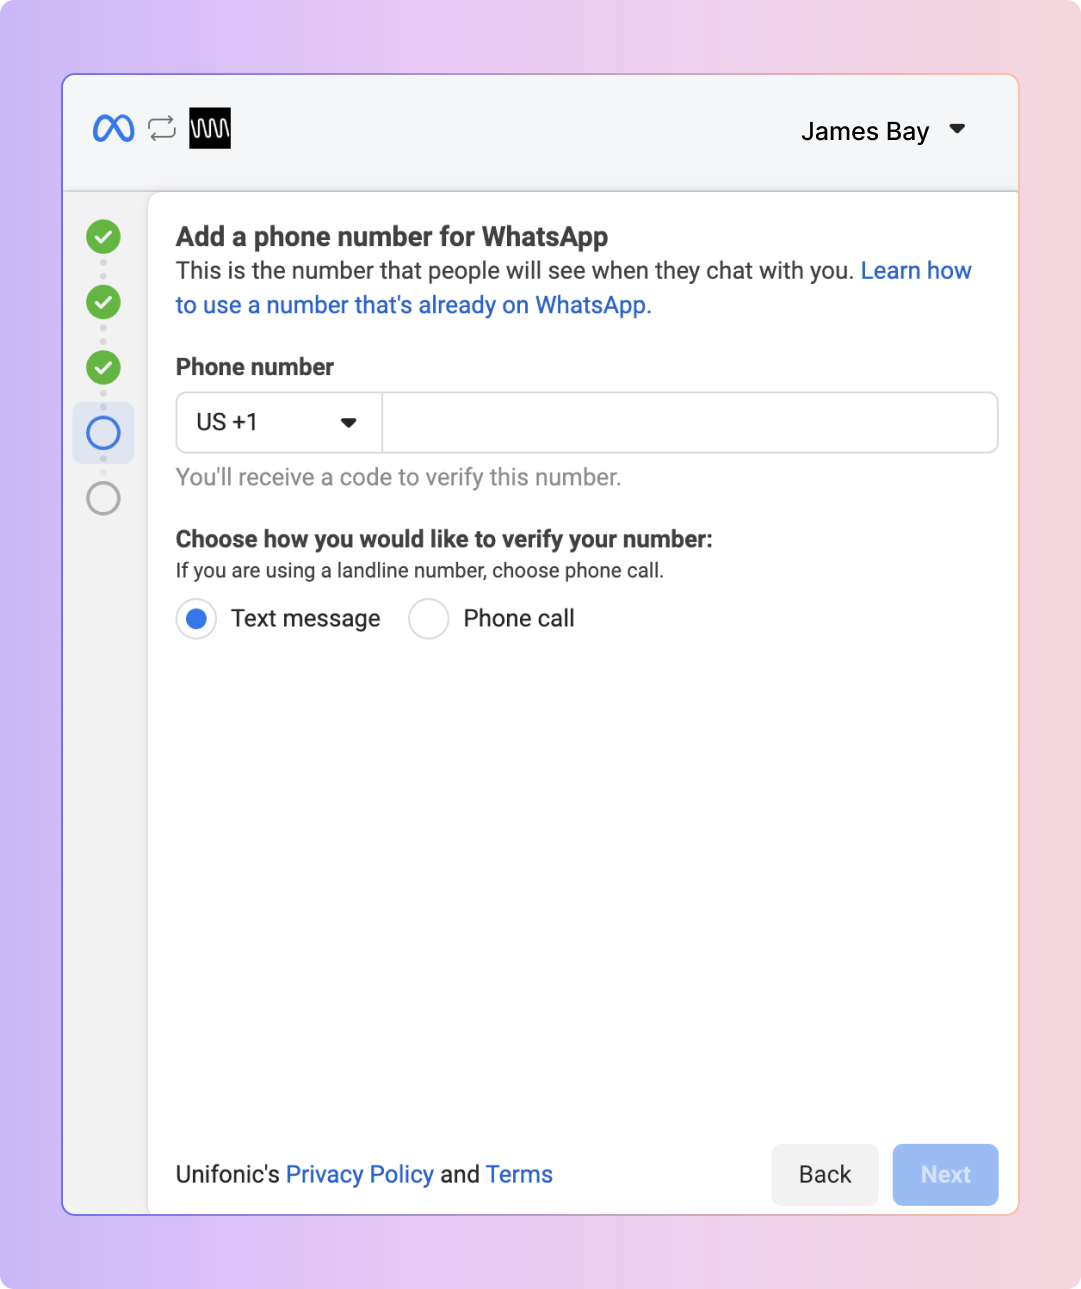
Verify Your Phone Number
If registering a toll-free number with IVR, IVR should be disabled temporarily to allow WhatsApp to verify the number via call.
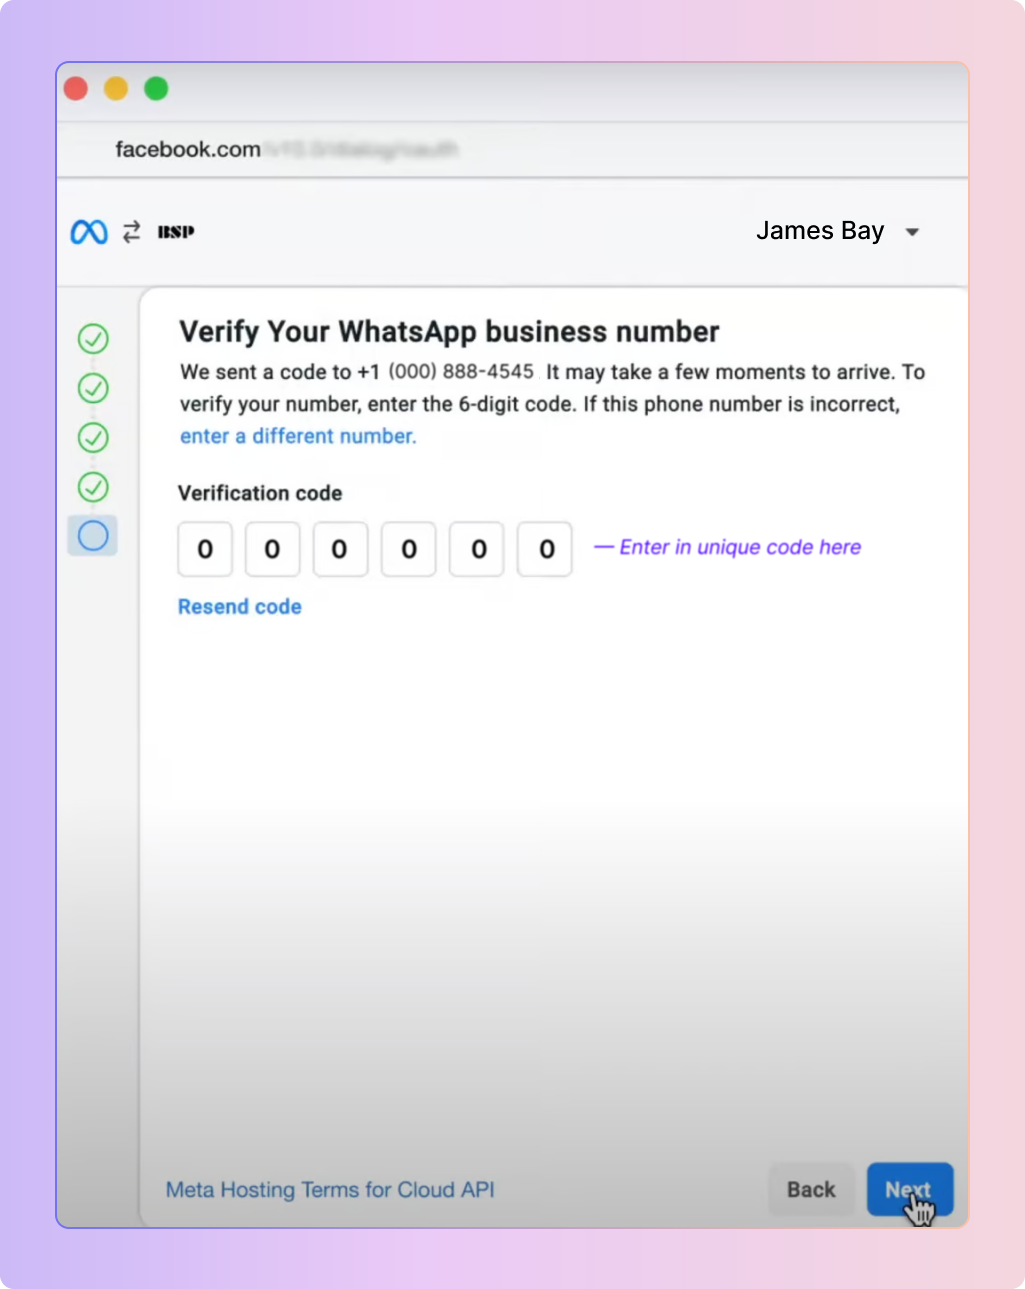
Enter the 6-digit code you receive and click "Next".
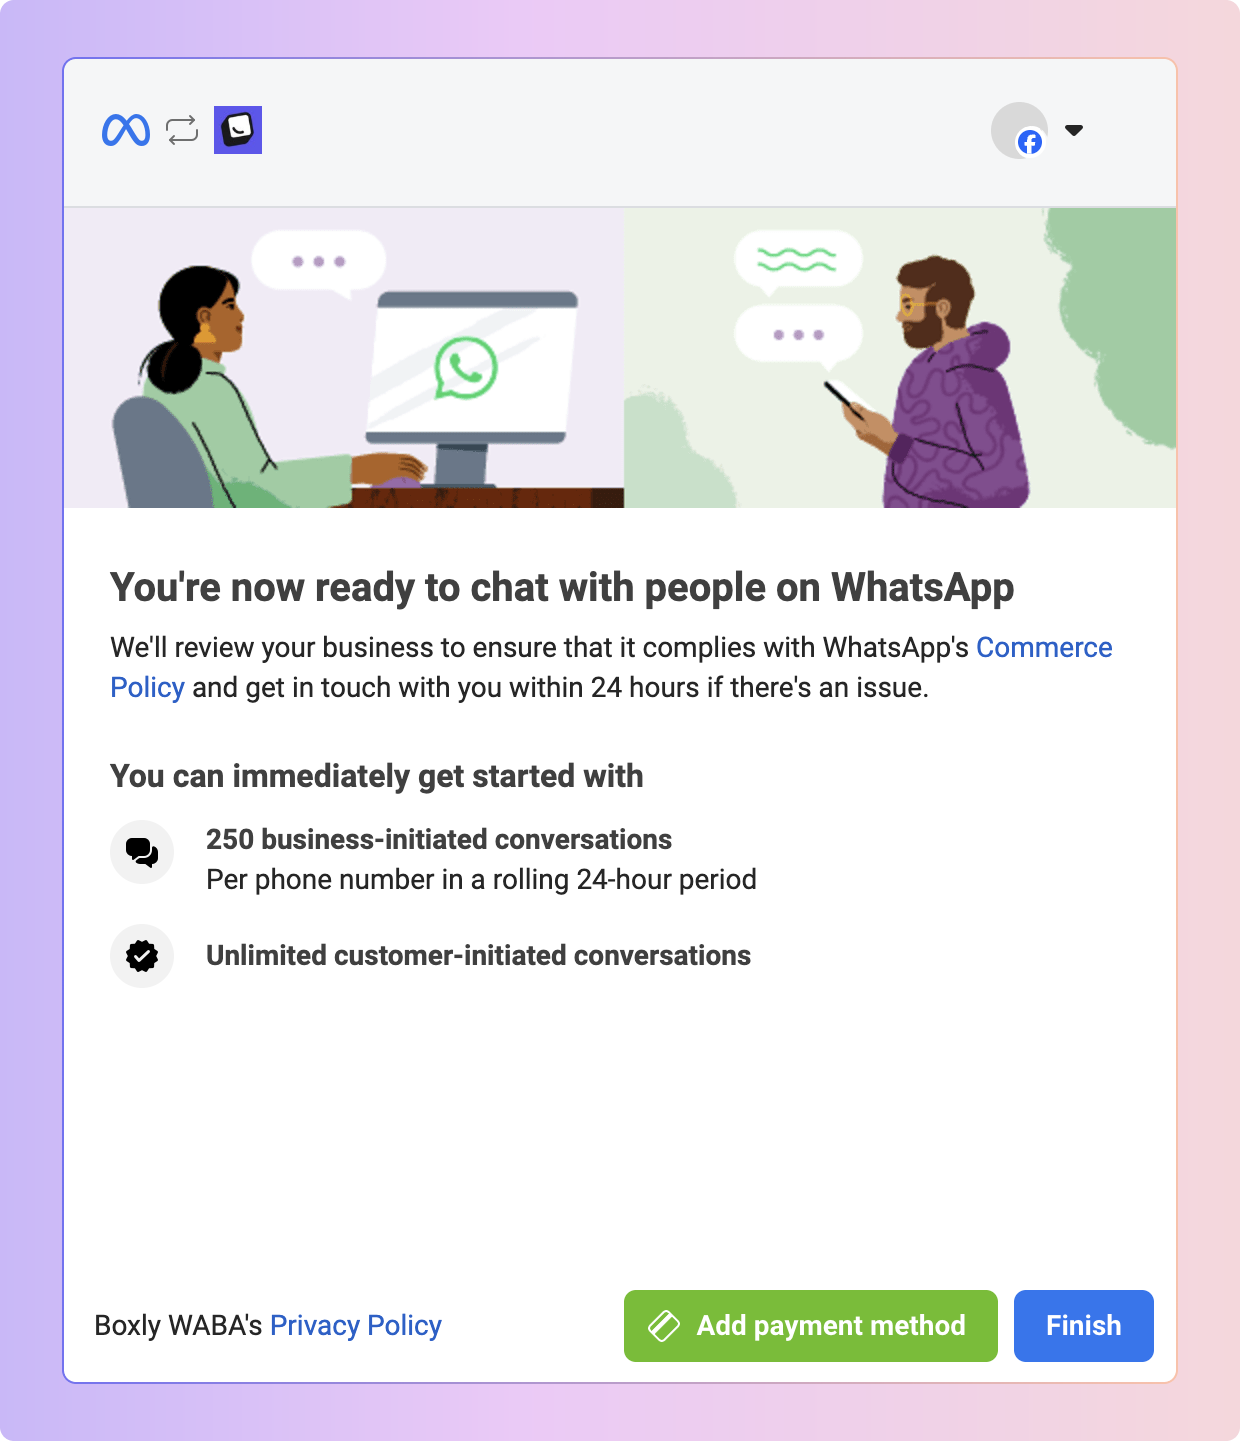
Important: Add a Payment Method
Click "Add a Payment Method" to be redirected to the Facebook Billing page.
If you miss this step, you can complete it later by clicking "Pay for WhatsApp" after connecting the channel.
Or Click "Finish" to be redirected to the Boxly "Connect WhatsApp" page.
Create WhatsApp Message Templates
WhatsApp Message Templates offer a powerful way for businesses to streamline communication and engage with their audience effectively. Read this article to learn how to create message templates for your WhatsApp business account:
✨ Follow the existing guide below

Connecting WhatsApp as a Channel is our most technical of channel connections but simply follow the step-by-step guide below and you'll be connected in no time at all.
If you run into any issues, you can contact us at support@boxly.ai and we would be happy to assist.
Here is the complete step-by-step guide in a video format, also below are step-by-step instructions.
In order to connect a WhatsApp account to Boxly you will need to first create a Meta for Developers account to configure the connection.
If you already have a Meta for Developers Account, please move to Step 2
To create an account go to the developer's page for Meta
Click on "Get Started" on the top right hand corner
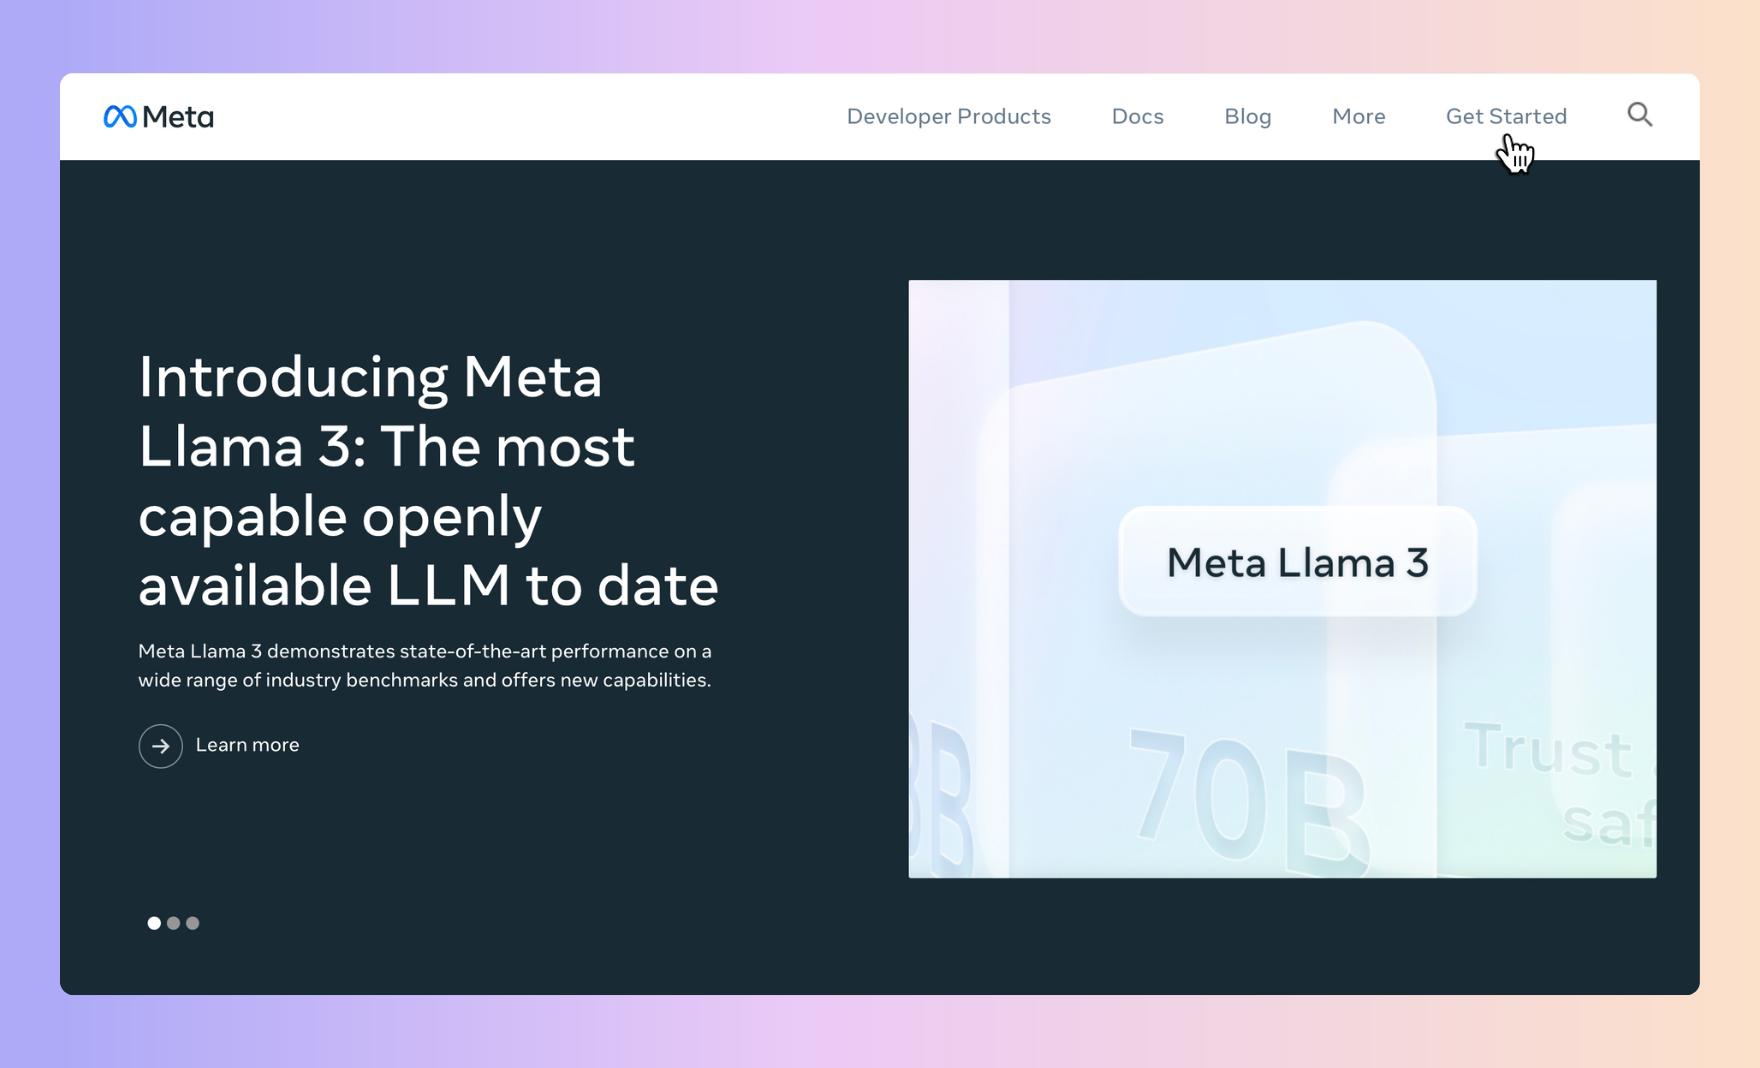
Next, click continue to start the account creation process
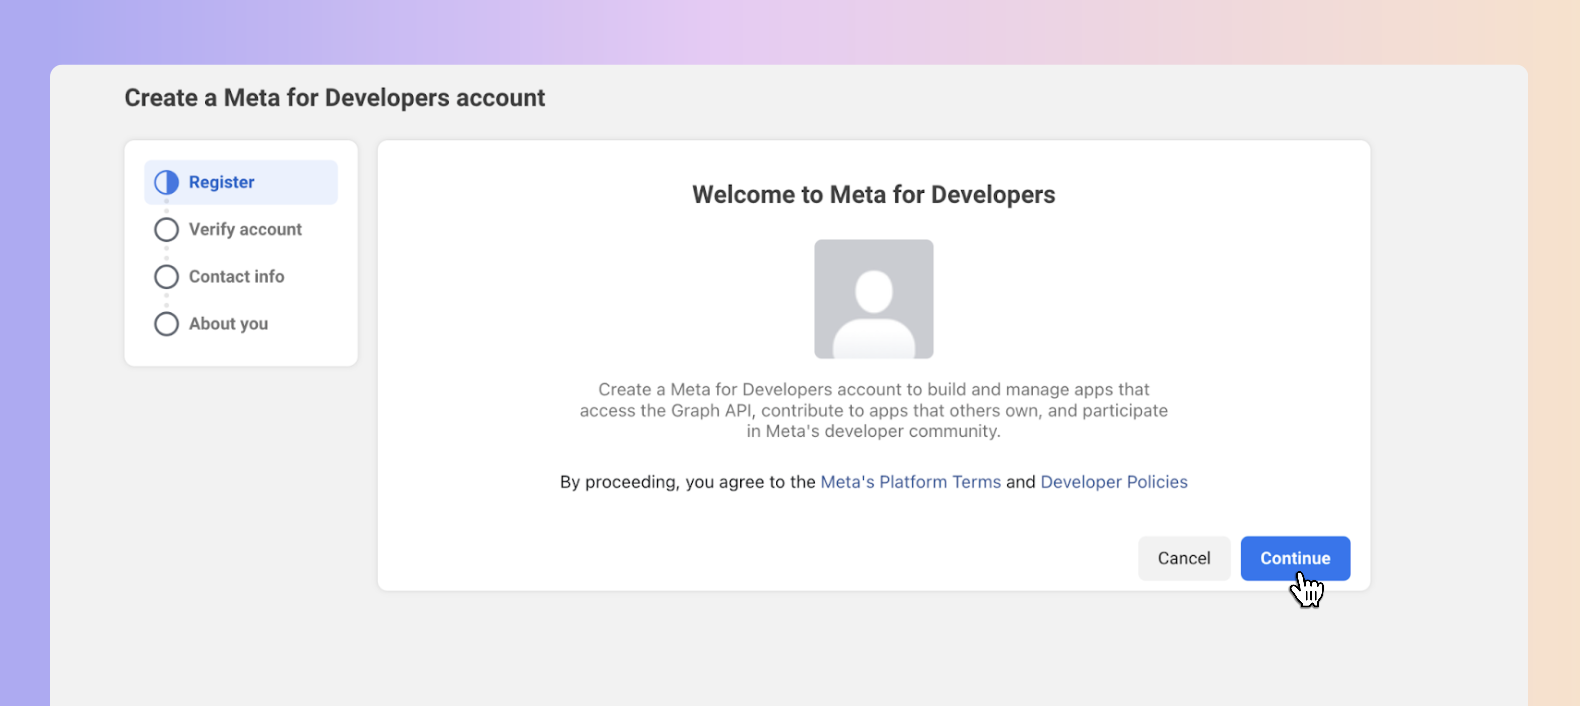
Follow the account creation steps
Verify your developer account by adding a mobile number.
In the new window enter the code that was sent to the specified phone number. Click “Continue”;
Select Developer
Click on complete registration
Go to the developer's page and click on "My Apps" on the top right of the menu.
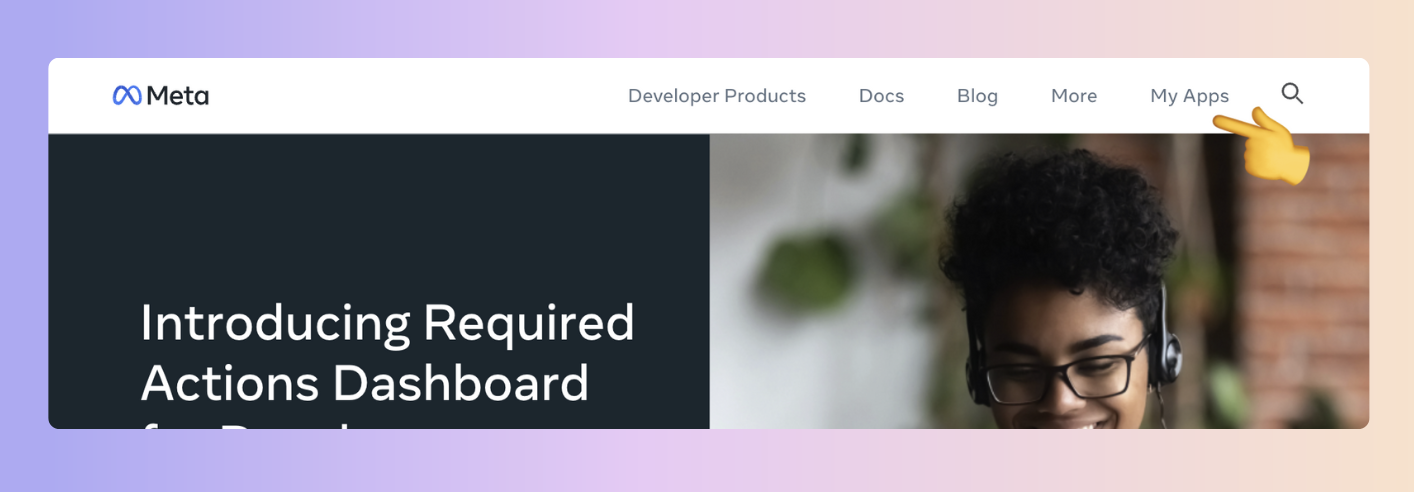
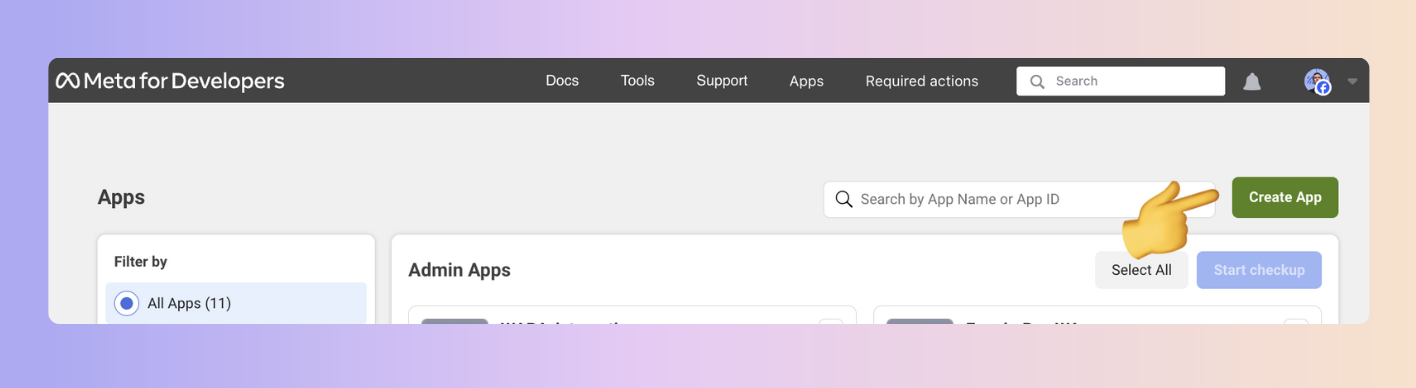
Next, click on Create App
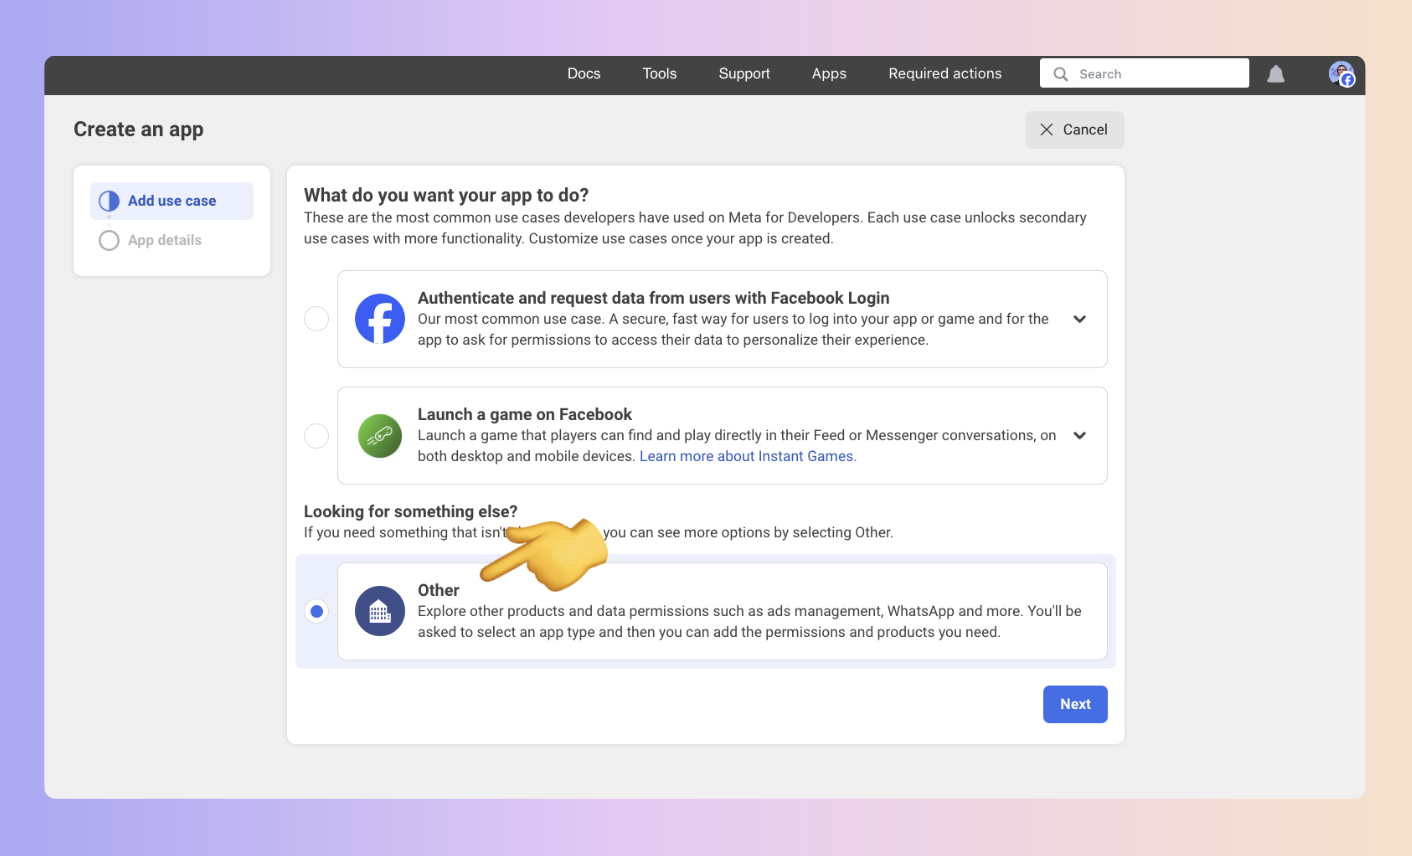
Select, "Other"
Next, on the pop up, select the app App type - Select the Business option. Scroll down the page and click "Next"
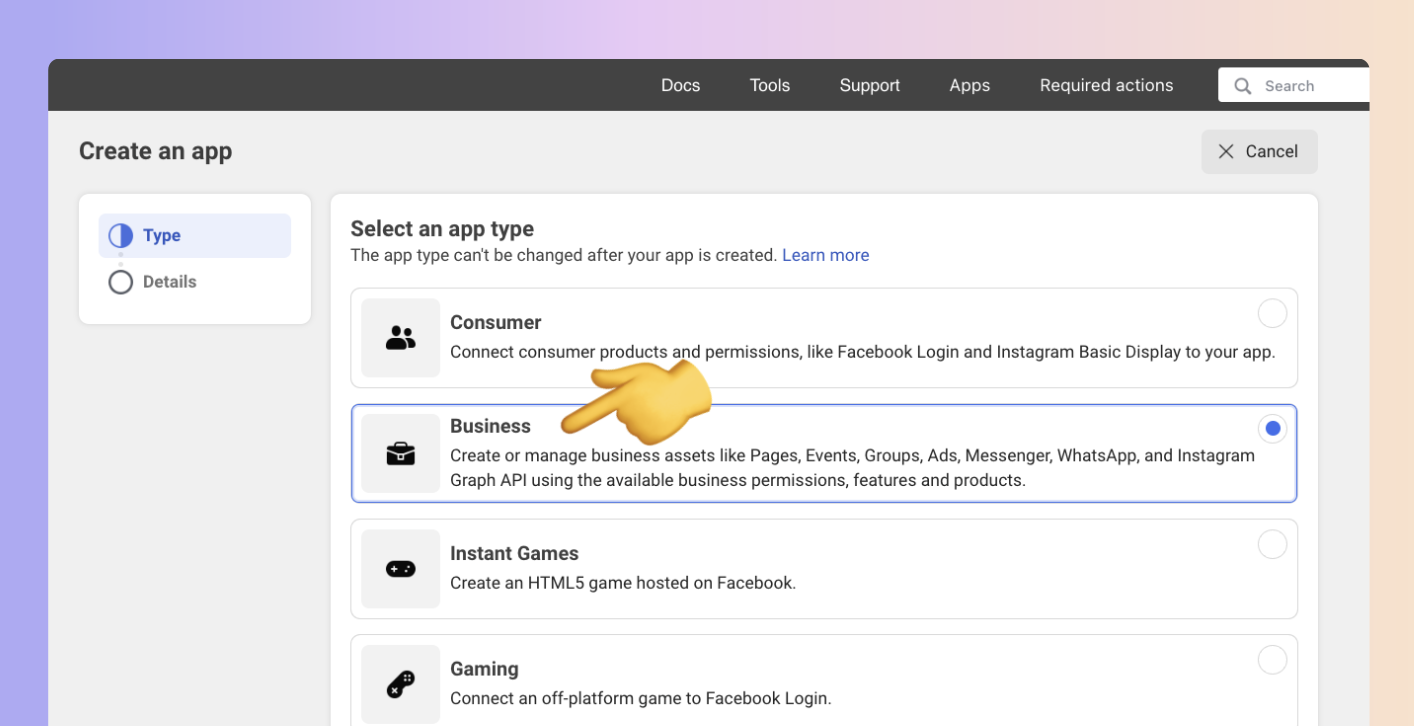
Next, fill in the details below.
App display name
✅ Use your business name here
App Contact Email
✅ Add your email address or an email you have access to
Business Manager Account
✅ You can skip this at this stage and come back to it later
Once you create the app you will land on the app dashboard.
Click on the "Set up" button on WhatsApp
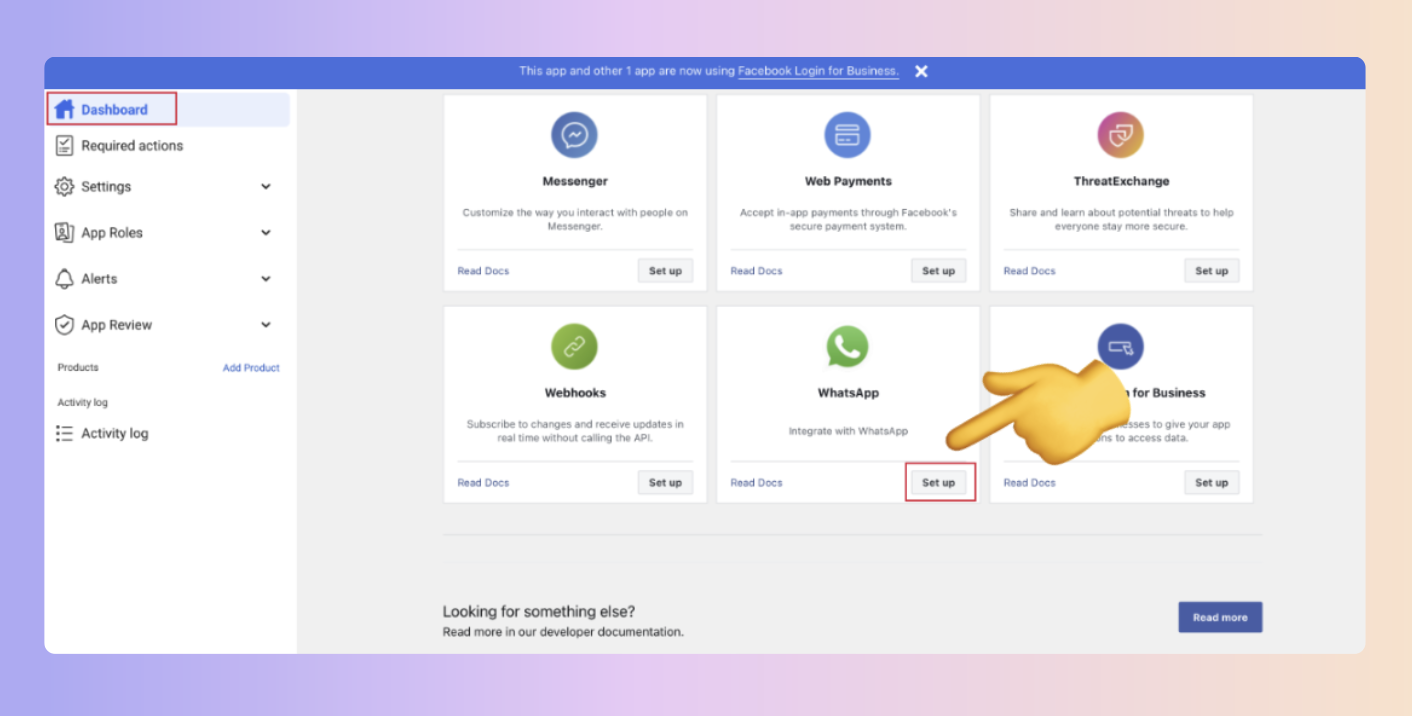
You have now created your WhatsApp app Successfully.
Now go
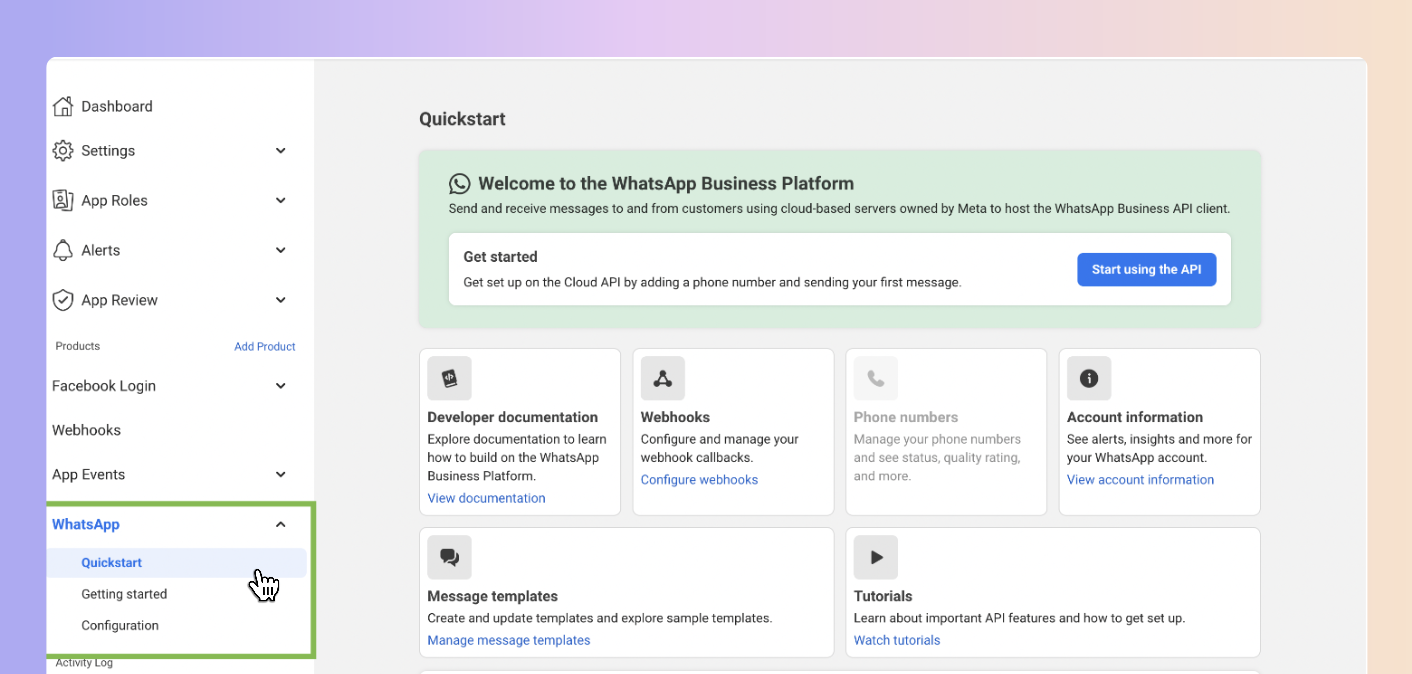
Tap on the "Start using the API" button
You will be redirected to the “Getting Started” Sub Section
On the API Setup Page, click "Add phone number".
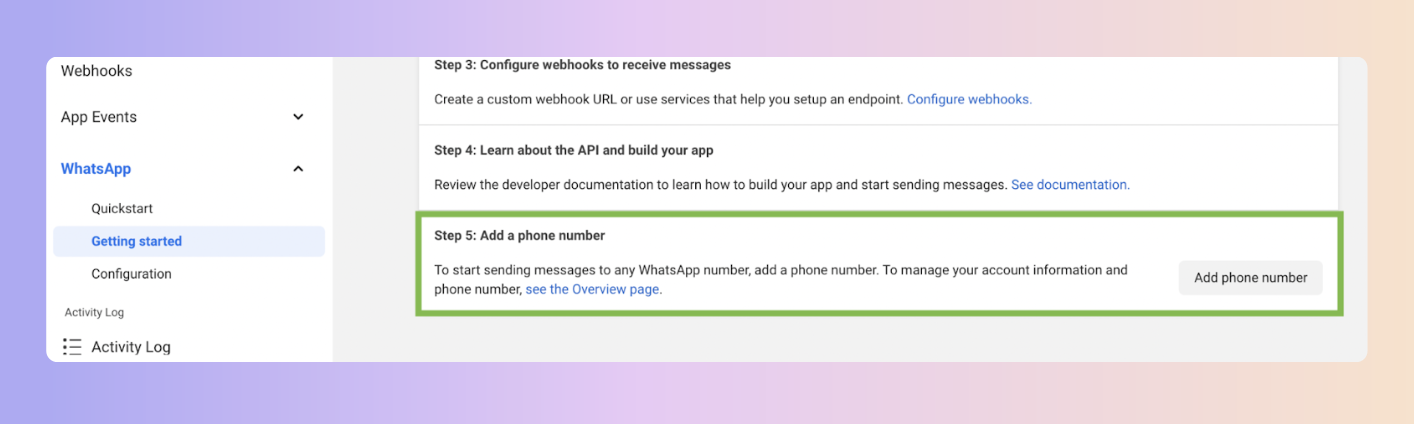
Add the necessary information about your business in the next step
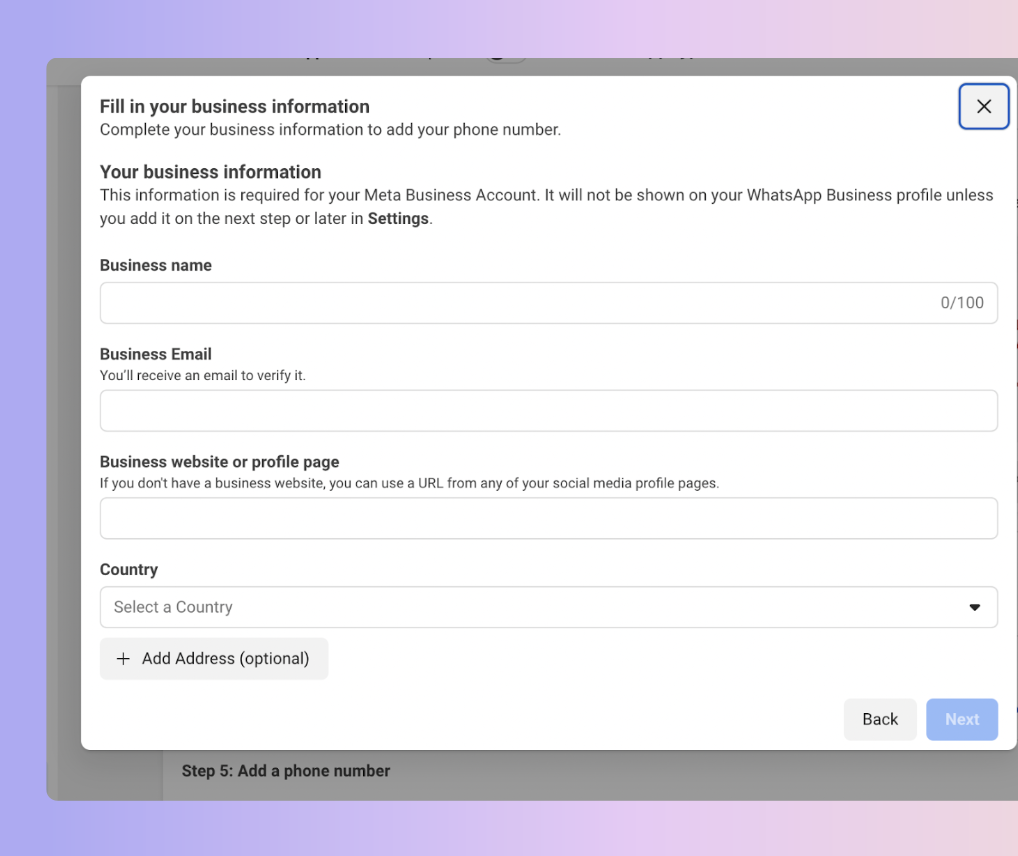
After filling in the information, Select “ Next” to begin the phone number verification process
Select your country code from the drop-down and enter the phone number you would like to register
Please Note: If you see the error "This number is registered to an existing WhatsApp account...", you need to use another phone number or delete the WhatsApp account from your number.
You cannot use WhatsApp business on your phone and on Boxly. It's one or the other. Please note, this is a WhatsApp policy and not ours.
To use your existing number will need to backup all your conversations and delete this number on the WhatsApp Business App.
This free's up the number to be connected via the WhatsApp Cloud API to Boxly.
Here's how to do this:
From your phone, go to the WhatsApp app that this number is connected to;
Tap "Settings" → "Account" → "Delete account";
Enter the phone number and tap "Delete account"
To back up your conversation on Apple IOS, read this
To back up your conversations on Android, Watch this video
Then select your preferred choice to receive the verification code, either by Text Message or Phone, and click "Next" to continue
Enter the code that you received in the message, and click “Next”.
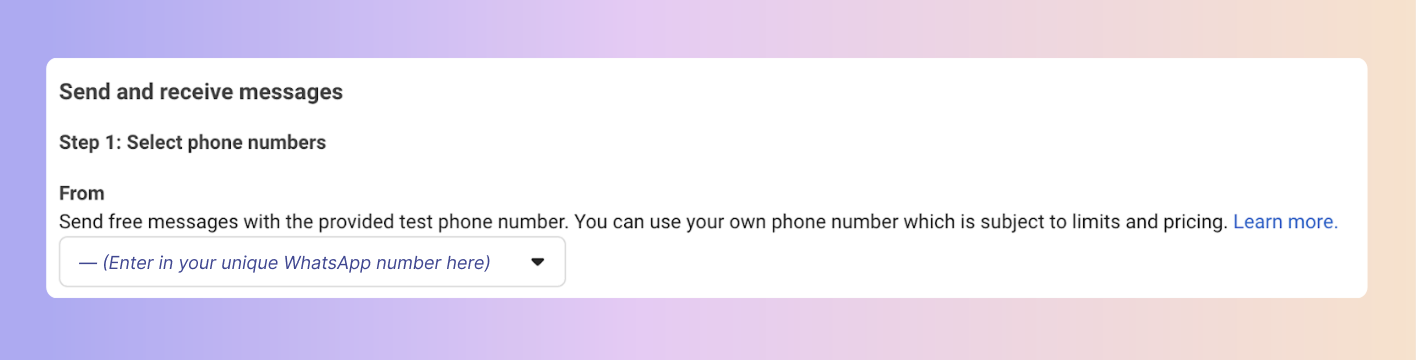
Once the number has been verified, It will appear in the From “drop-down menu” of the “Send and Receive Messages” section of the panel
Finally, fill out the payment details

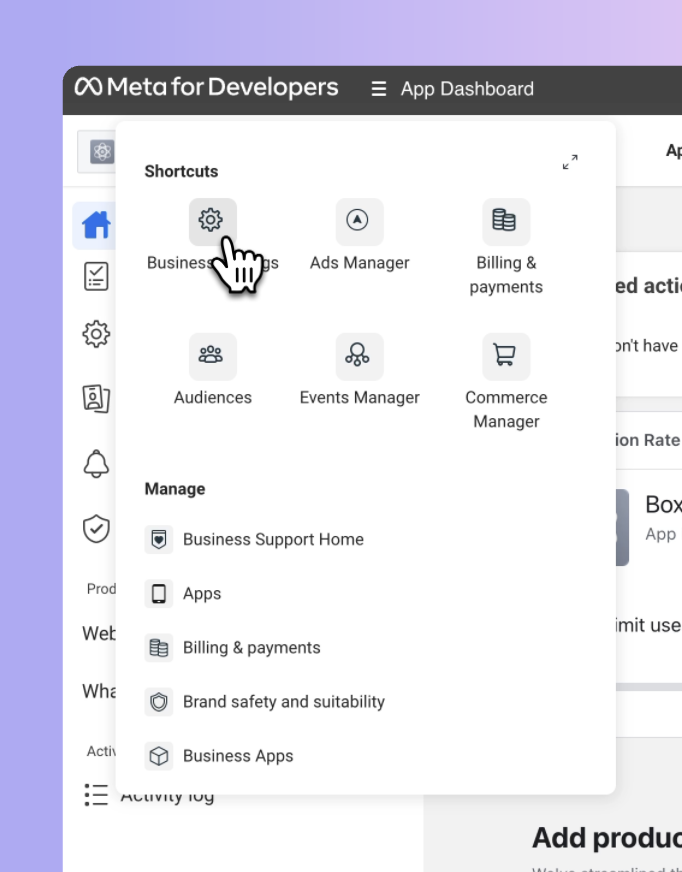
From The App Dashboard > Select “Business settings”
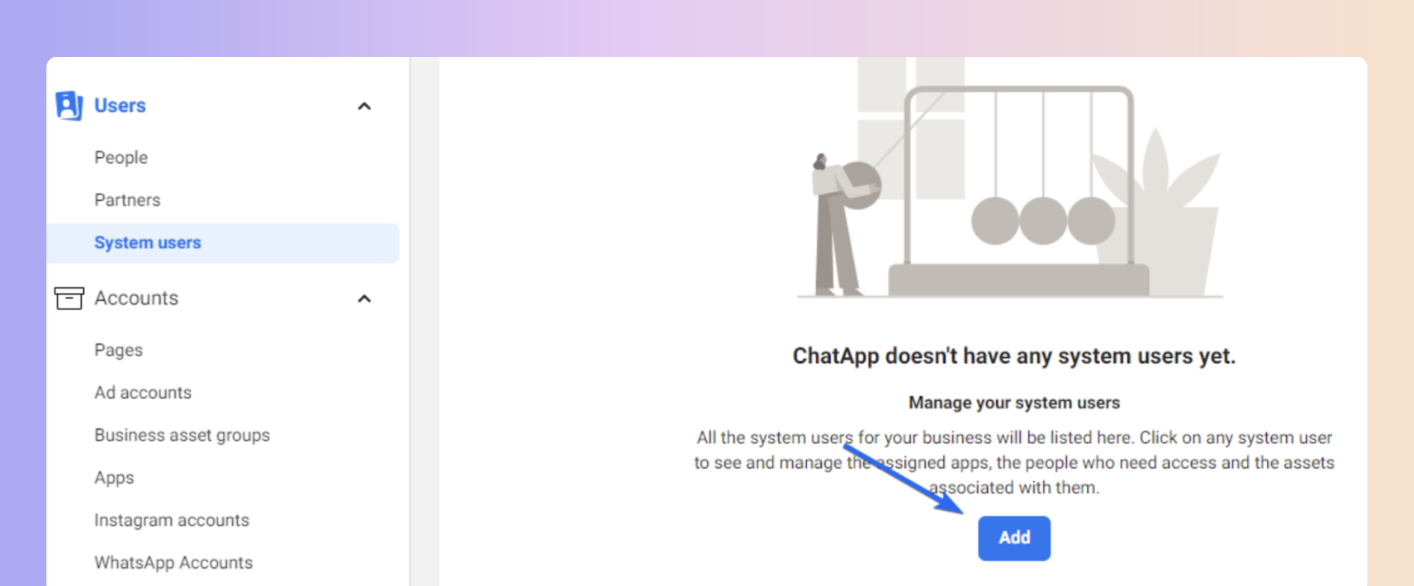
Under the Users Tab, select System Users and Click “Add”
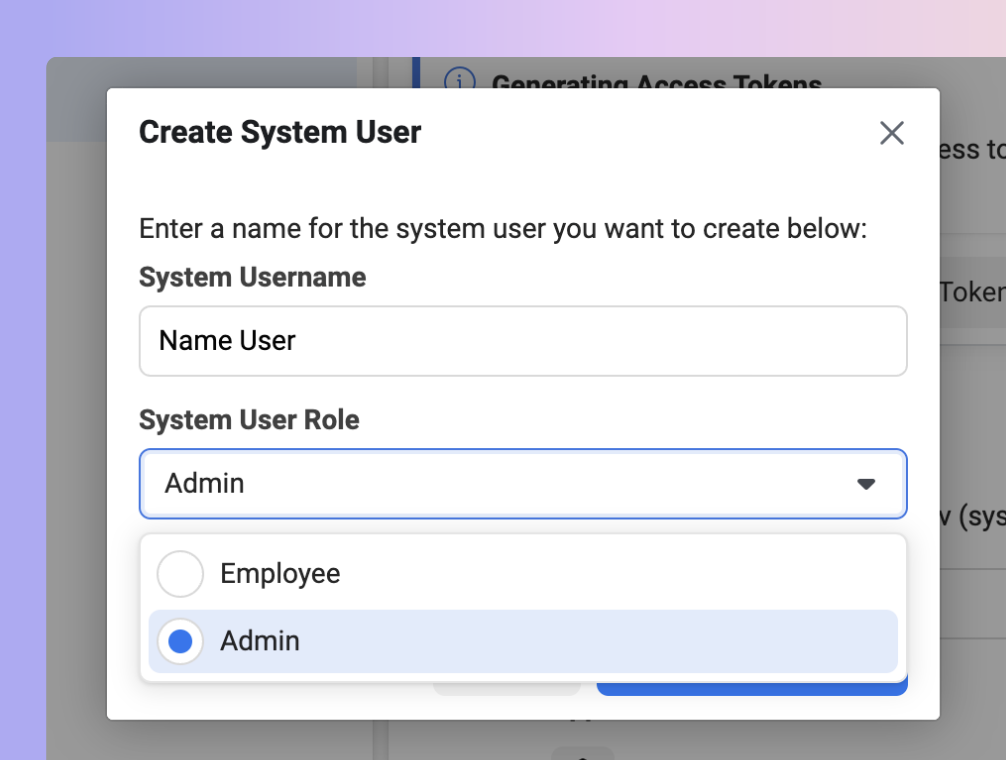
Enter the system user name and select the Role As” Admin” and click “Create system user”.
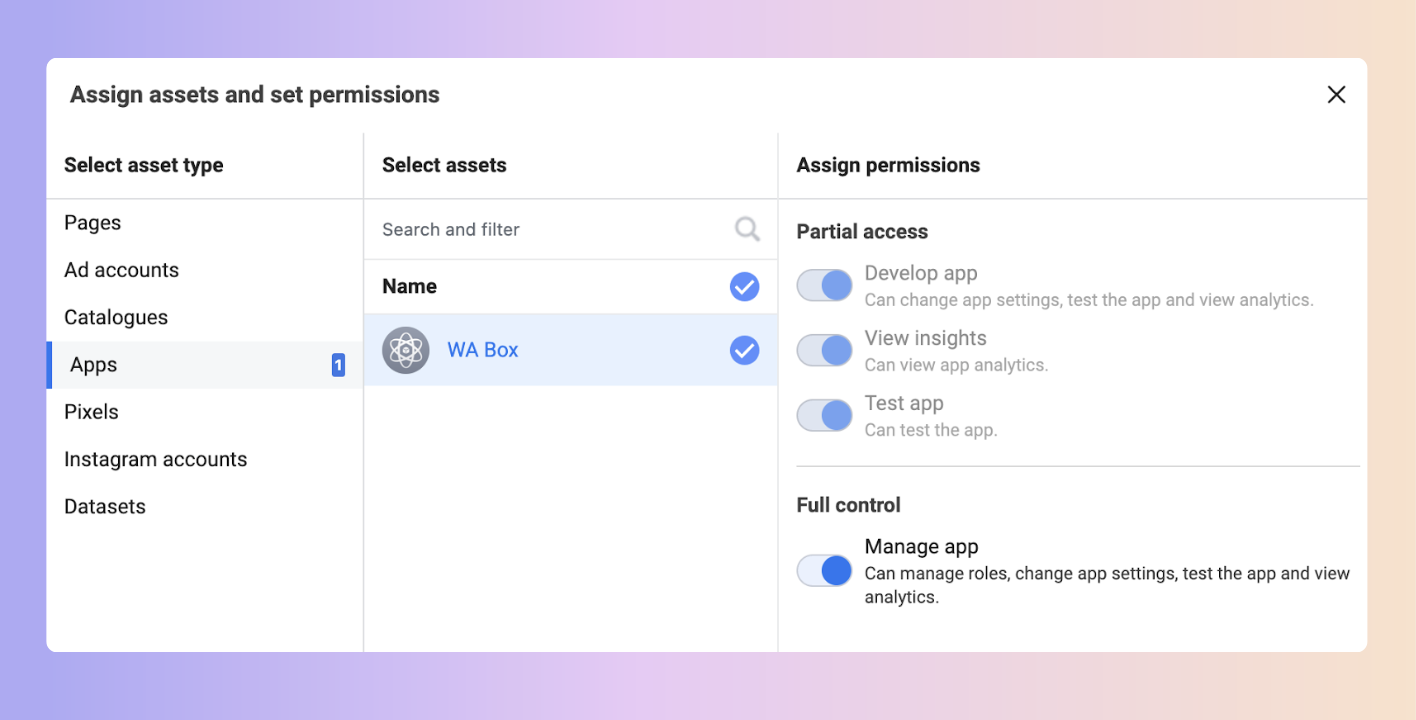
Now click on the “Assign Assets” > Apps > select the asset (the app you created) then Assign all the permissions.
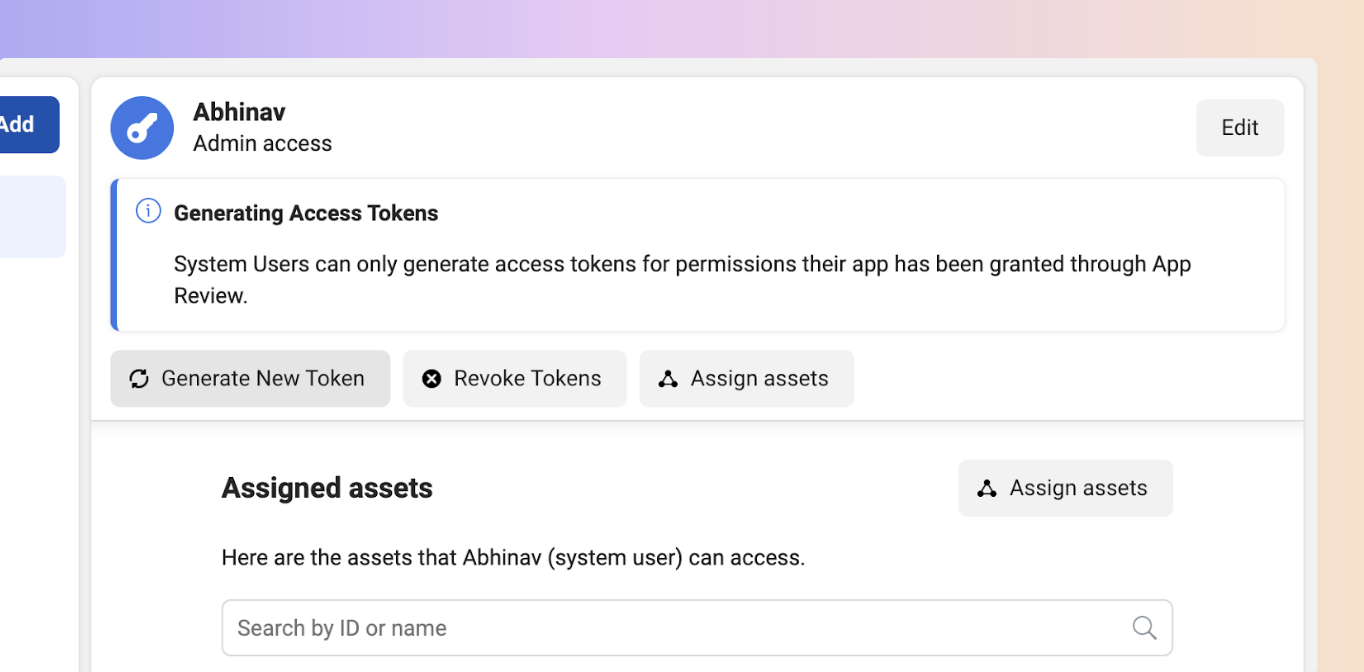
Select the system user and click “Generate New Token”.
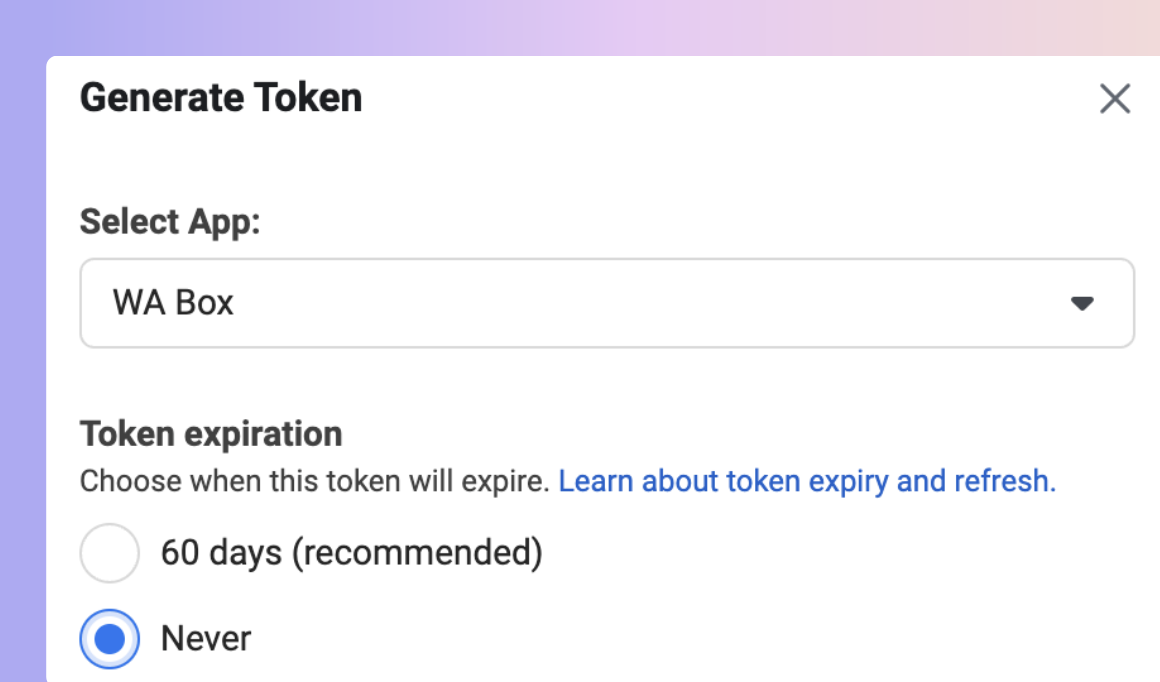
Next, select the app and click on “Never” Under Token expiration
Select the Below permissions
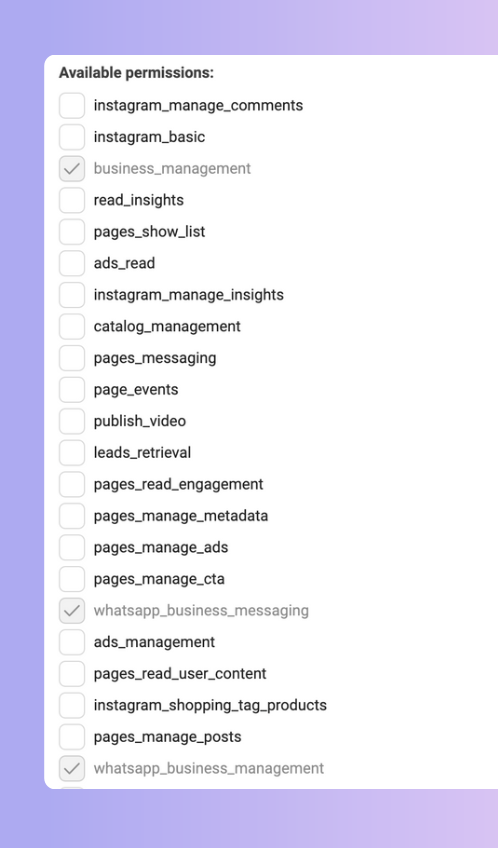
business_management
whatsapp_business_management
whatsapp_business_messaging
In the next window of the created token, copy and save the token.
Go to Boxly > go to Channels
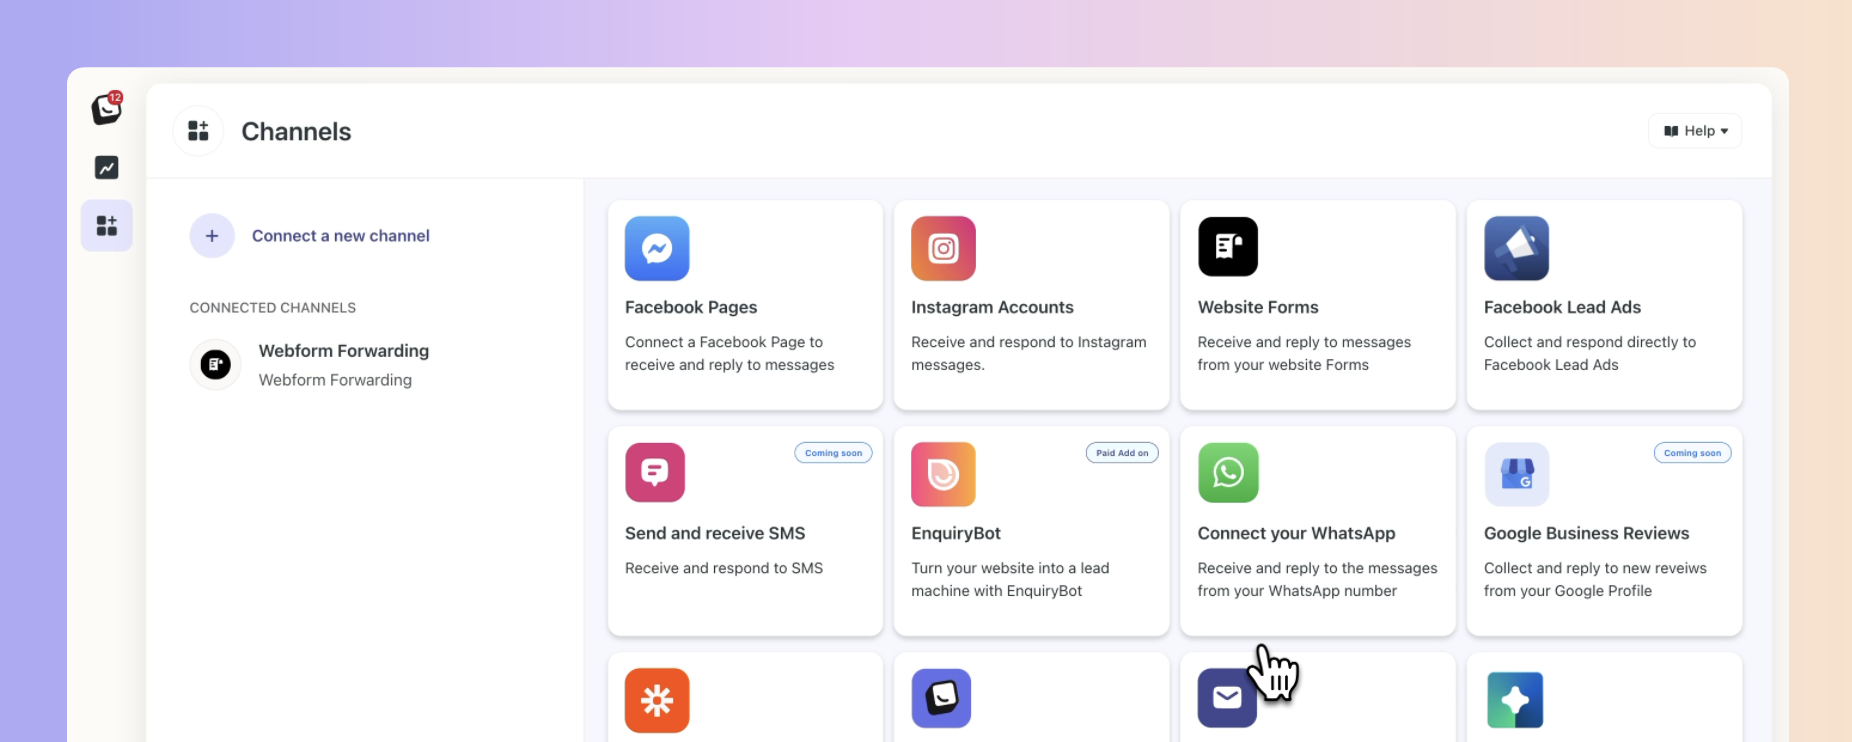
Click "Connect a new Channel" and find “WhatsApp” and click "Connect".
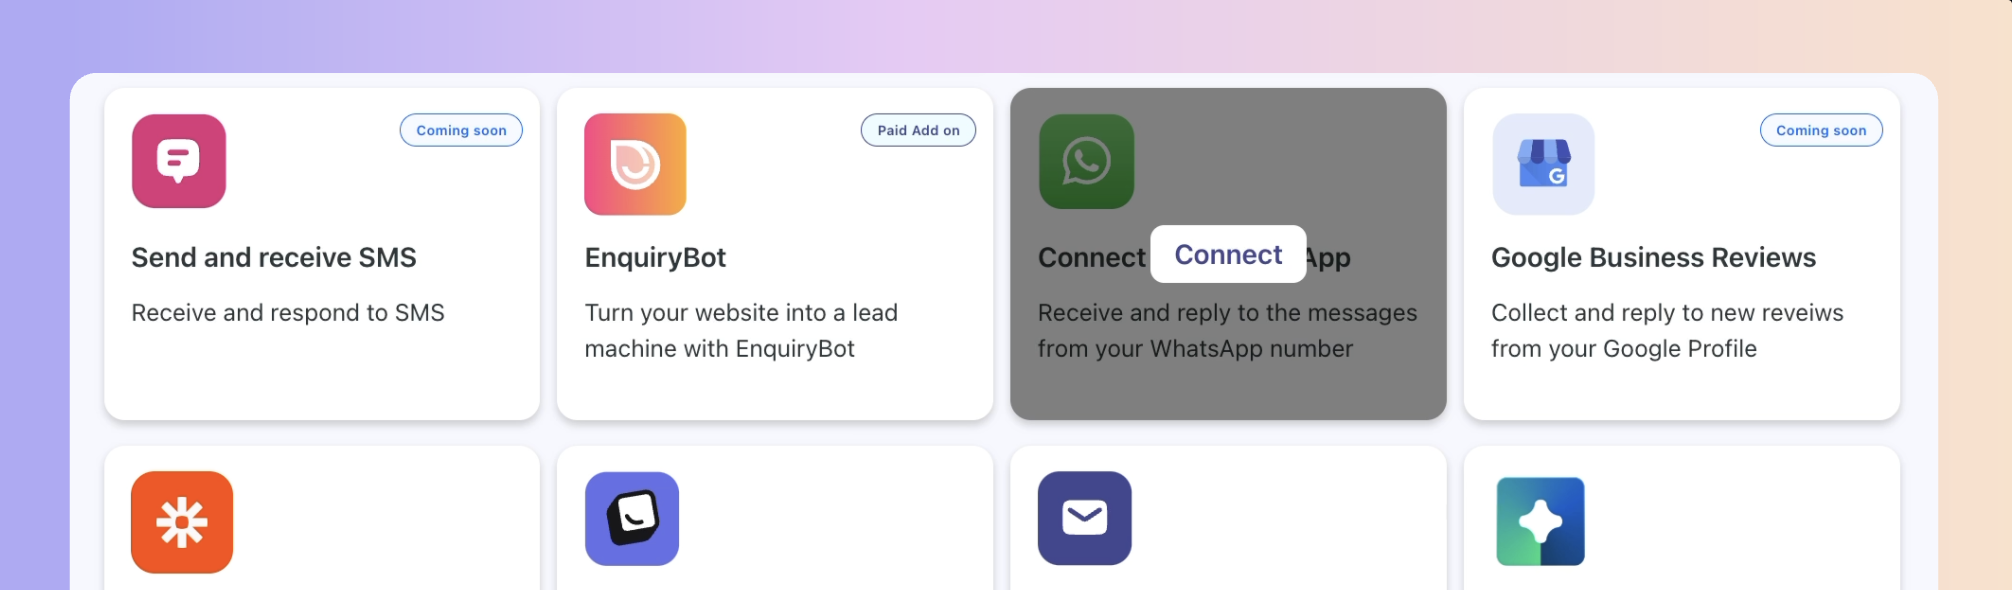
In the next screen hit "Next", to get your Callback URL
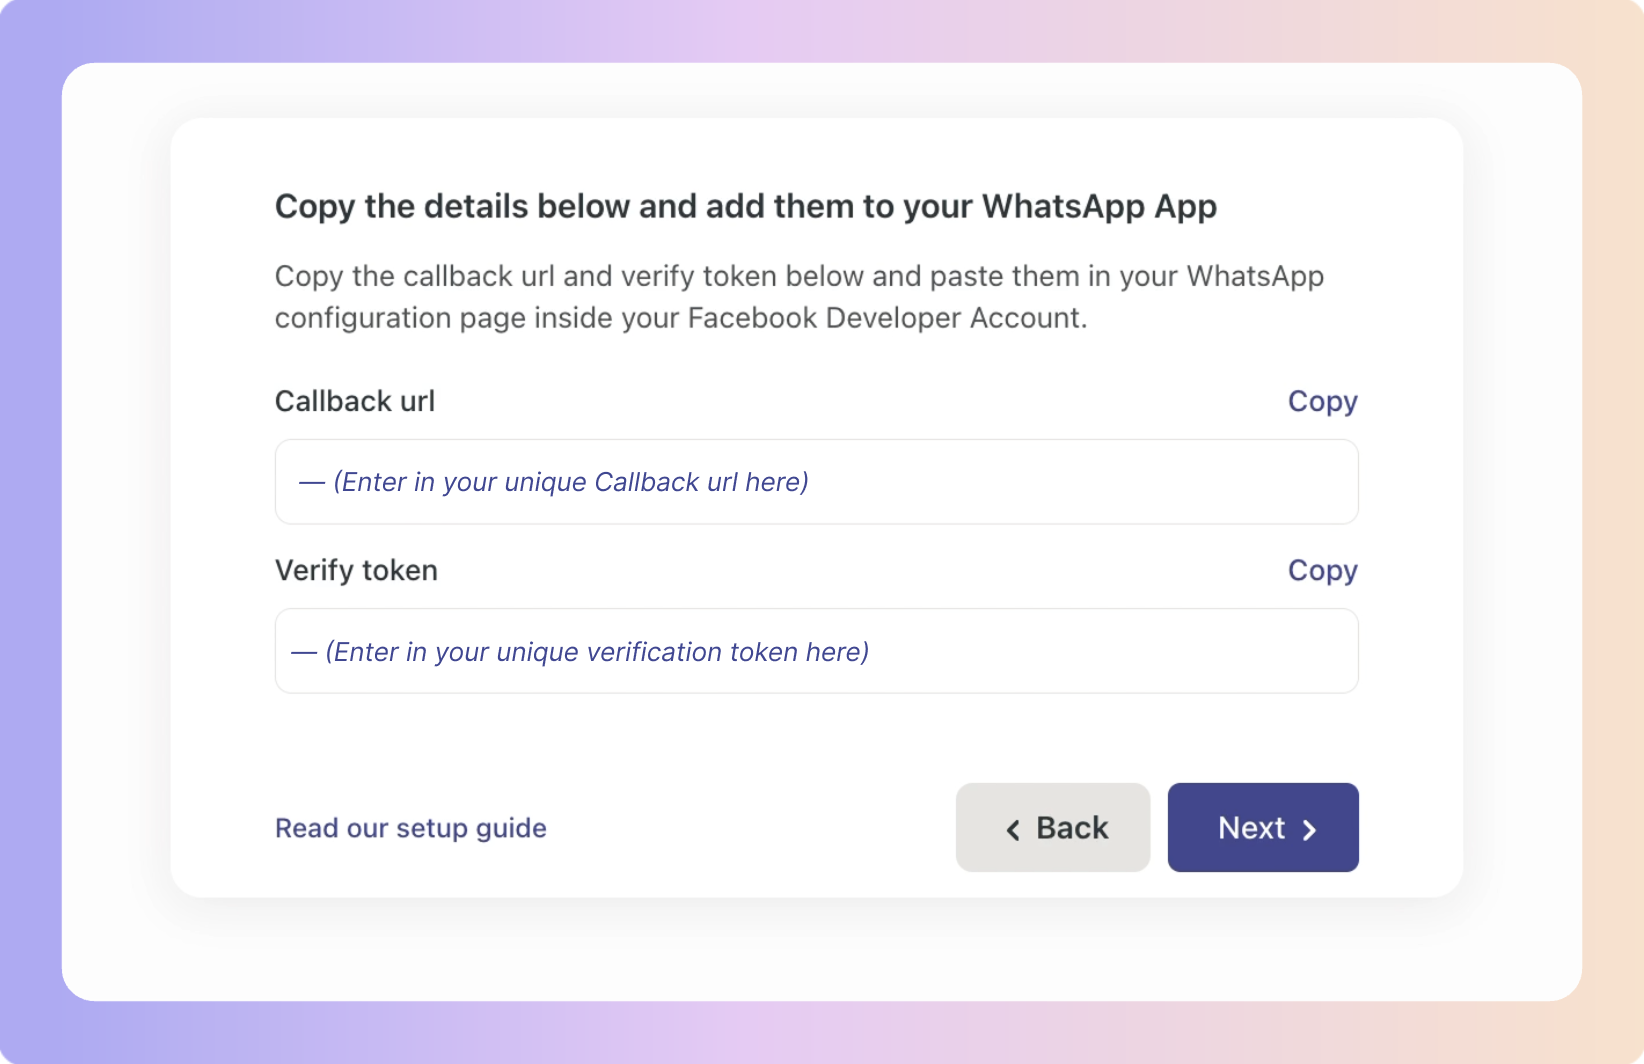
Copy the webhook URL from Boxly and paste it against the ‘Callback URL’ field on Facebook you can find it Under WhatsApp > Configuration tab
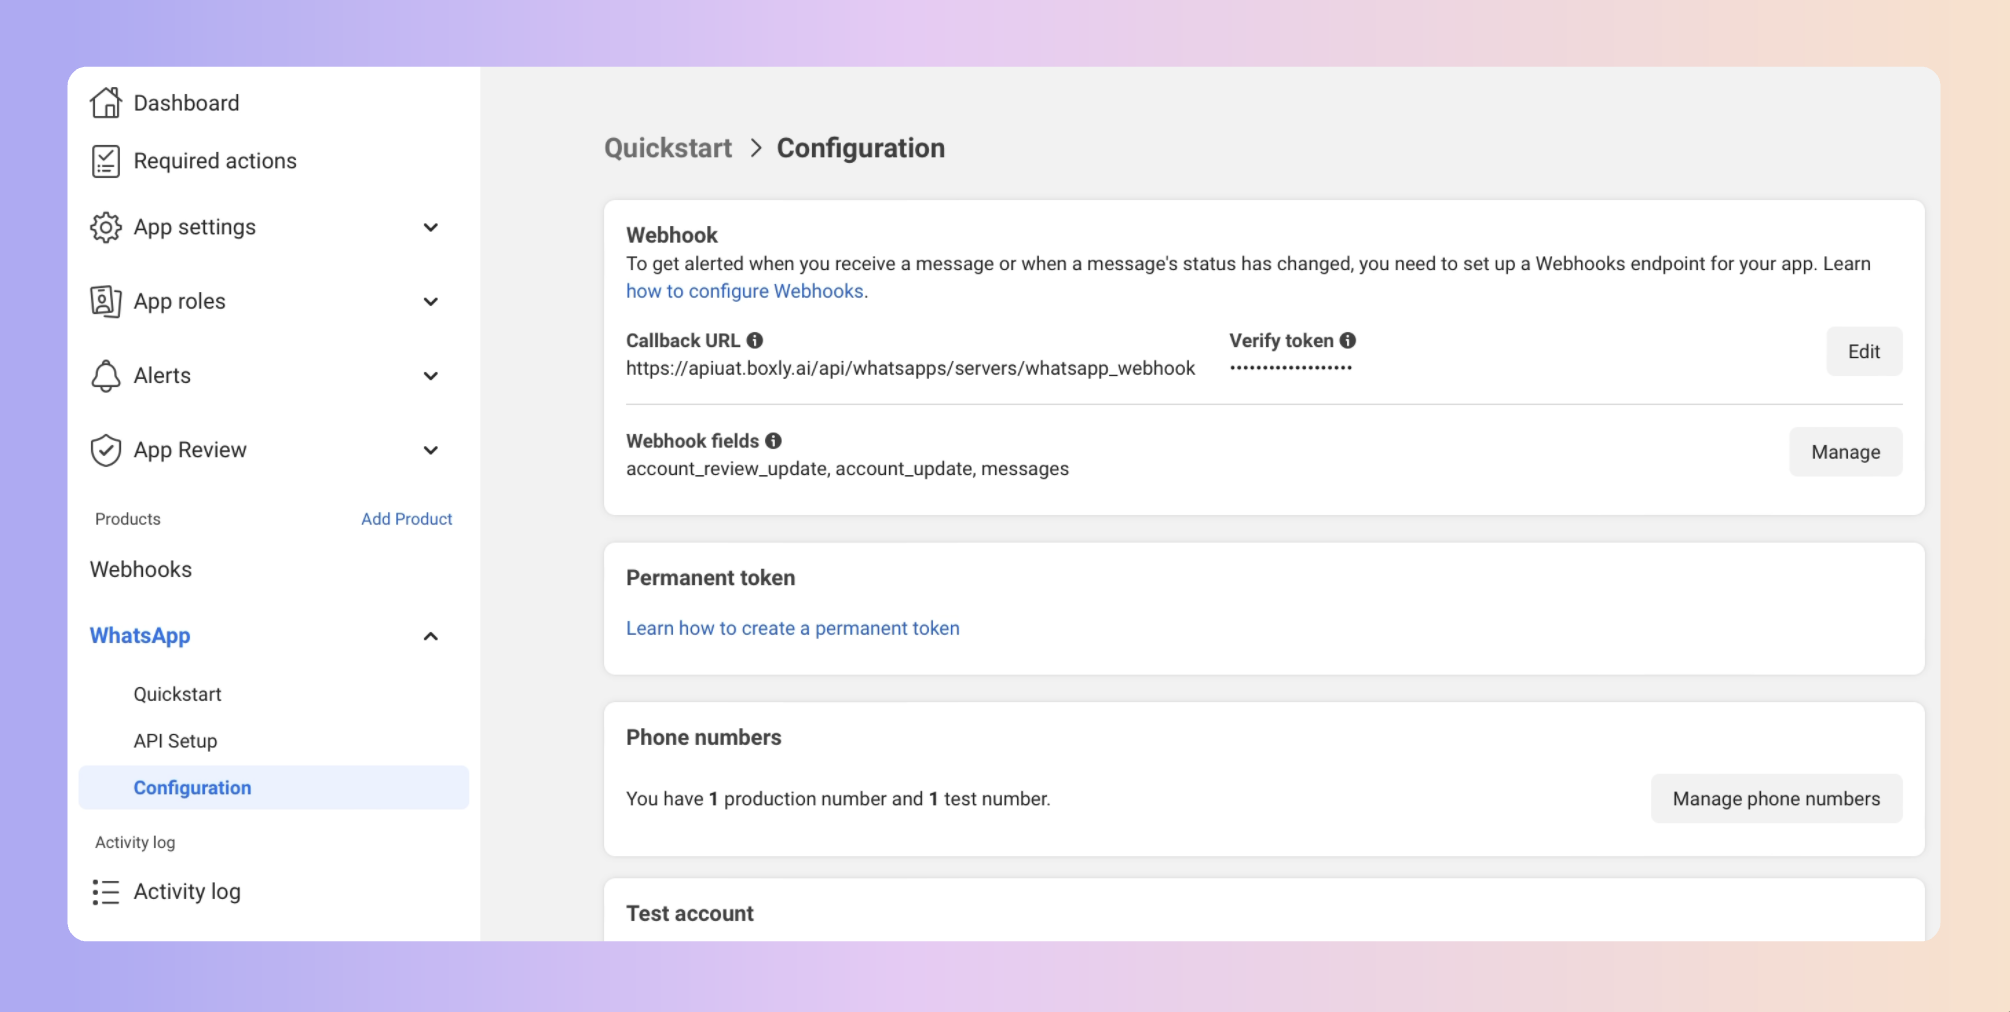
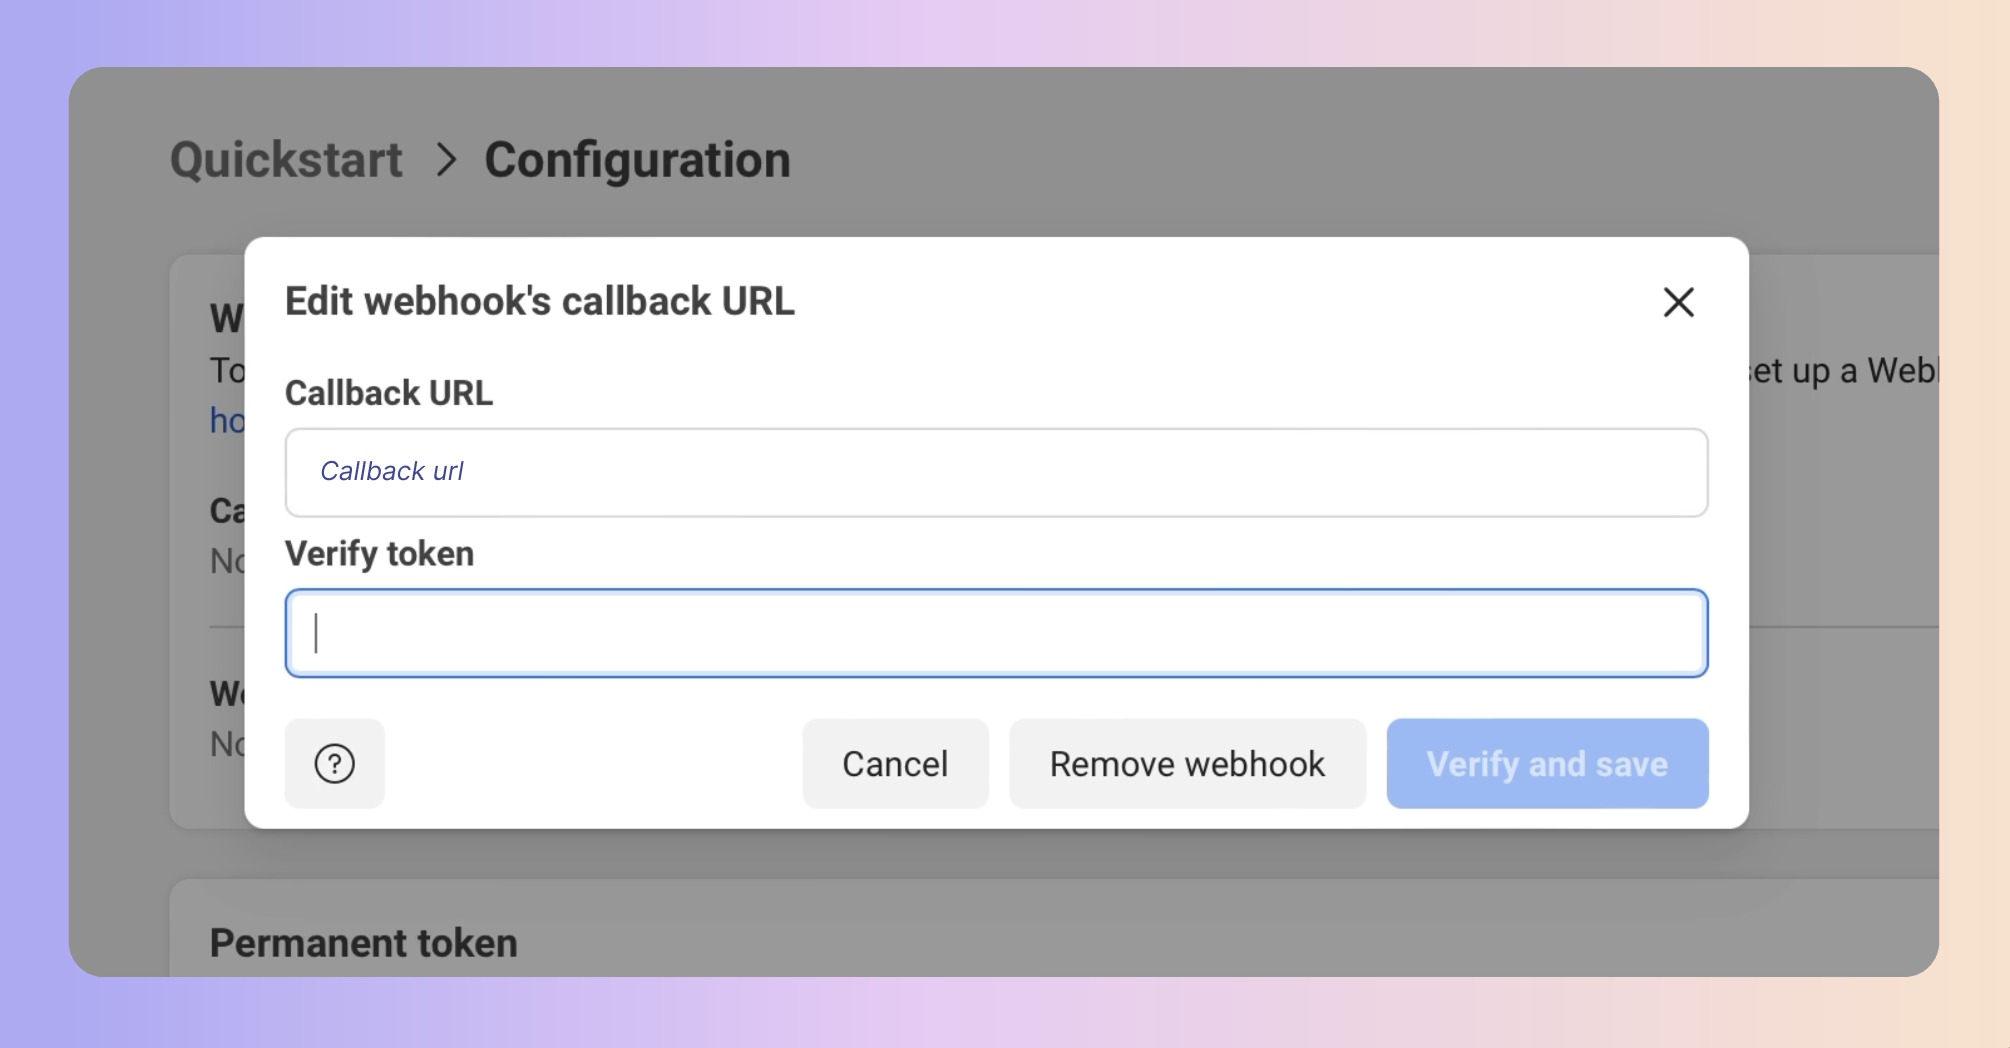
Copy the Verify token from Boxly and paste it against the ‘Verify token’ field on Facebook and Hit “Verify and Save”
Once you have added that Click on the Manage Button next to “Webhook Fields” subscribe to:

account_review_update
account_update
messages
No go to your Boxly account and Paste the Access token you saved before, along with the Phone number ID and WhatsApp Business Account ID From the API Setup section under “WhatsApp”
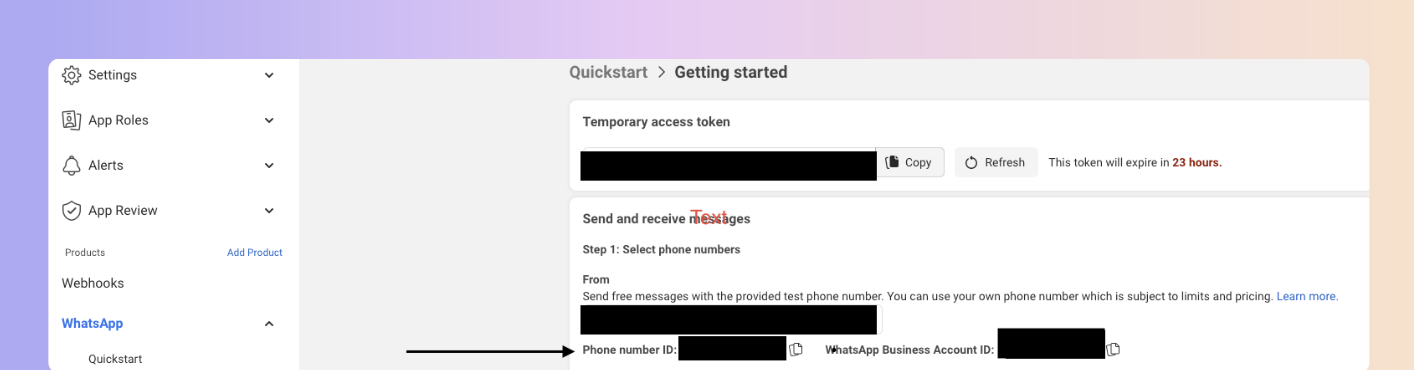
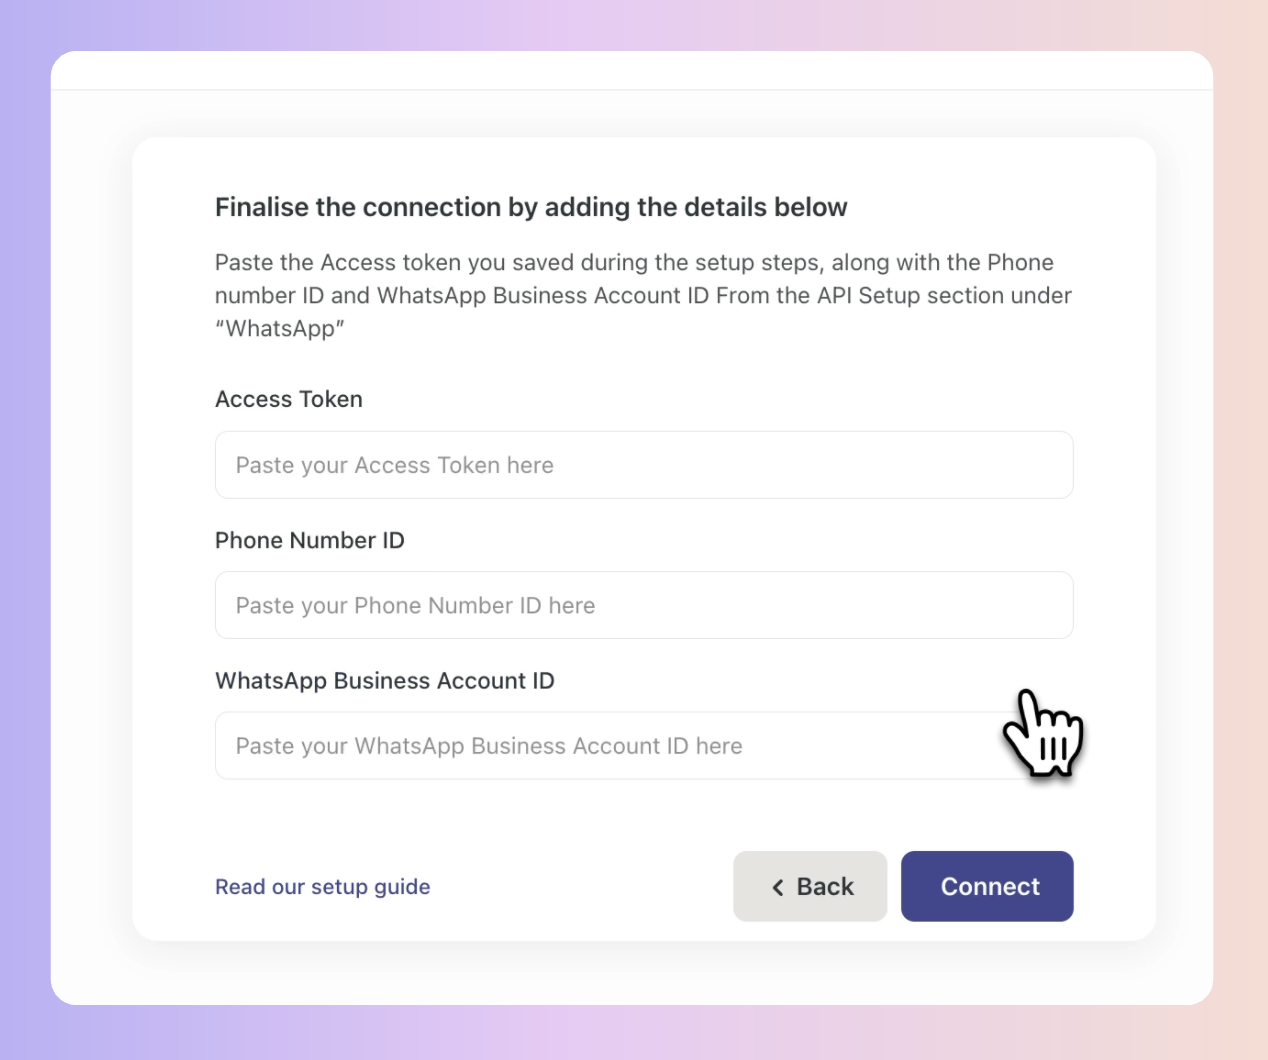
Once Done, toggle on the APP Mode: to live.

You have successfully connected WhatsApp to Boxly!
✅ Once connected either through Embedded or Manual setup, users will gain access to the following sections:
Automations
Settings
Templates
You can access your “Quick links” once you’re setup to quickly access your WhatsApp settings, & create and manage your templates.
Meta Troubleshooting Guide
Meta Troubleshooting Guide
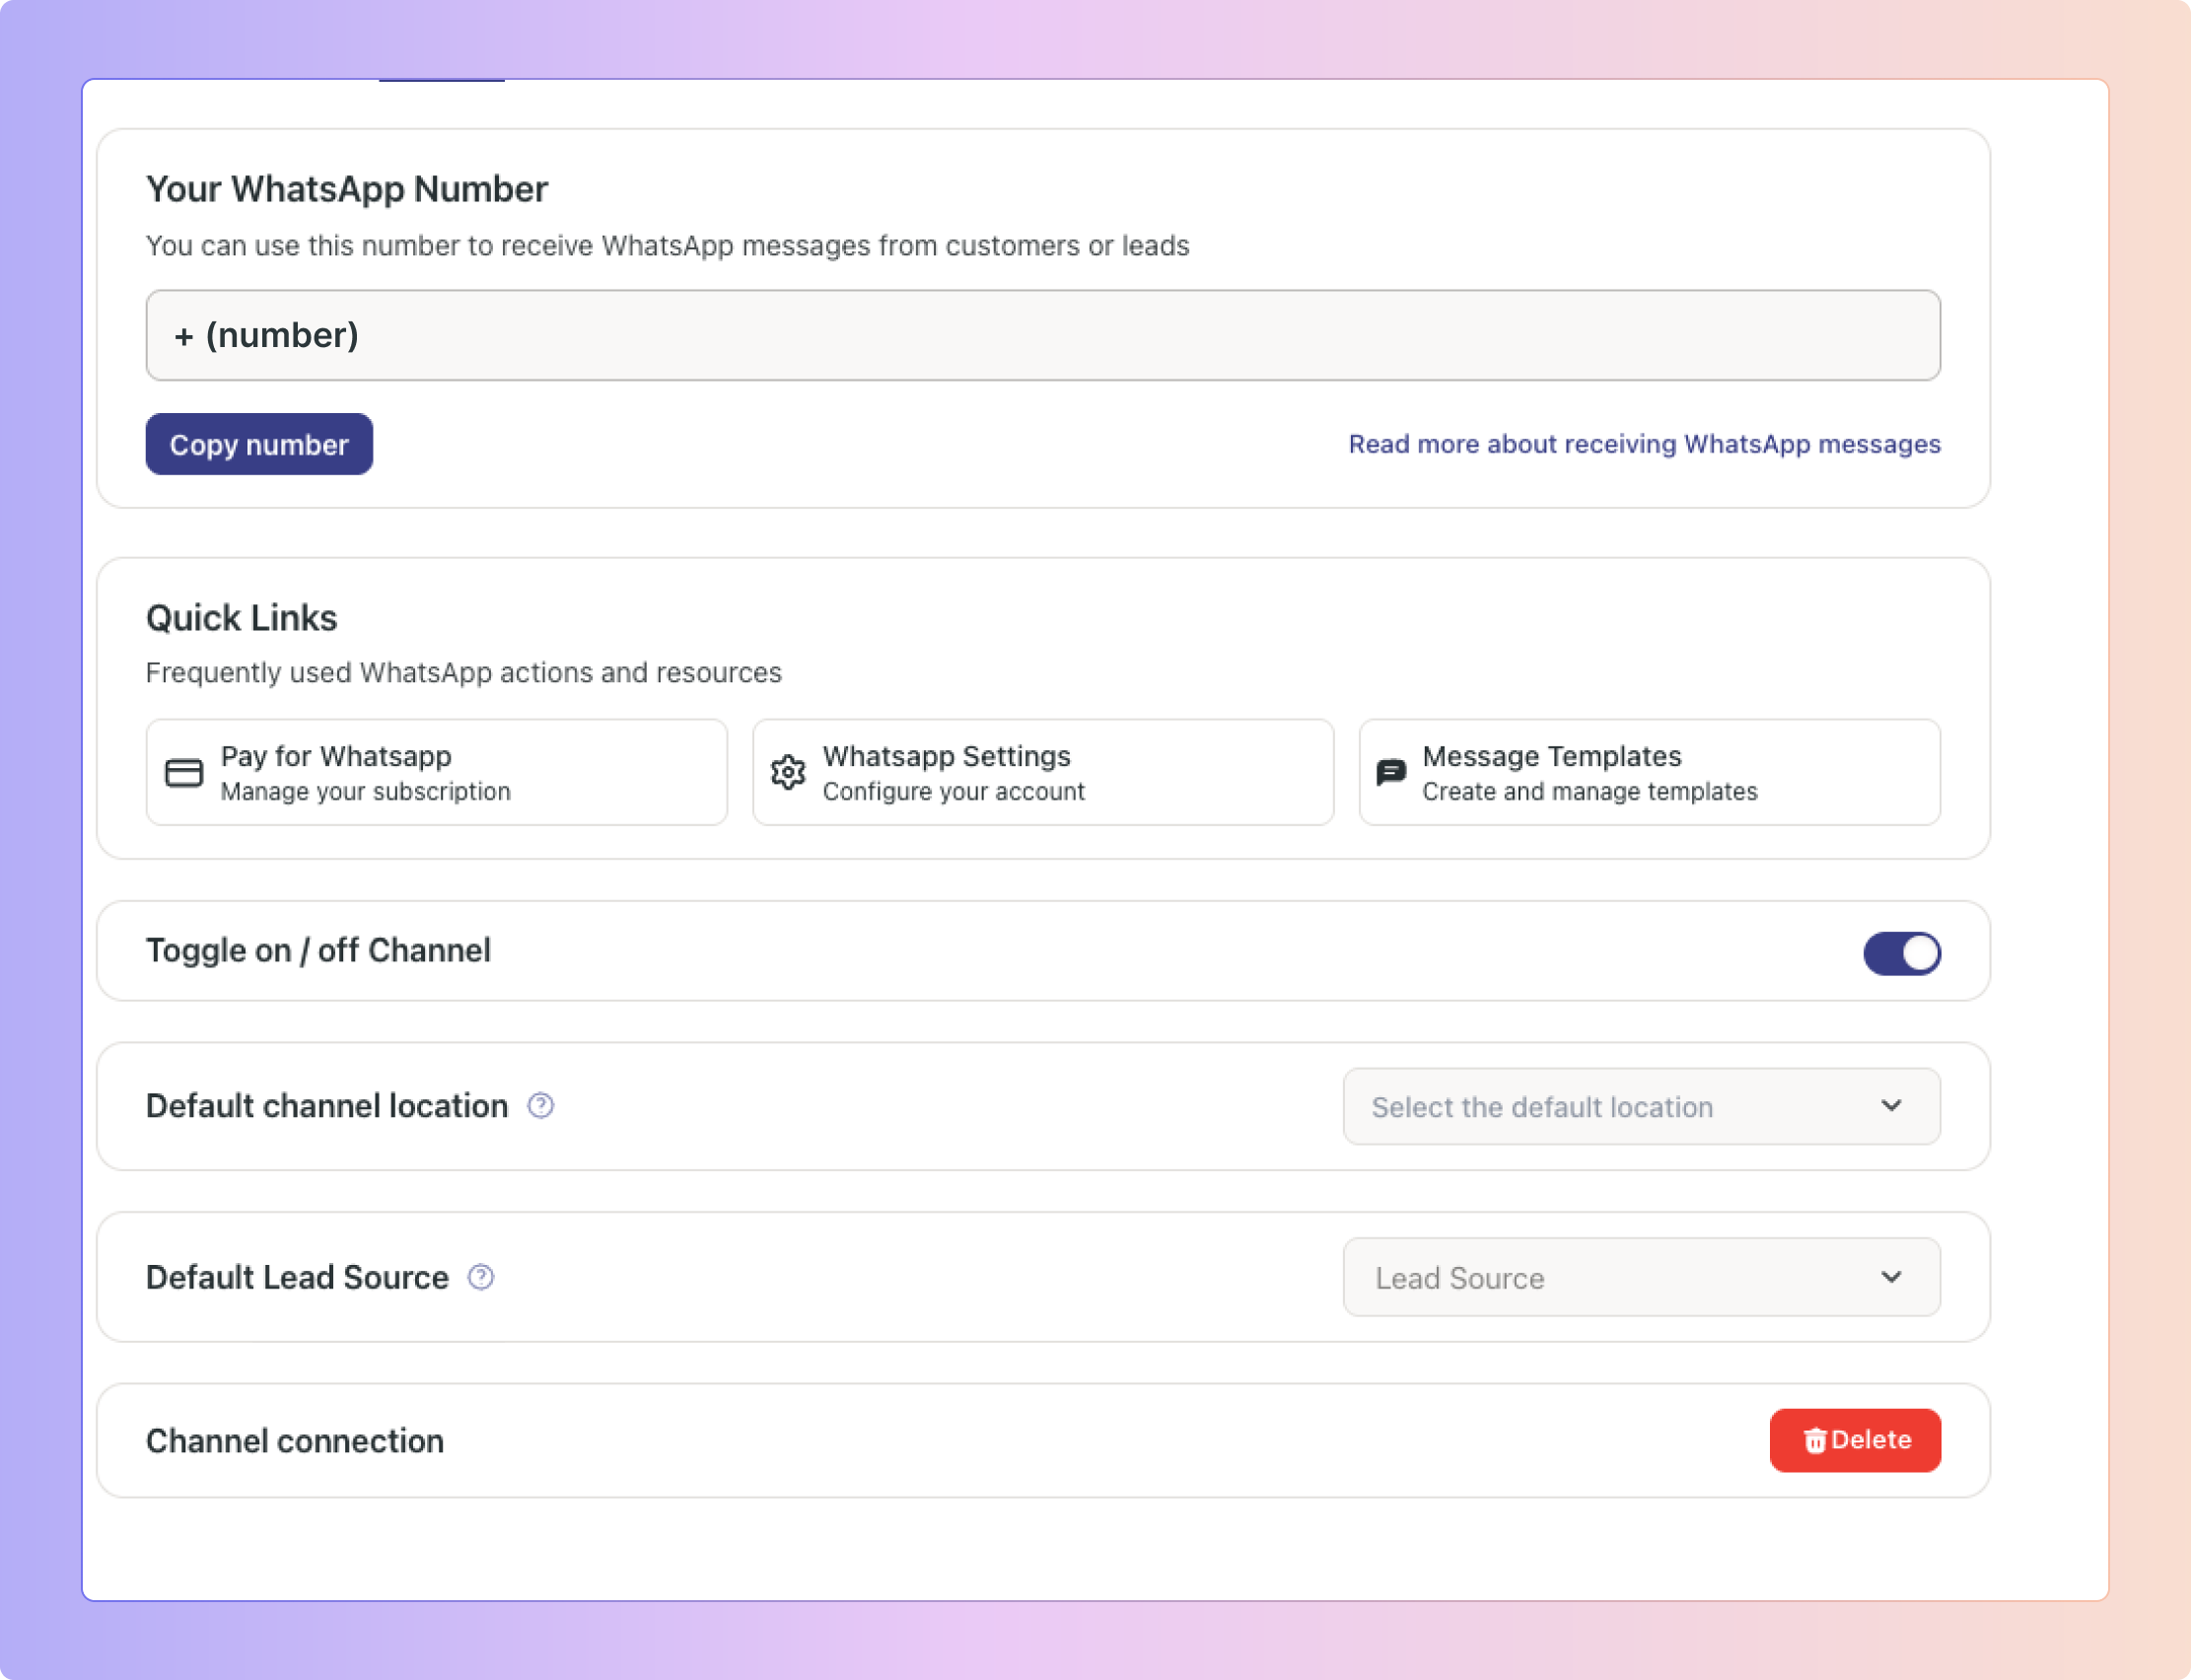
Within the Settings section in your WhatsApp Channel, users can manage:
✅ Your WhatsApp Number
✅ Quick Links
✅ Toggle On/Off
✅ Default Location
✅ Default Lead Source
✅ Delete Connection
✅ Quick Links
The Quick Links section includes:
Pay for WhatsApp – (Redirects) Takes you directly to the payment page for subscription or usage fees.
WhatsApp Settings – Where you can setup your account settings and redirects you so that you can add in a Display name and profile picture that the customers will see.
Message Templates – (Redirects) Takes you directly to Meta's page to create and manage message templates.
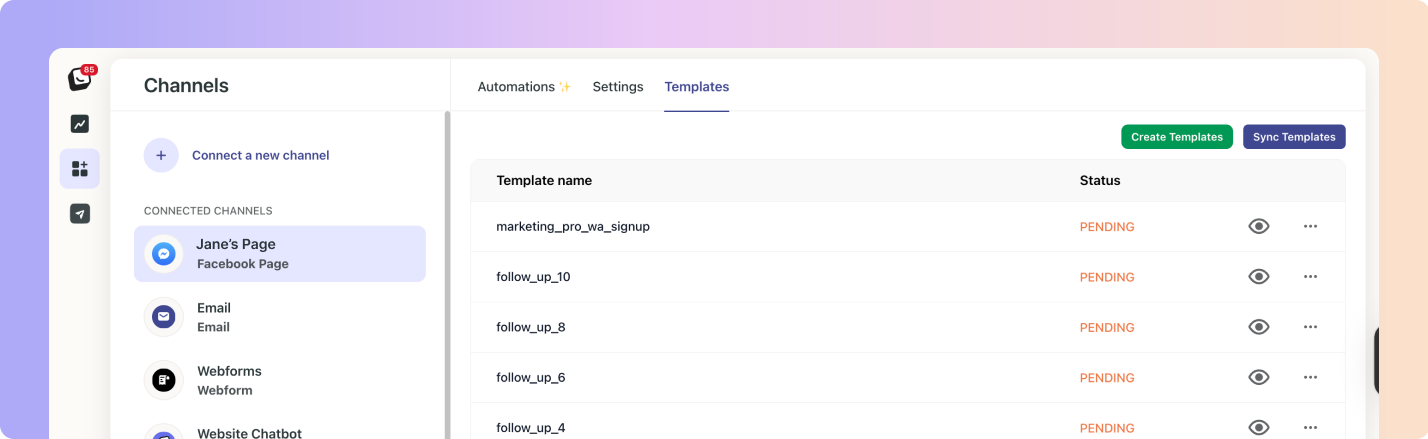
Templates created on Meta's platform will be available in the Templates section of WhatsApp Channel Connection.
Once a template is approved by Meta, it can be used within Boxly for messaging automation.
Click the blue Sync templates button to sync and update your Meta templates.

✅ Go to your WhatsApp Channel → Templates
✅ Click “Create Templates” in the top right
✅ Select Box Reply Templates - These templates will be used in box automation
Add text, images, links and buttons right in Boxly.
✅ Click the top right-hand button to “Submit for approval”

Notes for creating WhatsApp templates:
When creating the template name: Use only lowercase letters, no spaces or special characters. Use underscores (_) to separate words.
You must use a WhatsApp approved number in the button option to add a call back
By integrating WhatsApp Business into Boxly, businesses can streamline communication, enhance customer engagement, and maintain secure, organised interactions.
If you are using WhatsApp Business for sales, marketing and support for your business you are most likely running all of this on your personal phone on the WhatsApp Business App.
While this works, it is limiting for the following reasons 👇
Data Protection Issues
Managing customer information on a personal device does not comply with data protection regulations.
Messaging Restrictions
Only able to send mass messages to 256 contacts at a time, risking account termination for excessive messaging.
Limited Automation
Auto-reply and quick reply options only, making timely responses to customers difficult.
Lack of Accountability
No way to track which team member responded to a customer or when.
Security Risks
If a team member leaves with access to the account on their phone, it poses a security risk to the business.
By connecting your WhatsApp Business number to Boxly you can unlock the power of WhatsApp as a communication and marketing channel for your business. Below are just a few of the benefits.
Important - Please read this ⚠
If you want to use your existing WhatsApp Business number with Boxly you will need to backup all your conversations and delete this number on the WhatsApp Business App. This frees up the number to be connected via the WhatsApp Cloud API to Boxly.
You cannot use WhatsApp business on your phone and on Boxly. It's one or the other. Please note, this is a WhatsApp policy and not ours.
✅ Marketing templates are still charged for every message you send.
✅ When a patient messages you, or replies to your template, a 24-hour customer service window opens.
✅ Replies inside that window (free-form messages, including replies from your team and AI Front Desk) are free for the first 1,000 each month per WhatsApp number. After that, each reply is charged at the utility rate.
✅ Utility templates (for example, appointment updates) sent inside the 24-hour window are now charged.
✅ If a patient messages you from a Click-to-WhatsApp ad and you reply within 24 hours, all your messages are free for up to 7 days, including templates.
✅ Messages patients send to you are always free.
How much it costs
Meta charges based on the country code of the patient's WhatsApp number. Prices from 1 October 2026:
For other countries, see Meta's pricing on the WhatsApp Business Platform.
What happens:
You send a Marketing template to the patient.
Cost:
✅ This is always chargeable.
What happens:
A 24-hour customer service window opens.
Cost:
✅ Your free-form replies in this window are free for the first 1,000 each month. After that, each reply is charged at the utility rate.
What happens:
You send a marketing template while the window is still open.
Cost:
✅ Charged again. Marketing templates are always charged, even inside the 24-hour window.
What happens:
You send a utility template, such as an appointment update, while the window is open.
Cost:
✅ Charged from 1st October 2026 (this used to be free).
What happens:
You can only message the patient with a template.
Cost:
✅ The template is charged. If the patient replies, a new 24-hour window opens.
What happens:
The patient taps your Click-to-WhatsApp ad on Facebook or Instagram and messages you from the WhatsApp app on their phone.
Cost:
✅ Reply within 24 hours and a free messaging window opens from the moment you reply.
✅ This window can stay open for up to 7 days.
✅ During this time, all messages, including Marketing and Utility templates, are completely free.
✨ Click below to go to Meta’s Pricing on the WhatsApp Business Platform:
Automations: each WhatsApp template sent by an automation is charged, so plan your WhatsApp steps carefully.
Replies from your team and AI Front Desk count as replies inside the window. Once your number goes over 1,000 in a month, each one is charged.
Broadcasts: Boxly charges £2 / €2 / $2 per 1,000 recipients and Meta charges its marketing rate for every WhatsApp message on top.
Carefully plan when and how to use Marketing templates to avoid unnecessary charges.
Boxly is here to help you work smarter, not harder, let’s keep streamlining your lead management together!
Contact us at [email protected] if you need any assistance!
Meta Troubleshooting Guide
Meta Troubleshooting Guide