 Introducing Marketing Pro, Your All-in-One Marketing Suite Inside Boxly
From creating scroll-stopping campaigns and building high-converting landing pages, to tracking every click, call, and conversion in real time. Marketing Pro does it all without leaving Boxly.
Smarter campaigns. Faster results. Bigger impact.
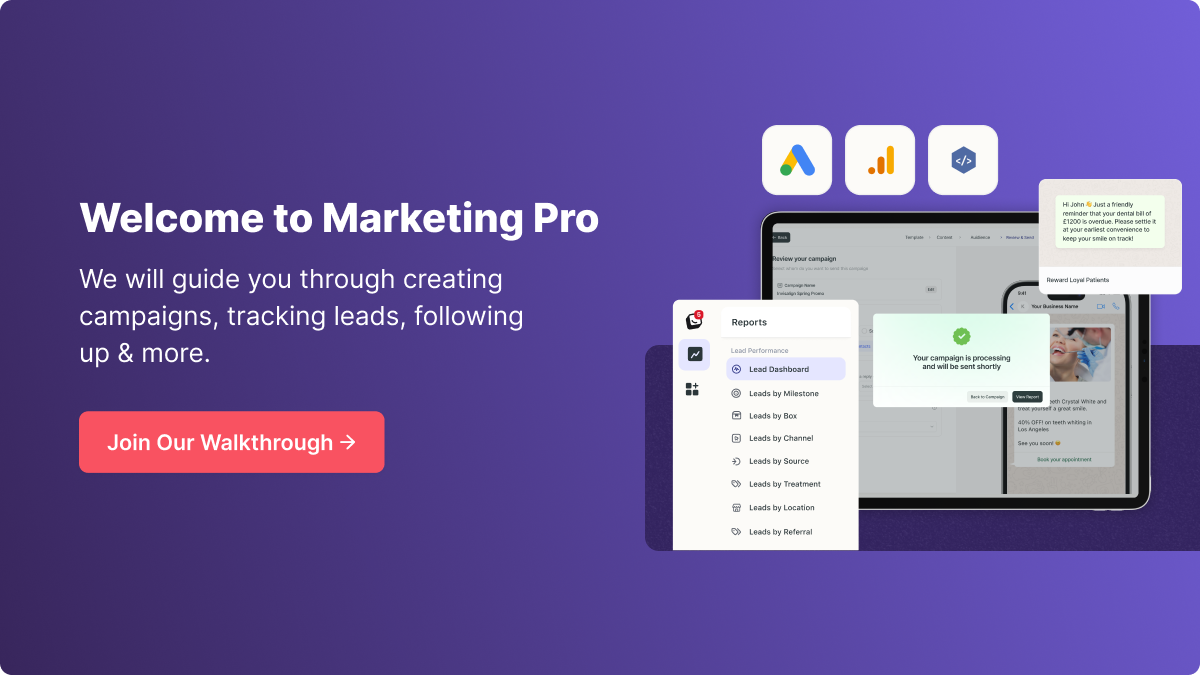
The Boxly Marketing Suite is your central hub for creating, managing, and tracking all your marketing campaigns. Whether you want to send a quick email blast, track ad performance, or build a high-converting landing page (coming soon), everything you need is now in one place.
You’ll find the Marketing Suite in your main Boxly menu. Click the Marketing menu icon on the left toolbar to open the Marketing Suite.
Boxly Marketing Suite constants of:
1. Broadcast Campaigns section - send Broadcast Email & WhatsApp campaigns.
2. Ad Tracking - Check out the feature.
3. Lead Generation (coming soon)
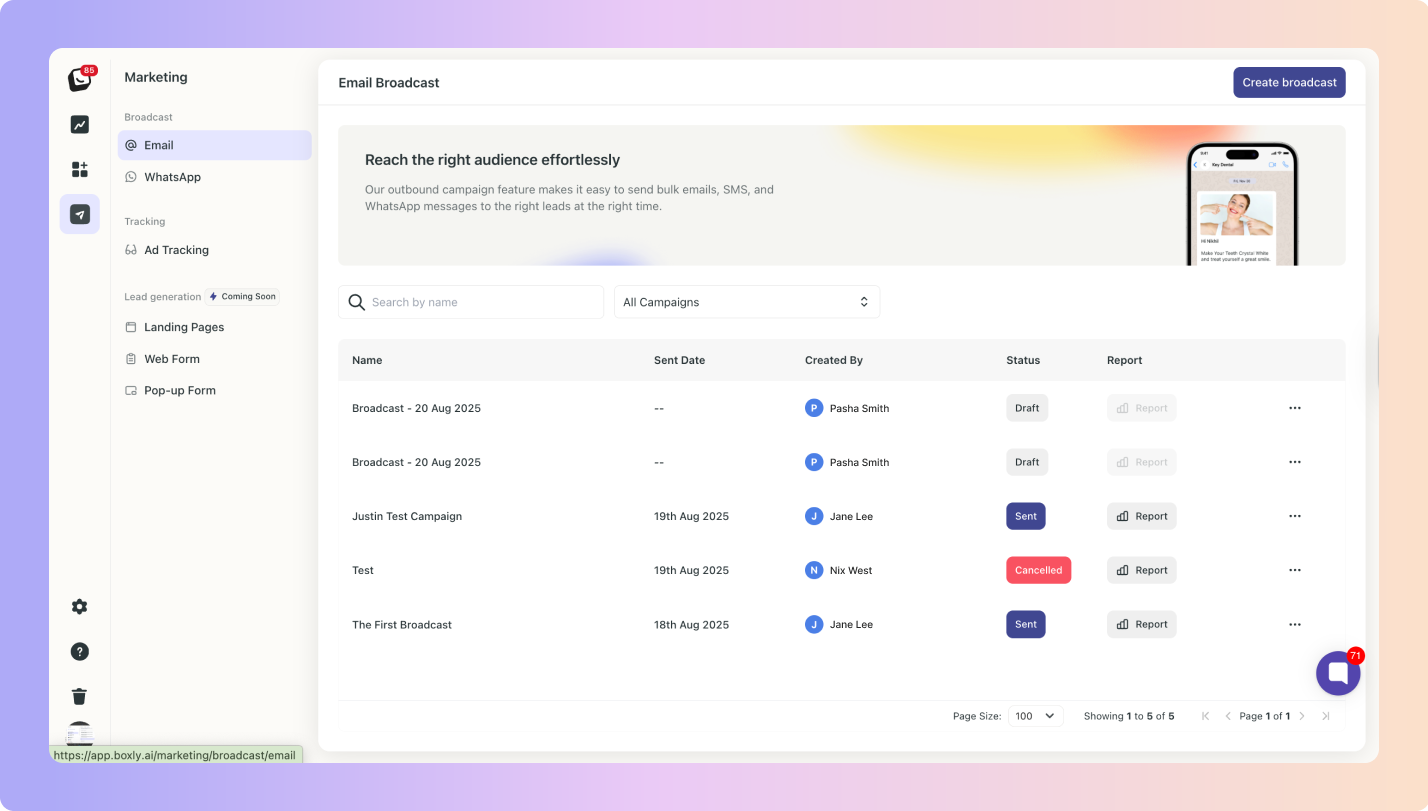
 Broadcasts
Email → Manage your email campaigns. You’ll see your campaign list, statuses, and reports.
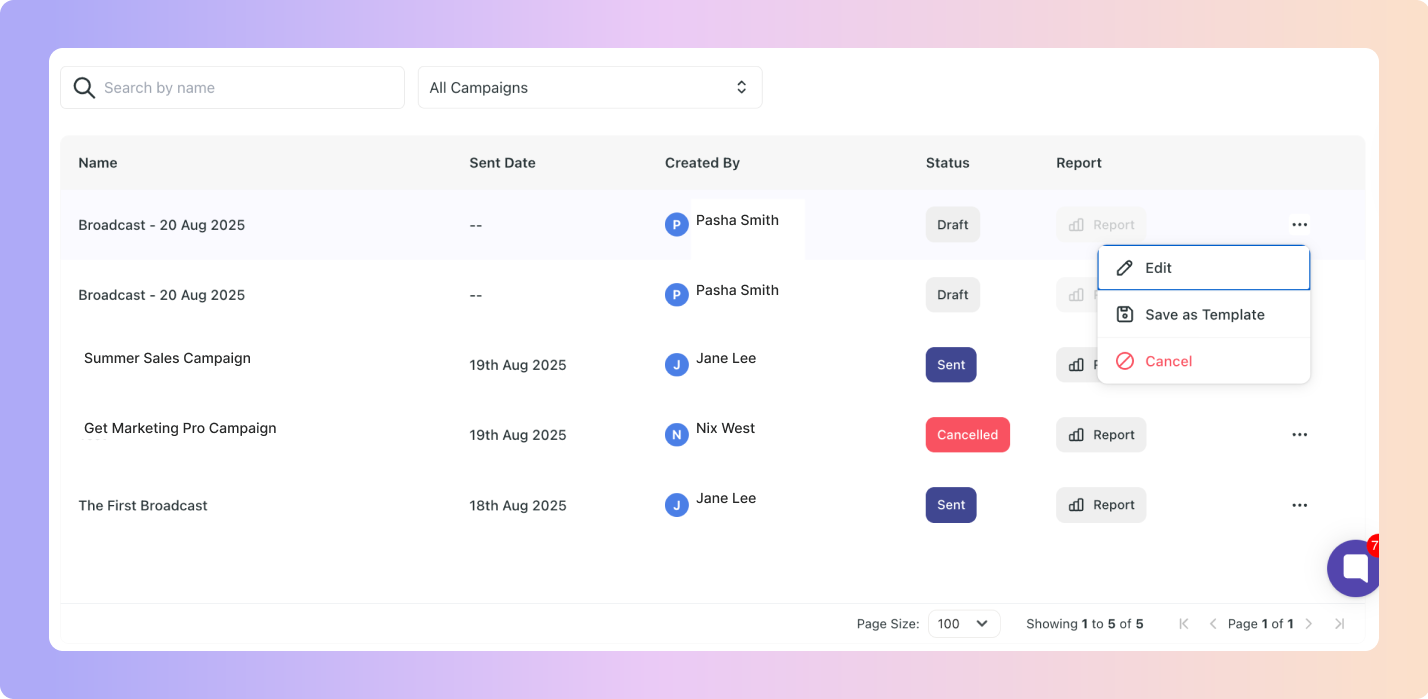
You can: edit, save and cancel draft campaigns.
WhatsApp → Create and manage WhatsApp broadcasts (just like email, but directly into your lead’s chats).
 Ad Tracking
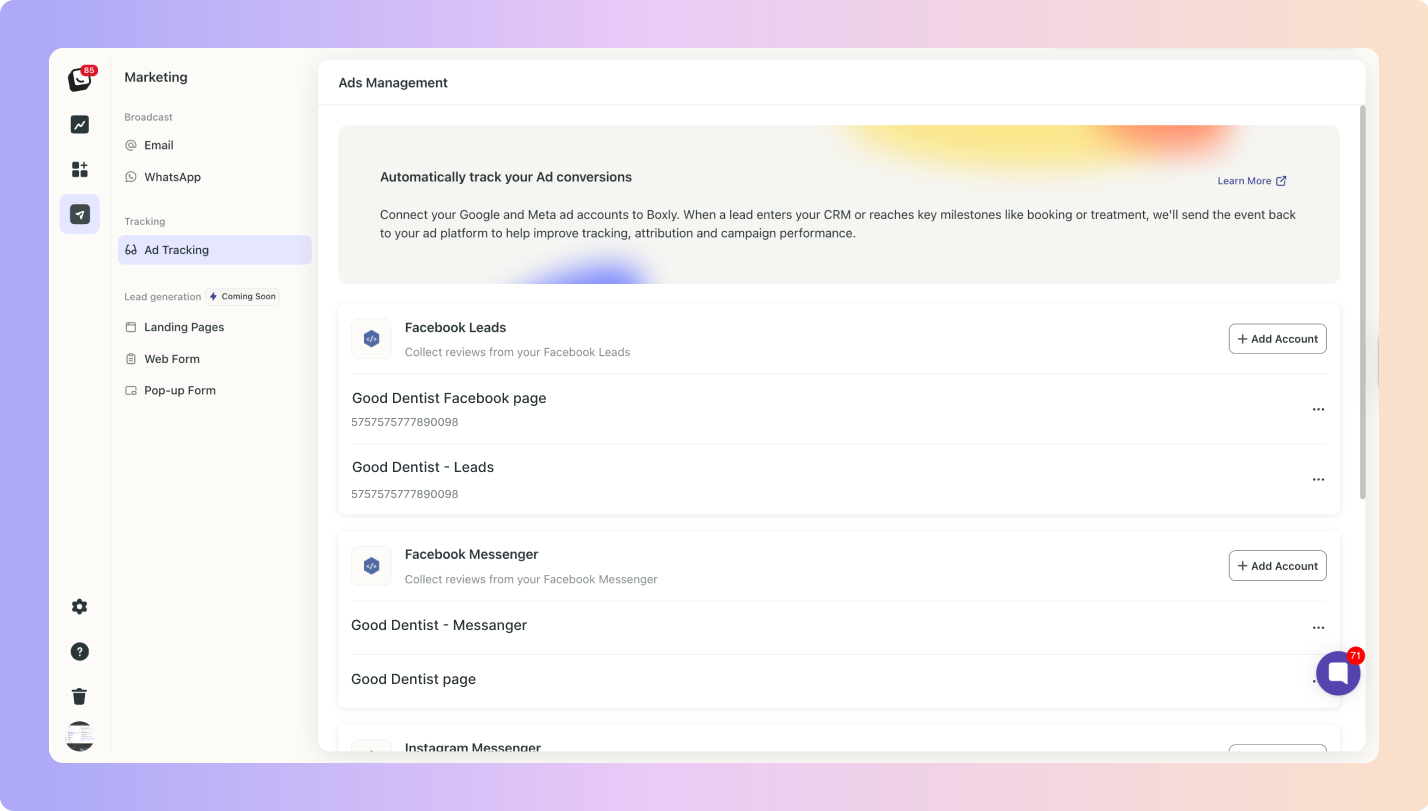
Ad Tracking → Connect and track your ad performance from Facebook, Google, and more, all inside Boxly - Check out the feature.
 Lead Generation (Coming Soon)
Landing Pages → Build landing pages without leaving Boxly.
Web Form → Create forms for your website and link them directly into Boxly.
Pop-up Form → Add pop-ups to capture leads on your site.
Create and send campaigns via Email or WhatsApp directly from Boxly.

Select your audience (filter by labels, stages, locations, etc.). Target specific segments of your leads or reach your entire database.
Schedule campaigns in advance or send instantly.
View performance stats like open rates, click-through rates, and replies, all in real-time.
To create an Email Broadcast: Click the top right “Create broadcast” button.

Your campaign building steps are divided into:
Template: Choose between an existing template or new blank template.
Content: Design the the campaign
Audience: Find your audience, either manually or through imported contact lists (CSV)
Review & Send: Choose your campaign name, your sender email, test your email, and send!
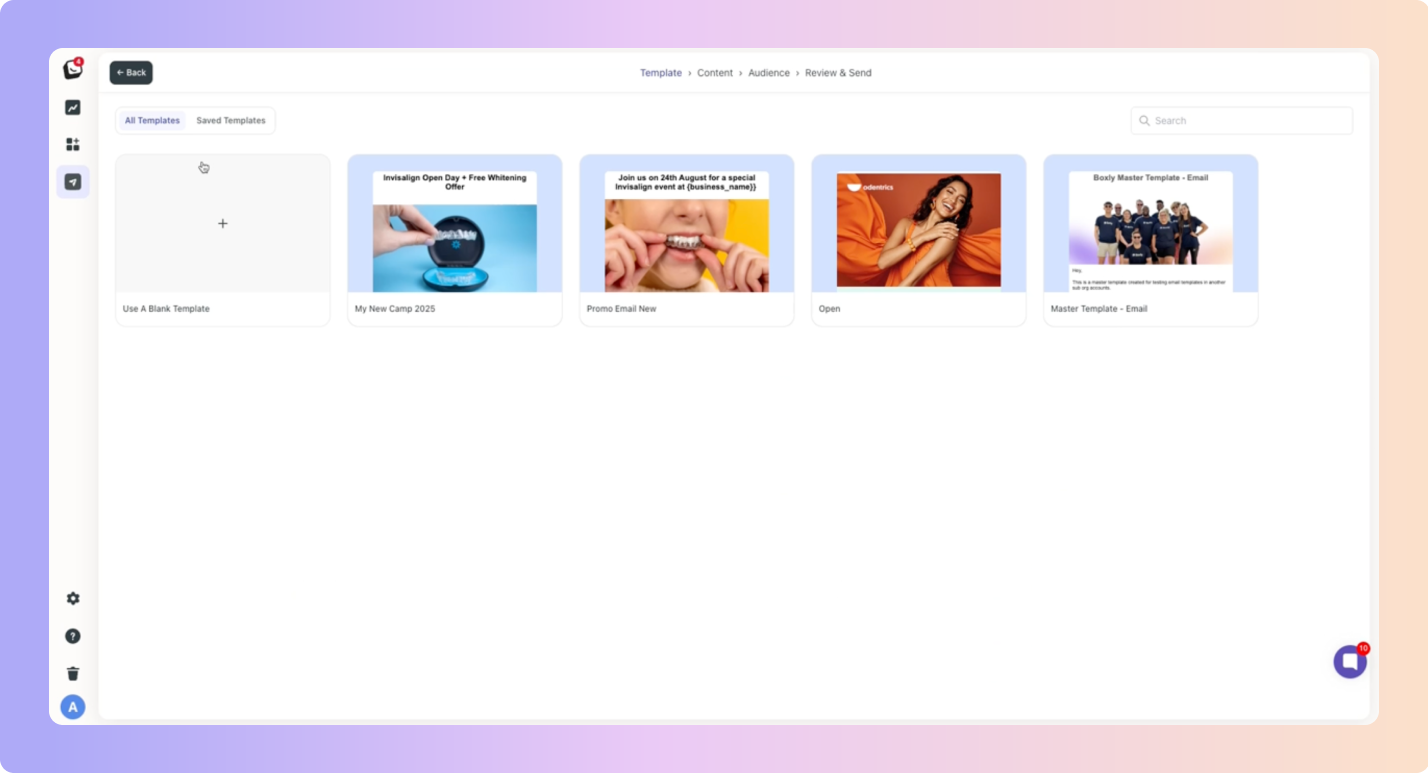
This will open the Templates section, which includes two tabs: All Templates and Saved Templates. Once you’ve created and saved a template, you’ll be able to access it anytime from either of these tabs.
You will have access to pre-built templates that Boxly created or you can choose “Use A Blank Template” to create your own email template.
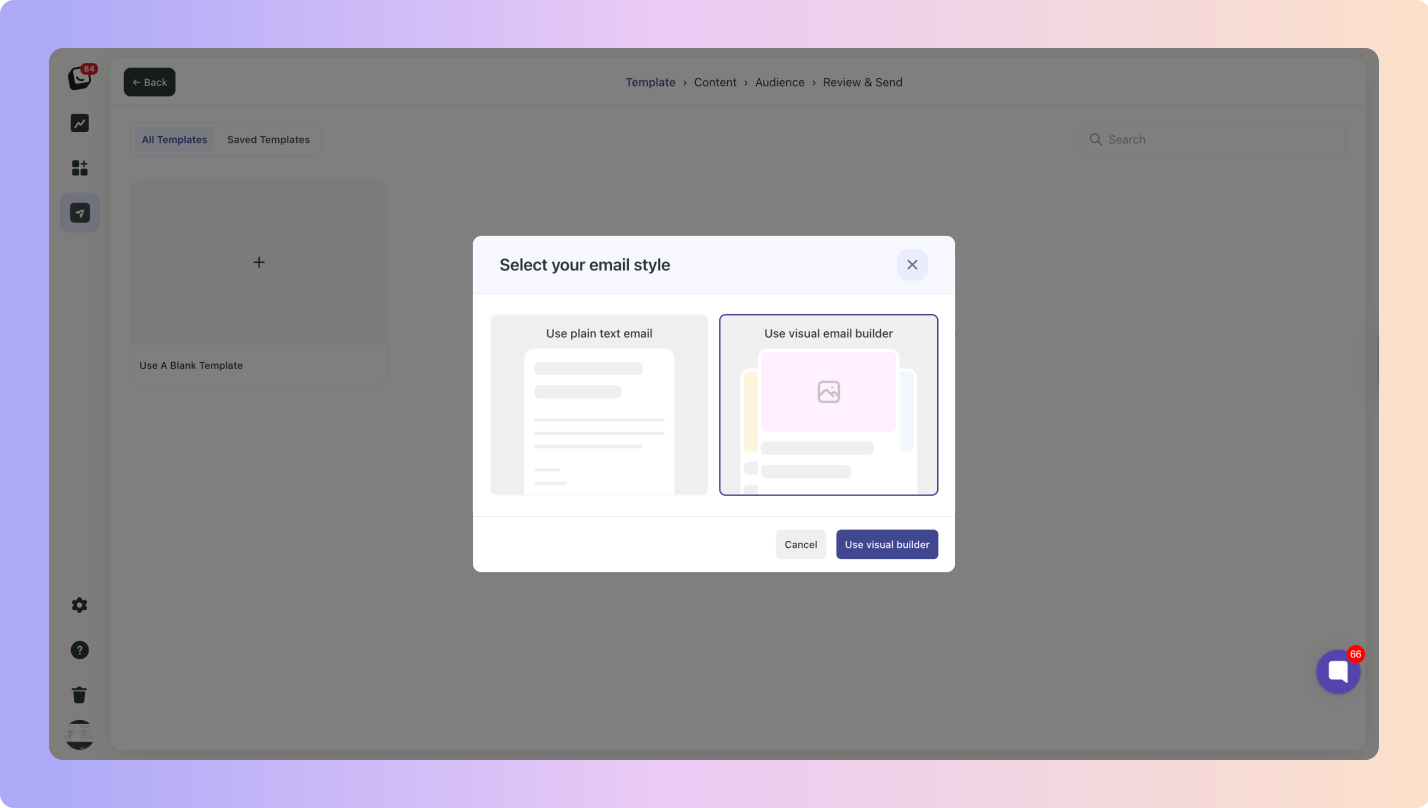
 Select your email style - You can “Use plain text email” or “Use visual email builder”.
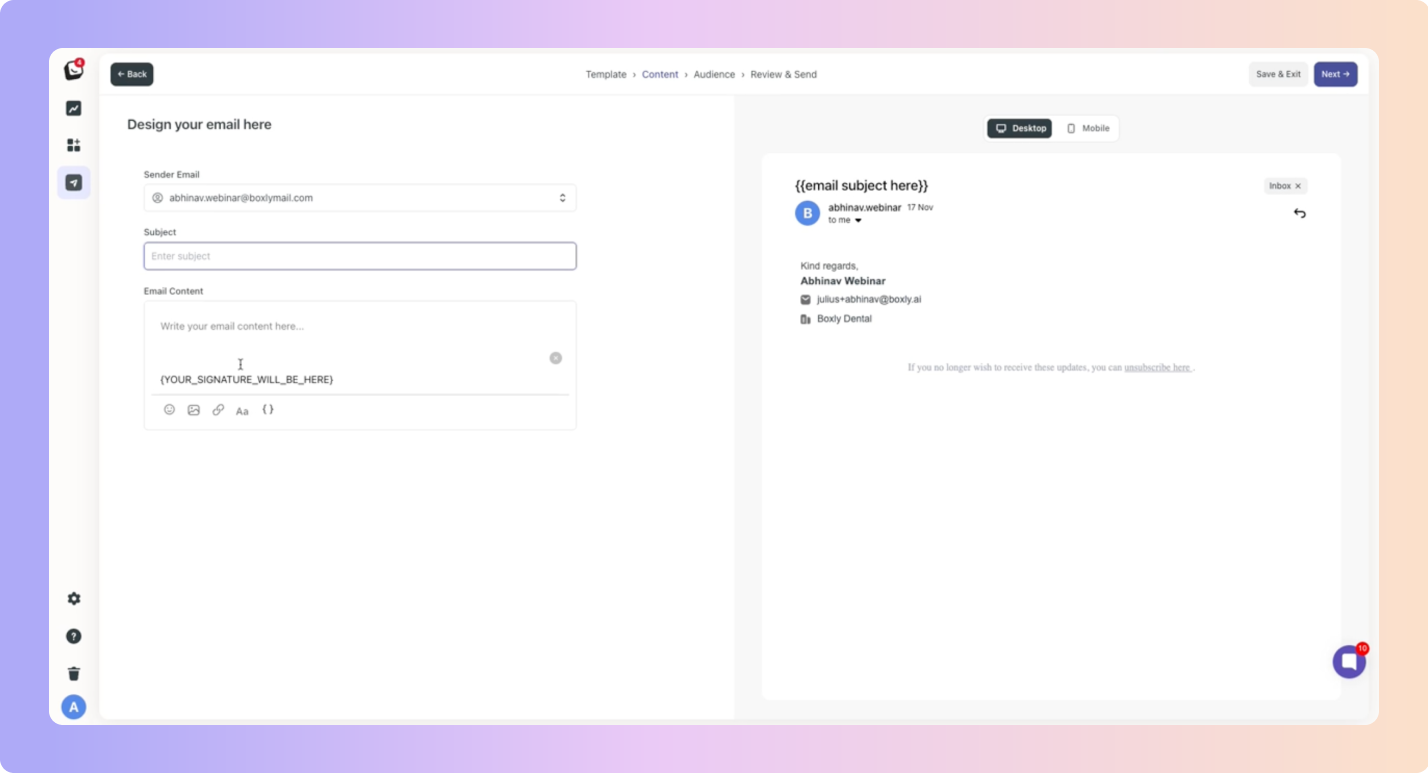
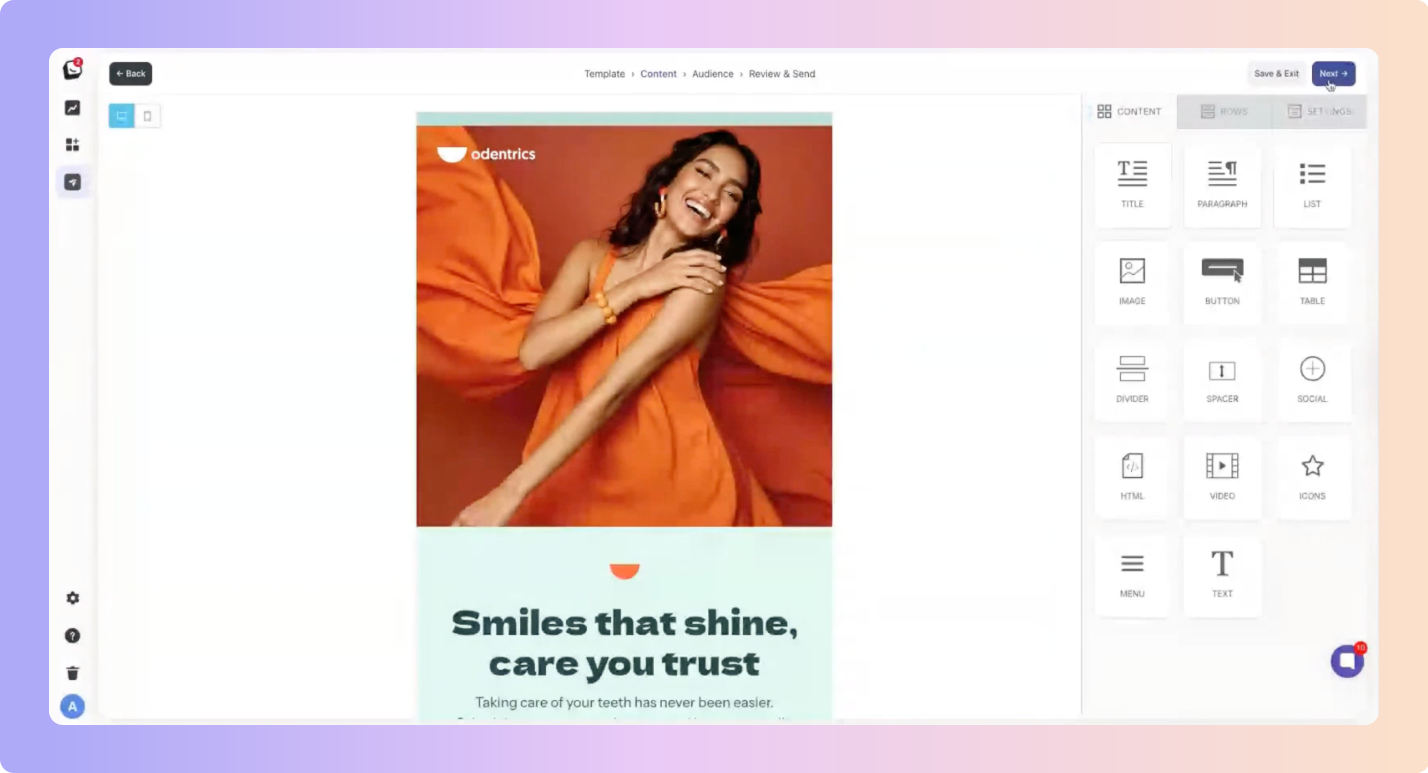
This is a normal email builder like below.
Enter in: Your Sender Email
 A Subject line
 The Email Content - you can add images, variables (including any custom variables you’ve created)
The Visual Email Builder is a drag and drop builder.
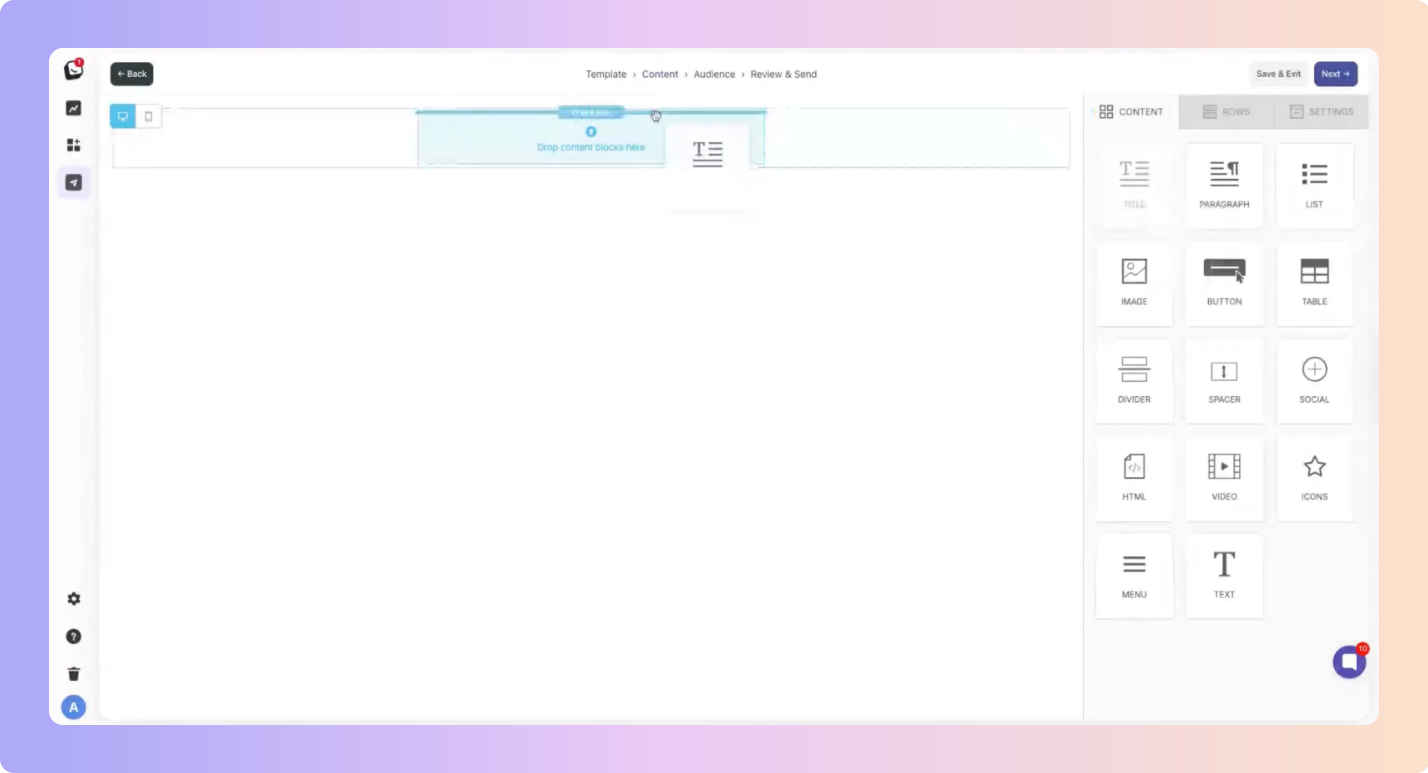
In the Content Tab, drag all components you want added to your broadcast email and drop them in the Drop Content Blocks Here space.
You have three Tabs when creating an email; CONTENT, ROW, & SETTINGS.
Components have settings, for example, when you add a “Spacer”, the settings for how big the spacer can be, will open up on the right in your Content Tab.
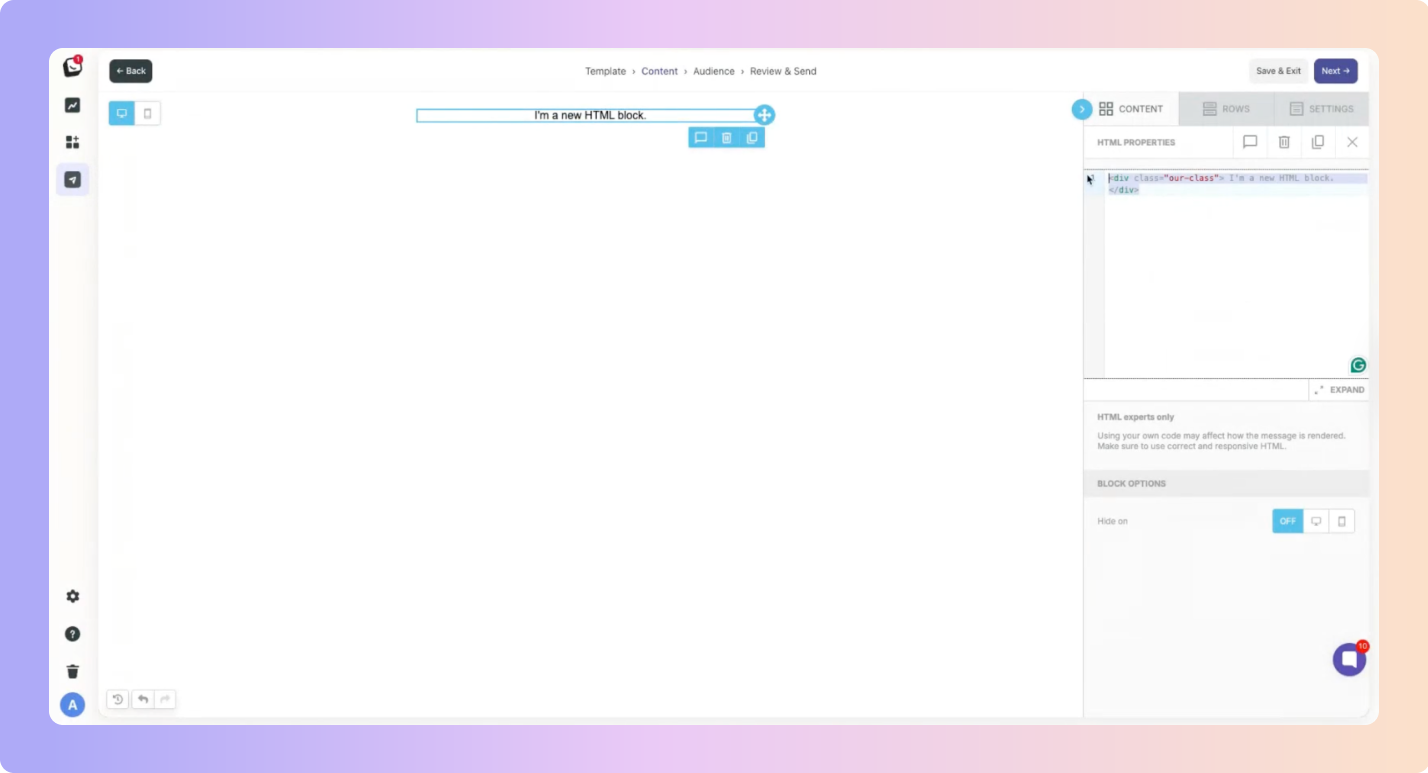
 If you have an existing HTML template you’d like to use, drag and drop the HTML component from your content options.
 Once you have the field open, copy your existing HTML template and paste it into the right HTML Properties section.
Note: Delete the existing HTML already there as the placeholder.
 Once you have finalised your content, click “Next”.
You can edit your HTML once it’s inside Boxly, but can’t edit HTML content with components added from the Marketing Suite.
Boxly’s Audience Finder is highly targeted, as all your leads are already inside the platform, you can target specific groups, services, and types of leads.
There are two ways to Find your Audience:
Create a Manual Filter or
Select or import a Contact List.
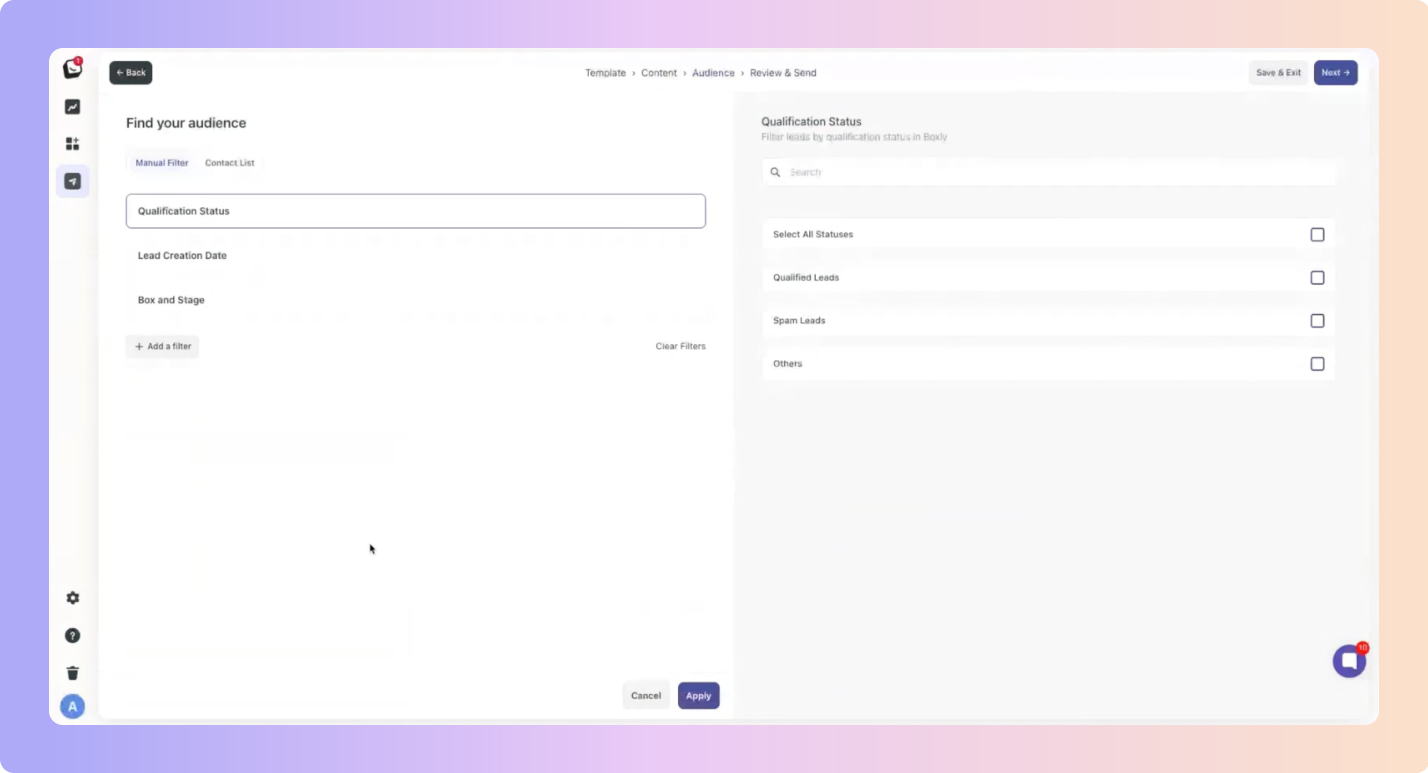
 Qualification Status
Select the lead status you want to target (Qualified, Spam or Other).
Each lead is classified into one of the following:
Qualified Leads: Genuine leads interested in your services.
Spam: Catches spam messages and removes them from your pipeline.
Other: Includes non-sales inquiries like Appointment Reschedules, Supplier Messages, Complaints, etc.
 Creation date
You can choose leads created at:
Anytime,
In the last 30 days,
In the last 90 days,
This year to date,
Between a custom date range,
On a specific date.
 Boxes & Stages
Choose which Box and tag you want to pull leads from. You can target multiple boxes and stages.
 Filters
If you want to refine your target audience even further choose a Filter to add:
Assigned User, Labels, Location, Lead Channel, & Lead Value.
This way you can target leads assigned to just you, or anyone specific team member, or a specific label you want to target, etc.
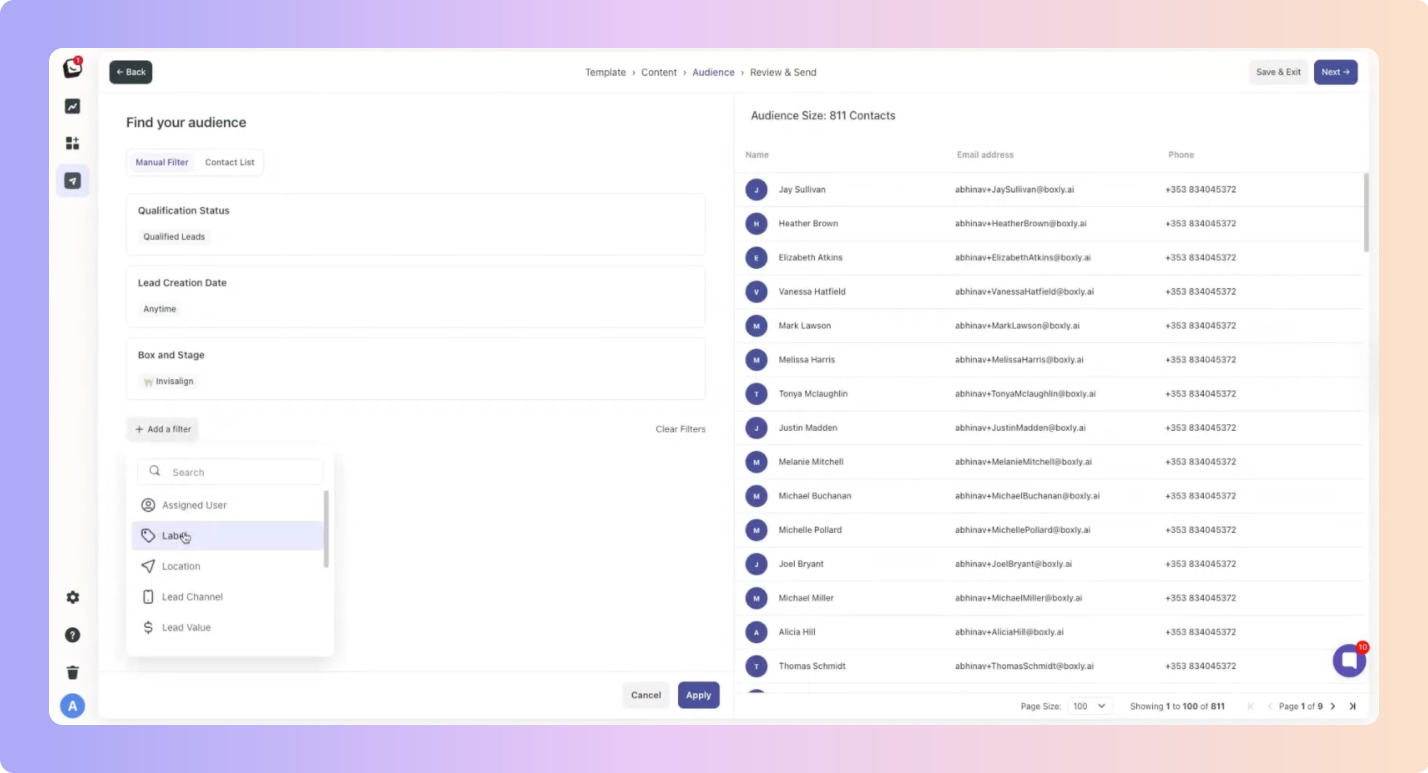
 Click “Next”- top right and move to the next step → Review & Send.
All imported contact lists will reside in this section.
 Click on the “Upload your audience List” field to add your new Contact List.
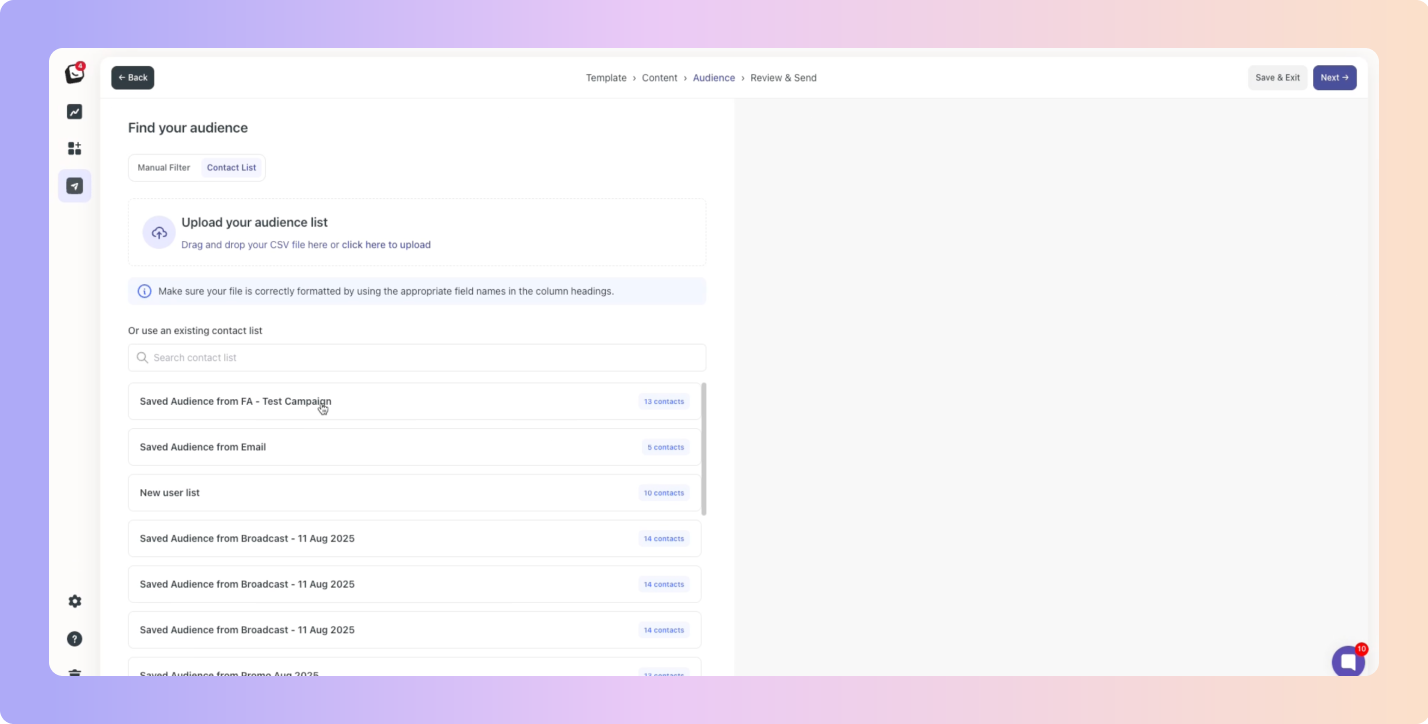
 Name your Contact List - Ensure the name you give the list makes sense, this list will now be added to your existing Contact lists. If you wish to send another broadcast to the same audience, you’ll want to be able to find it easily.
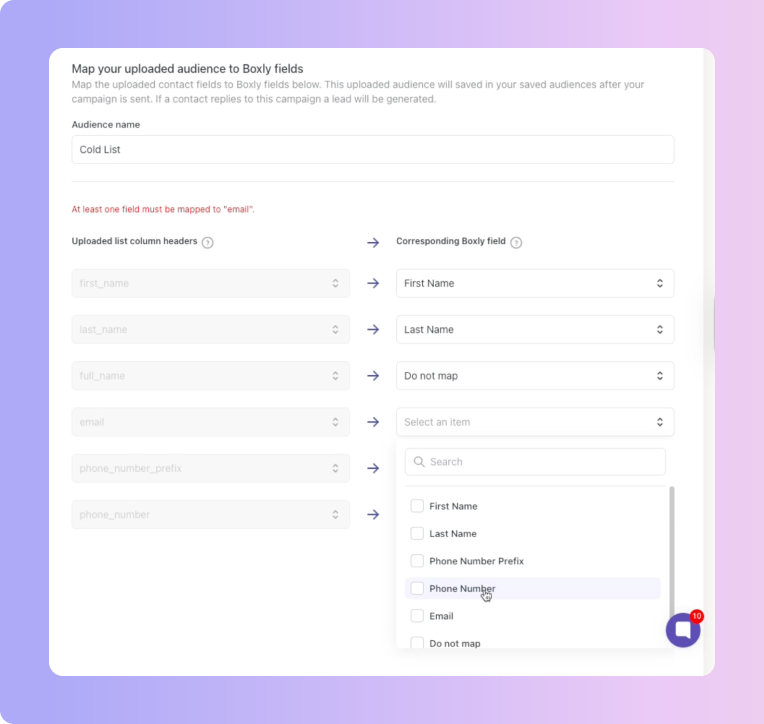
 Map (match) the contact list fields to your imported CSV fields. Before you upload your CSV make sure you label your CSV column clearly to avoid confusion. If there is a field you don’t have a corresponding field for, select “Do not map”.
 Once you’re satisfied with your audience, click “Finish & Save audience”
 Your audience will be listed on the right
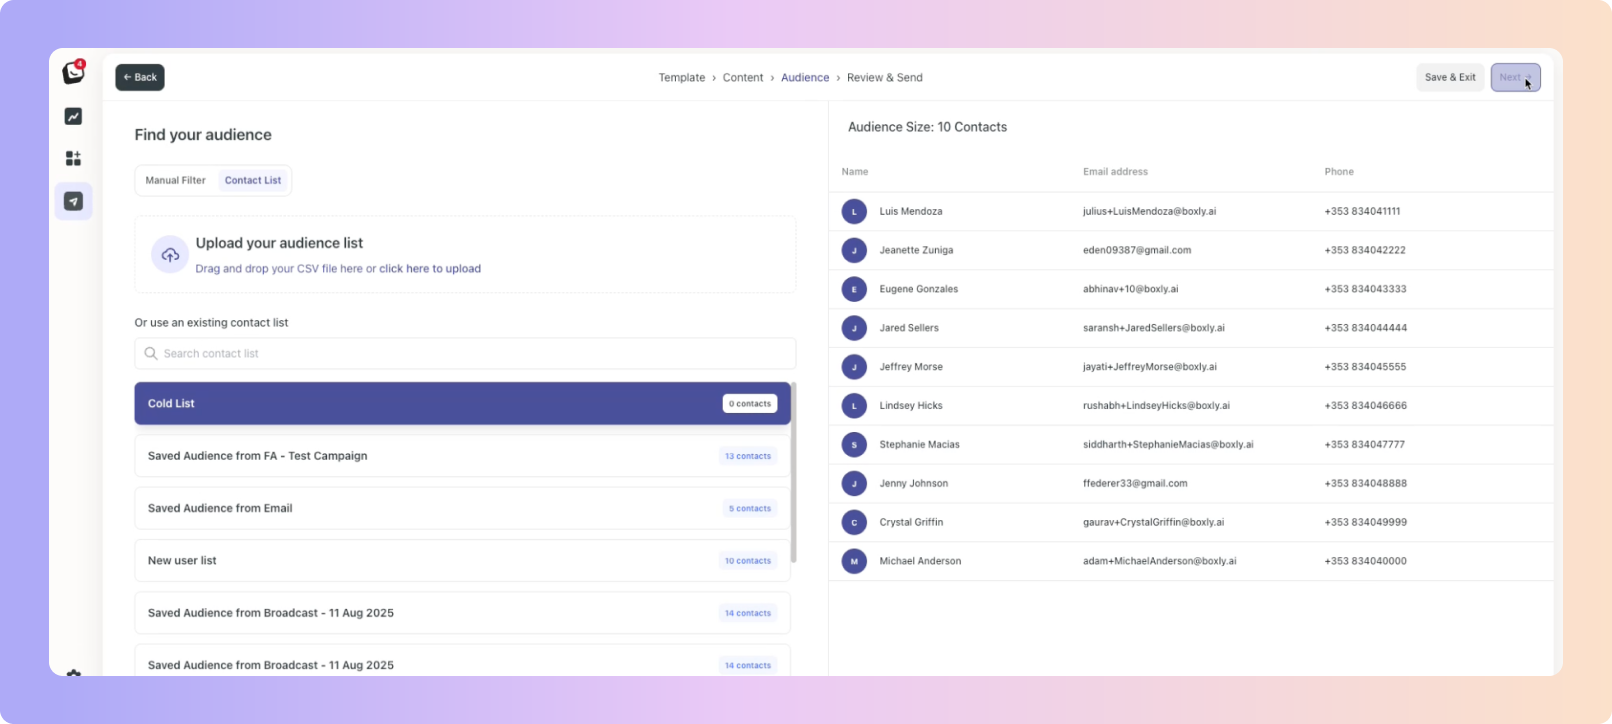
 Click “Next”- top right
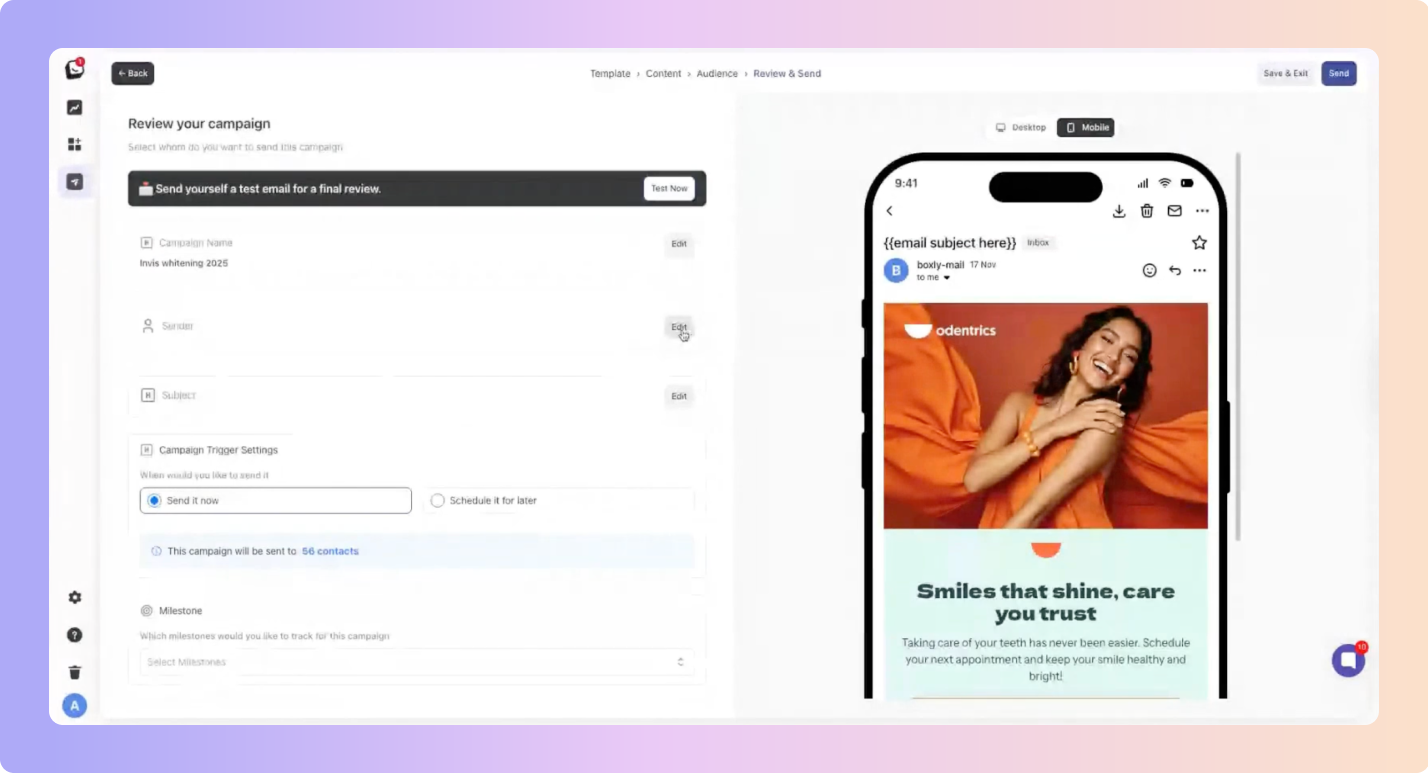
Name your campaign - Remember to name it something that will make sense for reporting or if you want to use the campaign in the future for another run.
Enter in your Sender email address and the Subject - Remember to click Save!
Campaign Trigger Settings: You can send the broadcast email immediately or schedule it for later.
Milestones - Select the Milestone you want to track for the campaign.
If you use a CSV to import a new audience the following options will be available once the leads reply:
Why do these options only appear with CSV imports?
Audiences you pull directly from Boxly are already organised, they’re in your pipelines and carry the right labels.
But when you bring in a brand-new list via CSV, those leads don’t yet have a home. To keep things neat (and make your life easier!), Boxly lets you decide which pipelines, stages, and labels to assign to your imported leads.
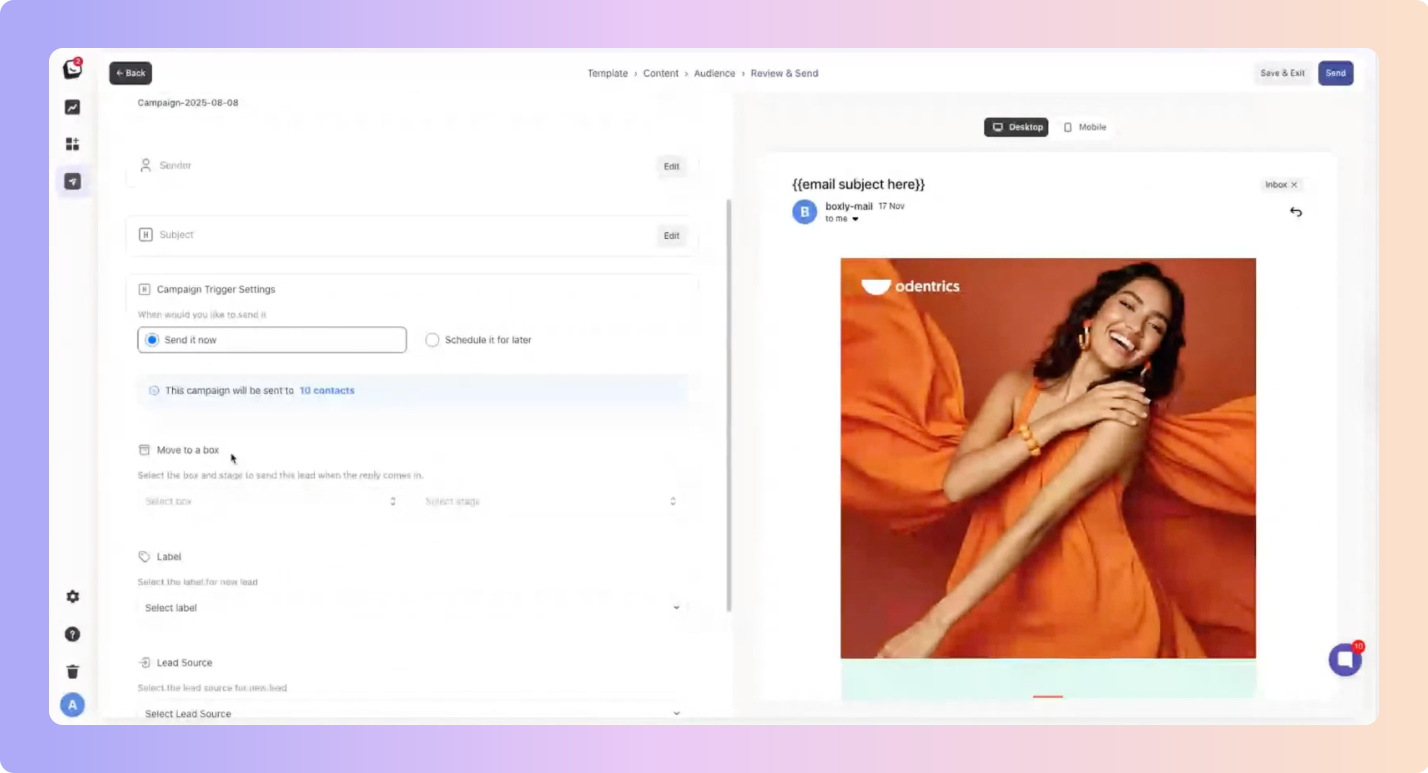
Move to a box - Once the leads respond you can choose to move the lead to a Box and Stage relevant to the campaign's purpose.
Label - Once the leads respond you can choose to label the lead with a new label relevant to the campaign you’re running.
Lead Source - Once the leads respond you can choose which lead source the lead will be linked too for reporting. If you leave this open, it will be called: “Boxly Broadcast”.
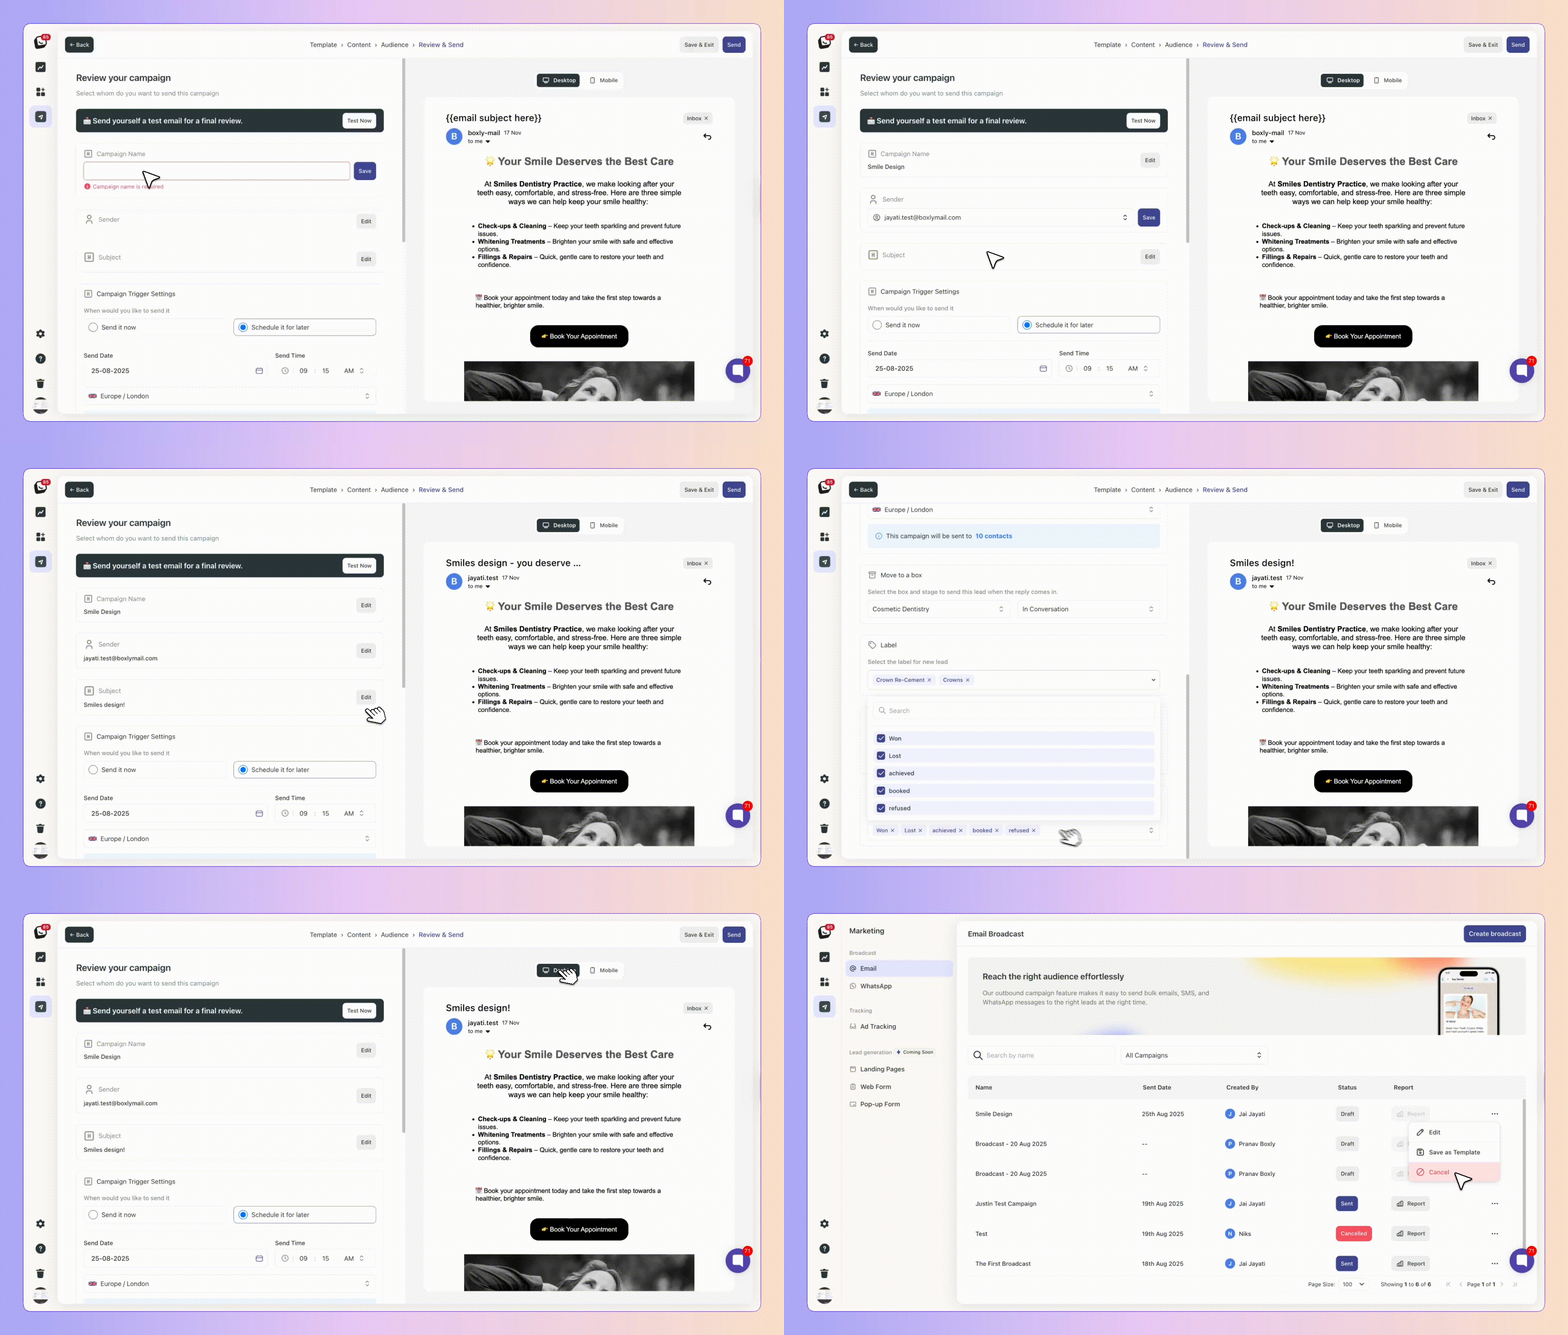

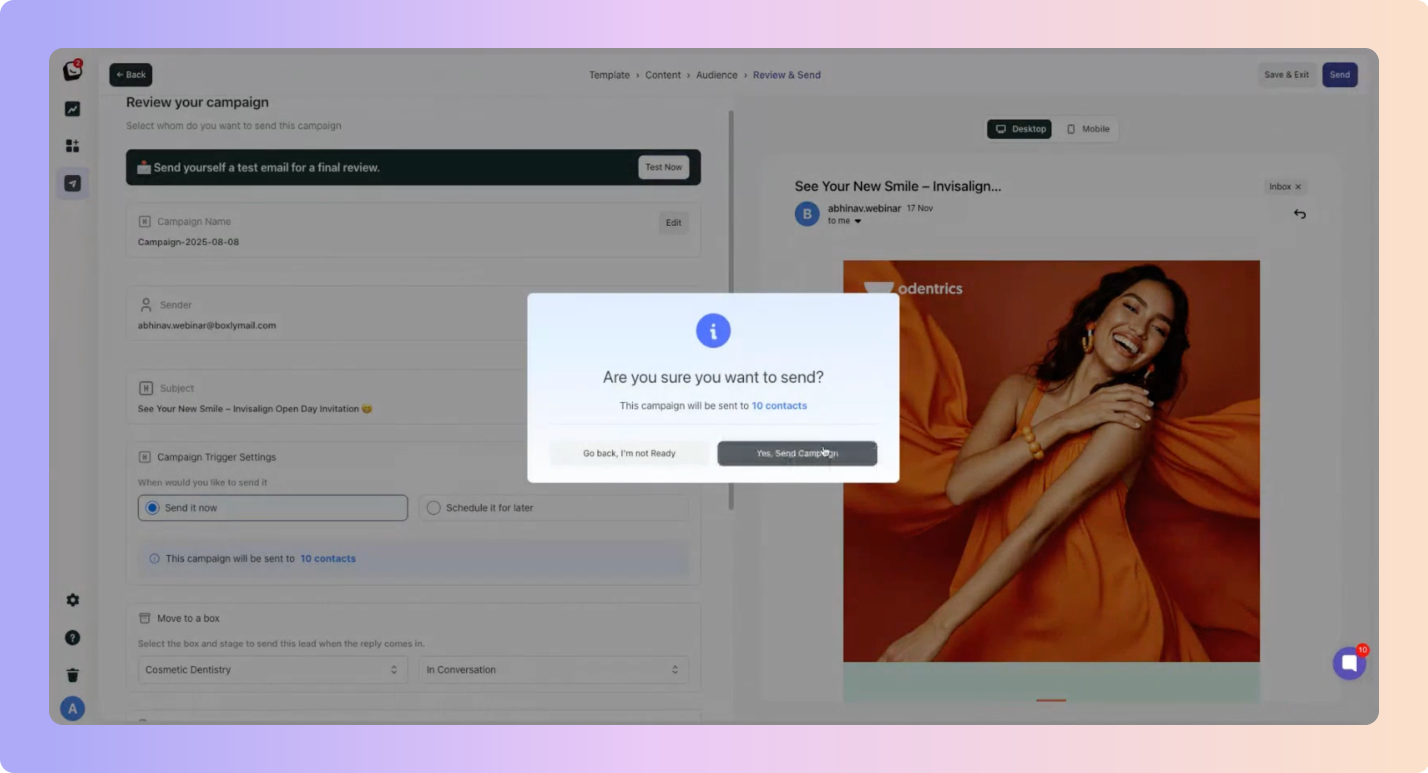
 Once you’re happy click “Send”.
Confirm that you’re ready and fire away!
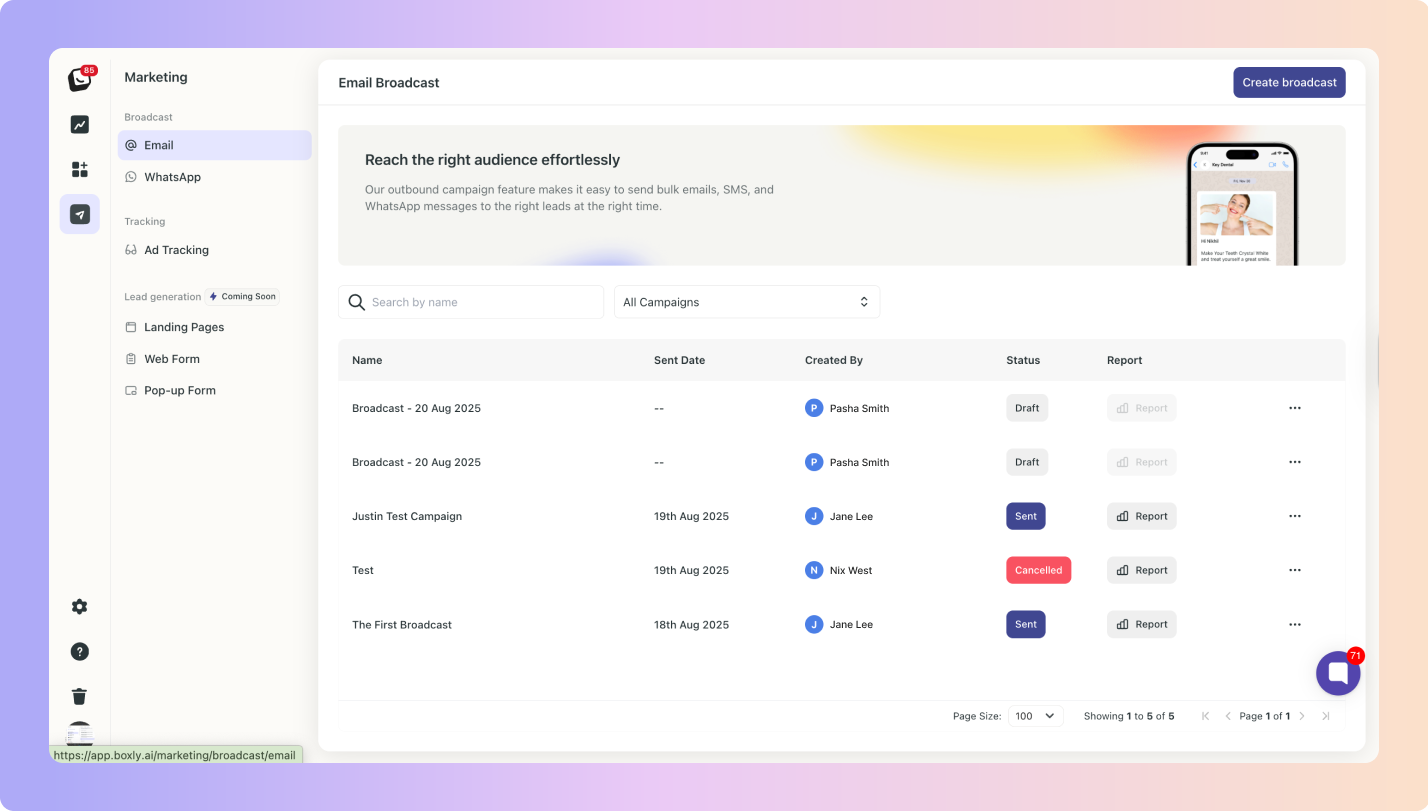
 You can see whether or not a campaign has been sent in the Status column.
If it’s just been sent it will be categorised as Scheduled, if it’s done and sent to your intended audience, it will have a dark blue Done label. Cancelled campaigns have a red Cancelled label. Your drafted campaigns will have a grey Drafts label.
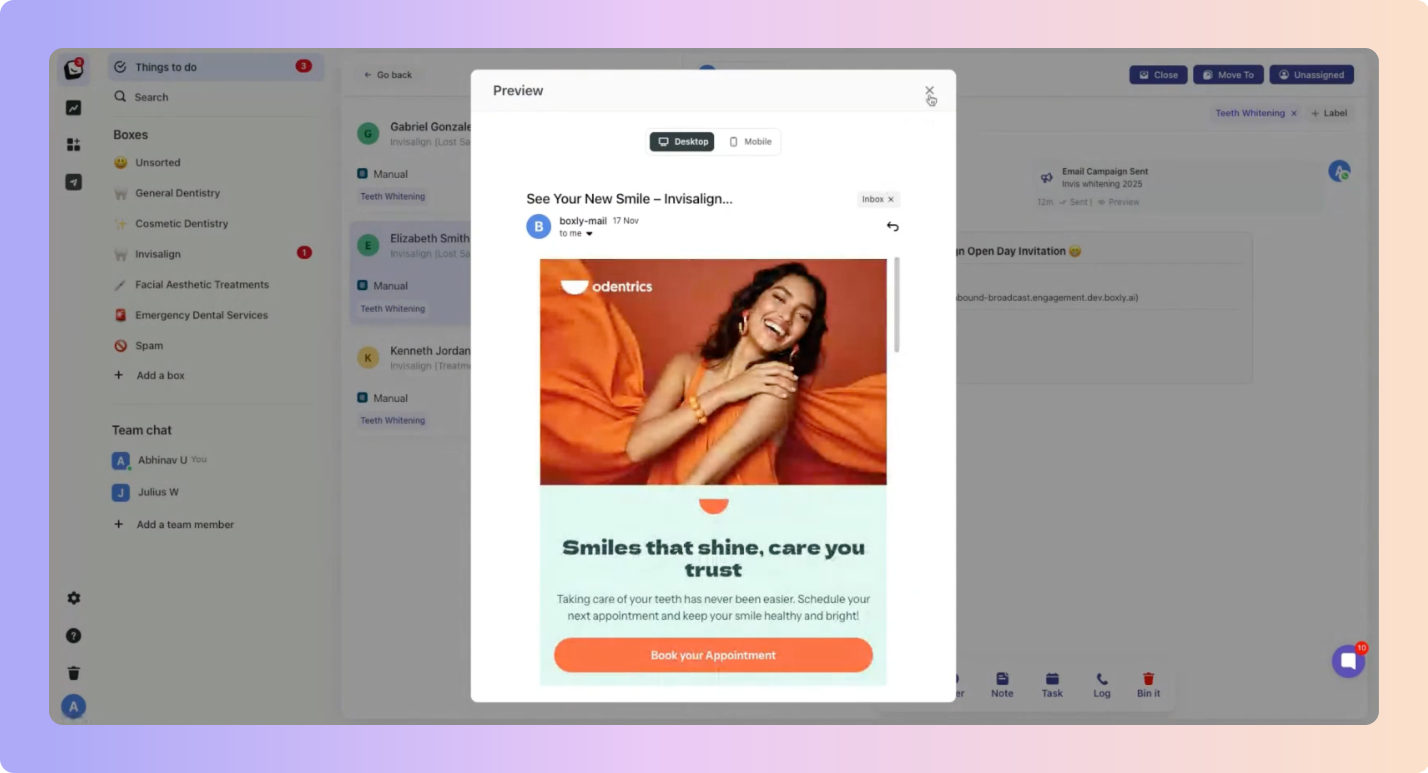
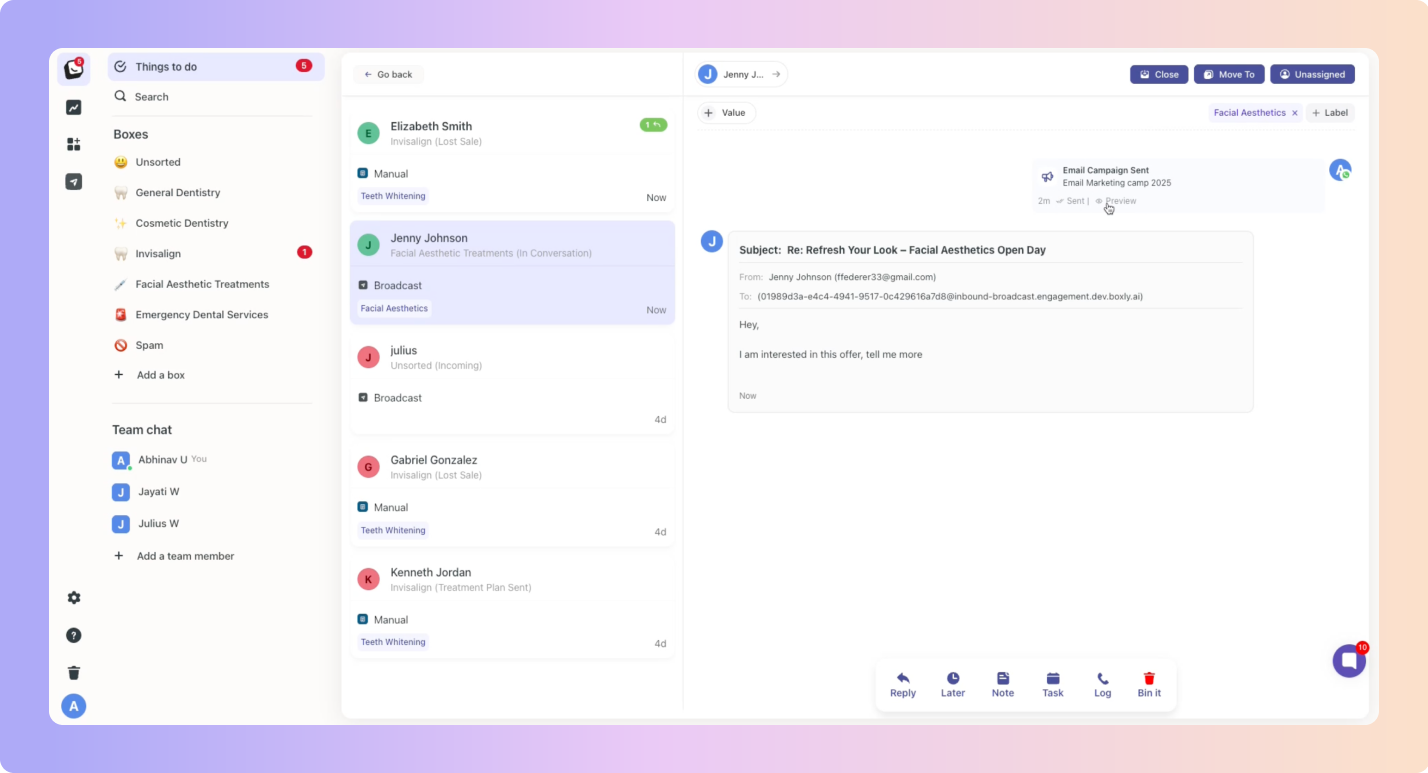
 When a lead replies to your campaign, you’ll be able to see a preview of the campaign that they replied from.
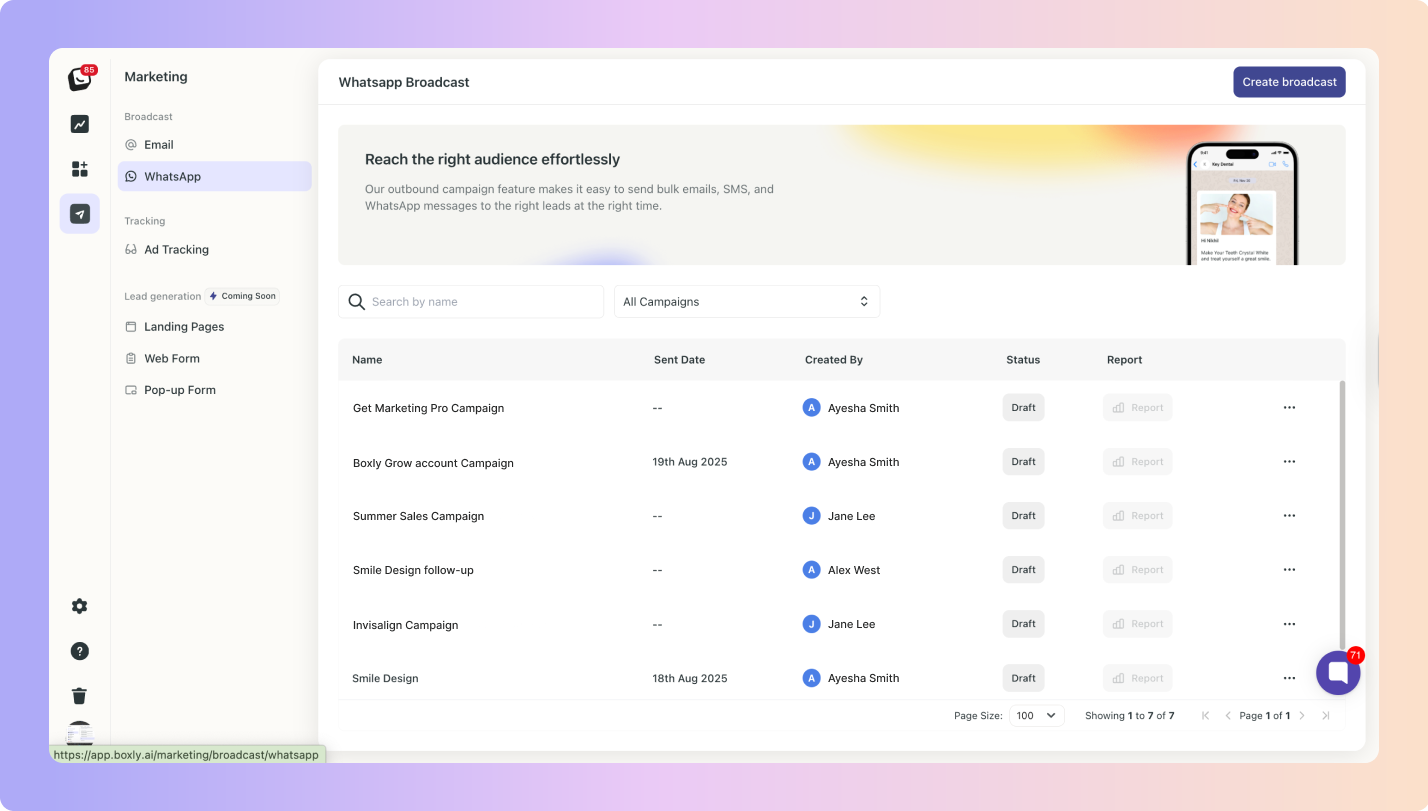
You can create a WhatsApp campaign from your Marketing Suite:
 Go to the WhatsApp tab
 Click “Create broadcast” in the top right corner
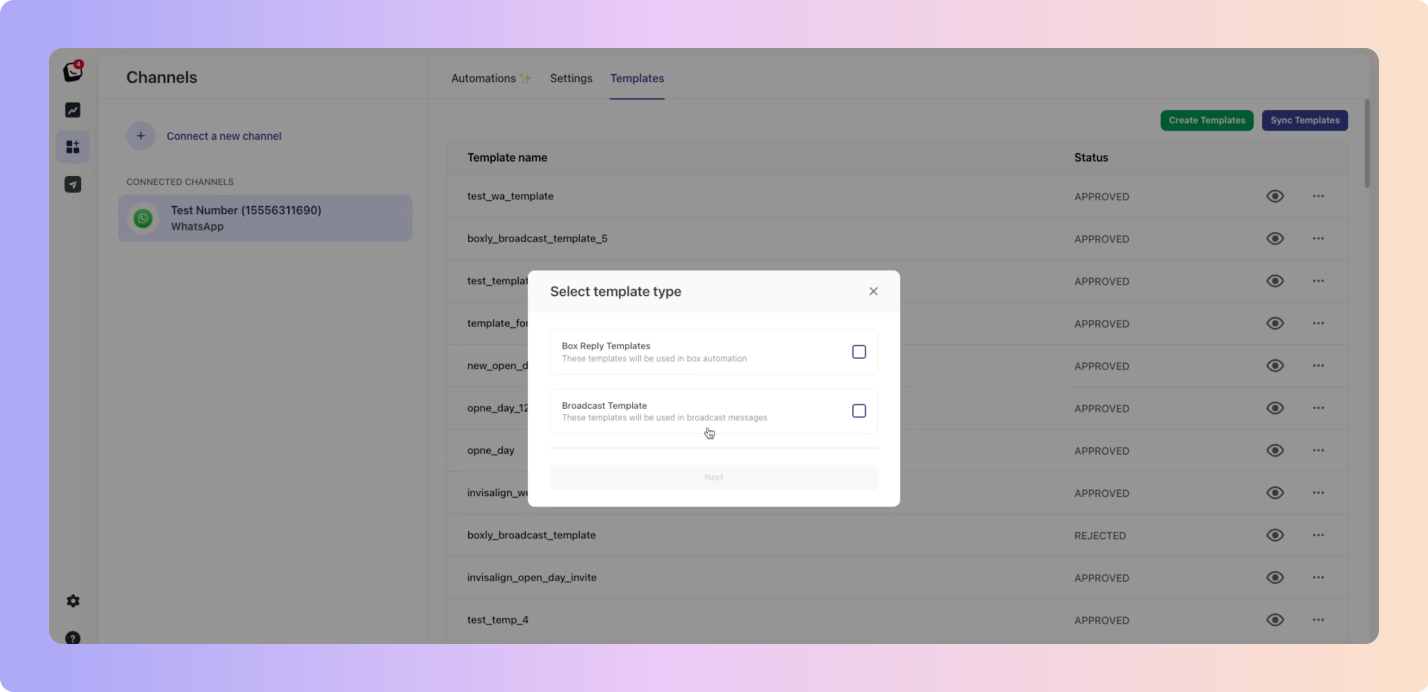
You can also create a WhatsApp broadcast from your WhatsApp Channel:
 Go to your Channels
 Go into your WhatsApp Channel
 Click on “Create template”
 There are now two types of templates in your WhatsApp Channel:
Box Reply templates - we’ve kept your original Box Templates that you use for automations separate from your Broadcast templates, this way you can clearly differentiate between the two types of Reply templates for WhatsApp.
*You will be able to import Box templates as Broadcast templates.
Broadcast templates - You will be able to add text, images, videos, & documents in the Marketing Suite.
 Select “Broadcast templates”
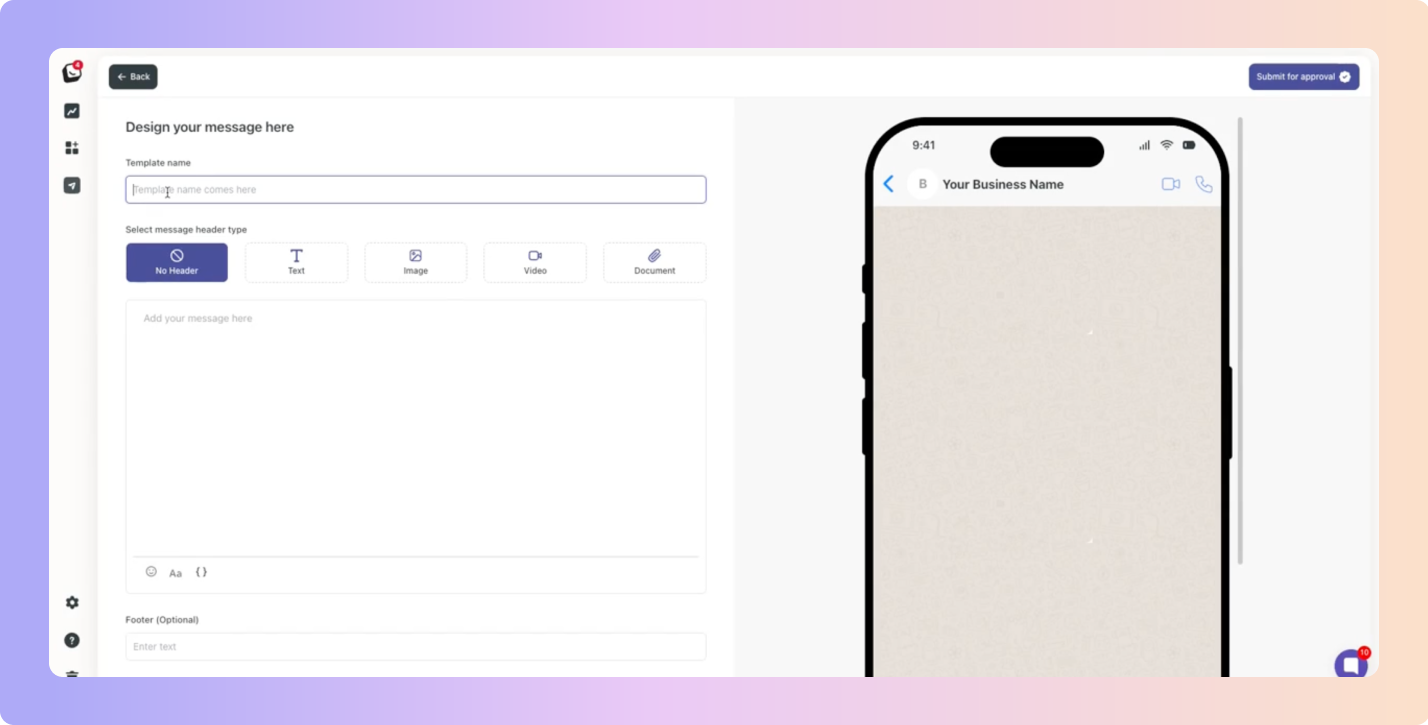
 Once you’ve clicked create campaign/broadcast using either method, the below screen will appear. You can now create your WhatsApp template.
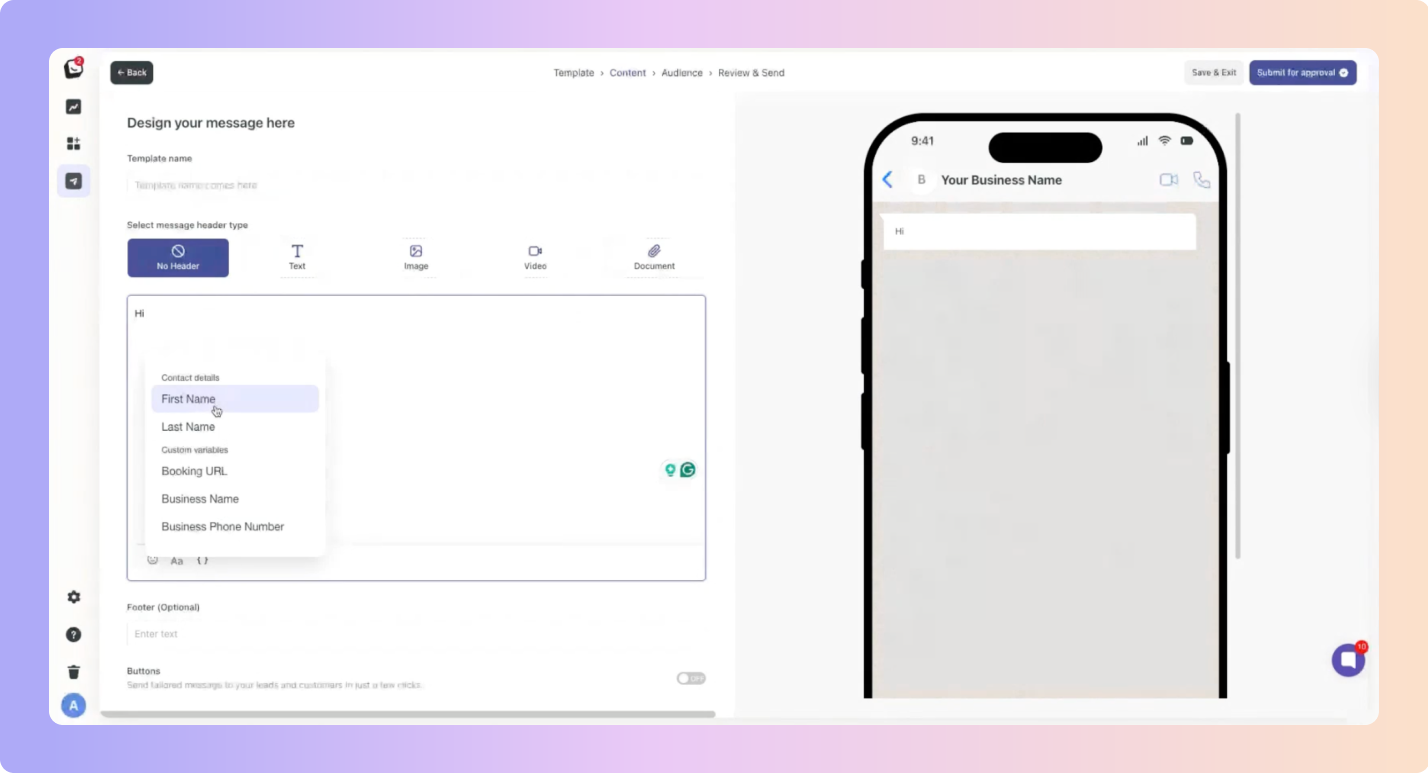
You can add:
Headings, text, images, videos and attached documents
You have Footer options
Variables
Buttons
Buttons
You can add as many buttons as needed right in the Marketing Suite when creating your WhatsApp broadcast.
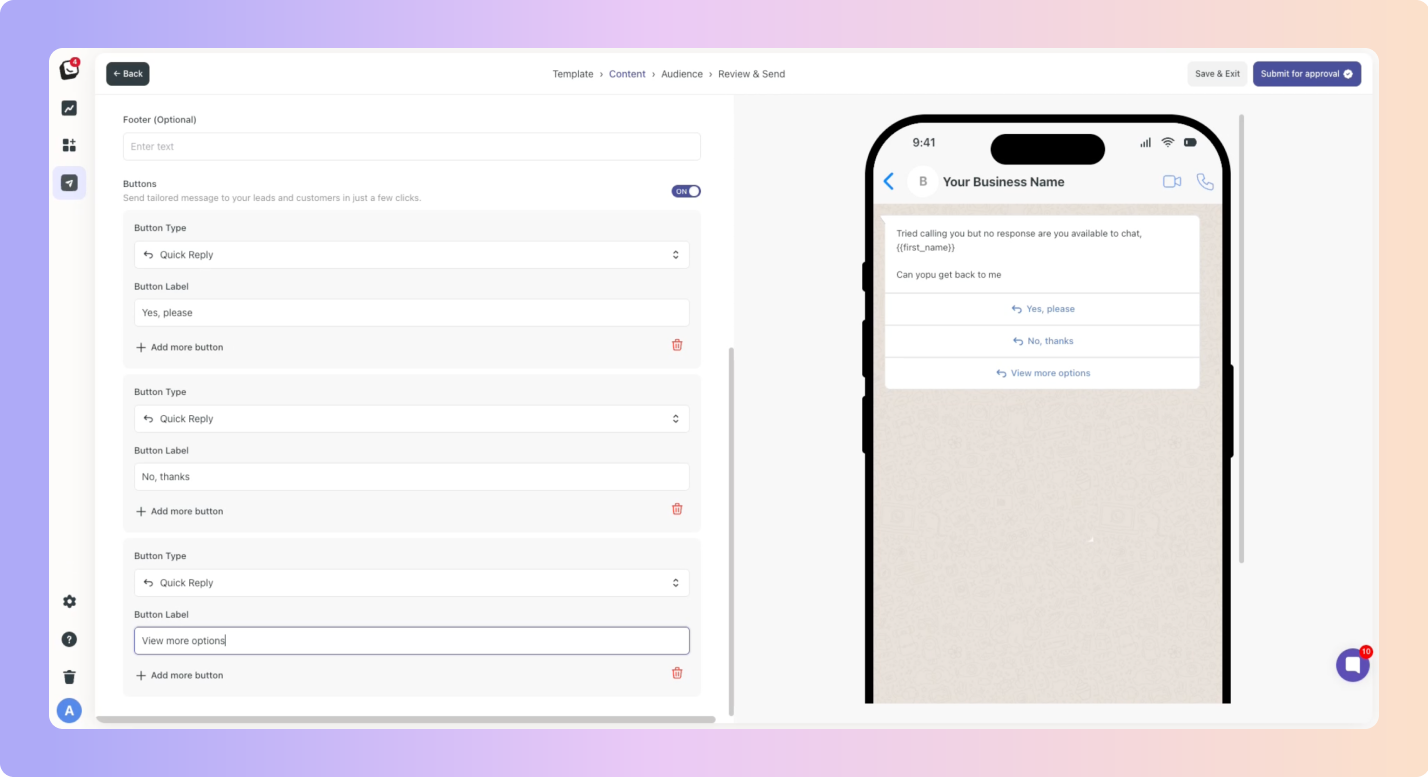
 Once you’re happy with the WhatsApp campaign/message, click “Submit for approval”.
Submit for approval
We’ve brought the process for creating WhatsApp templates into Boxly, you no longer have to go into meta! But you still need approval between boxly and meta before using a template. Once you’ve ‘Submitted for approval’ it will take some time for approval to be given.
Using already approved templates for broadcast campaigns is recommended to ensure everything goes smoothly.
 If you’re ready to send and your template is approved; select your Audience!
Import a CSV
When you import a CSV for your audience, you’ll need to map and name the new list. Phone numbers are required as it’s a WhatsApp Broadcast.
Reporting in Marketing Pro gives you a complete overview of how your campaigns are performing.
From your Boxly dashboard, go to Marketing.
You’ll see a list of your recent campaigns and their key performance metrics, click > Reporting on the campaign you want to review.
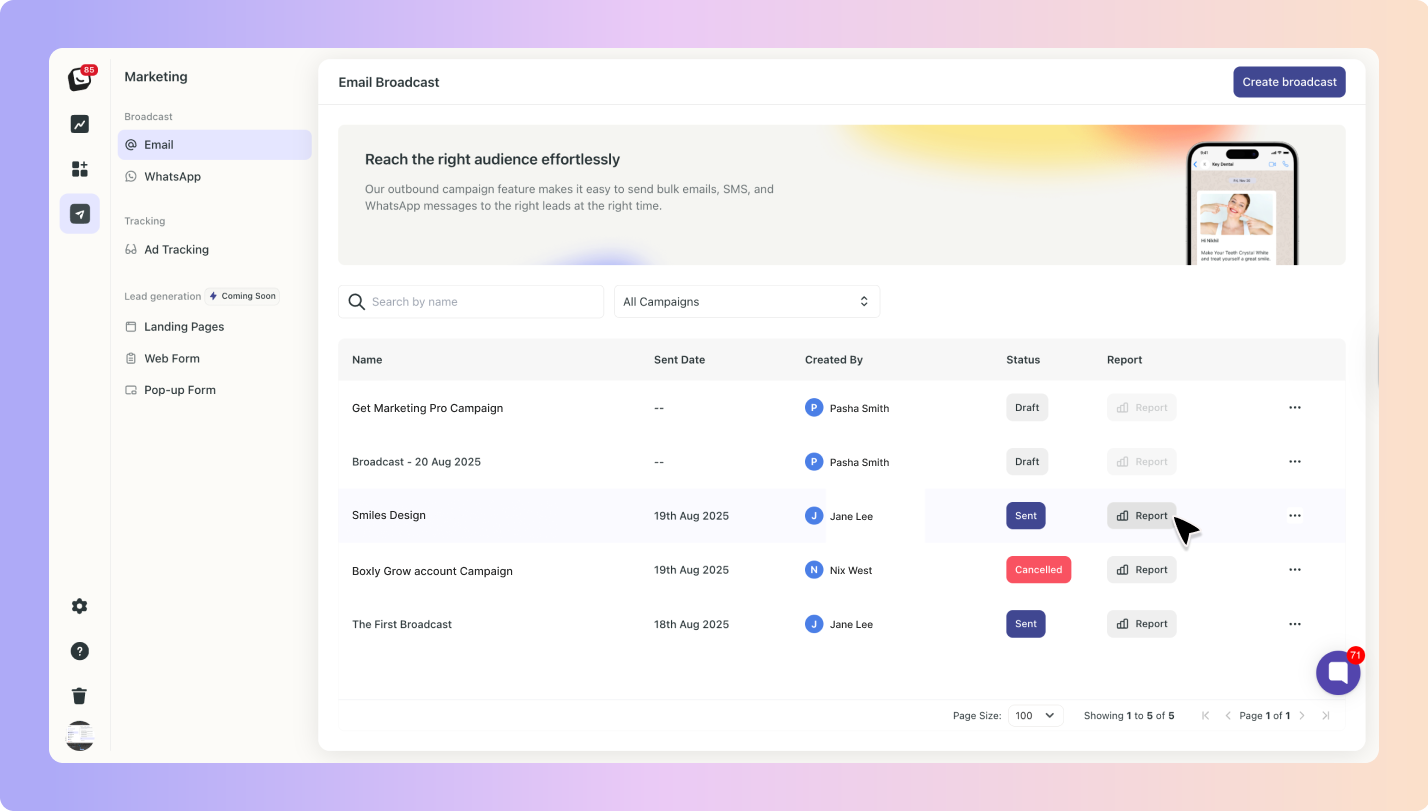
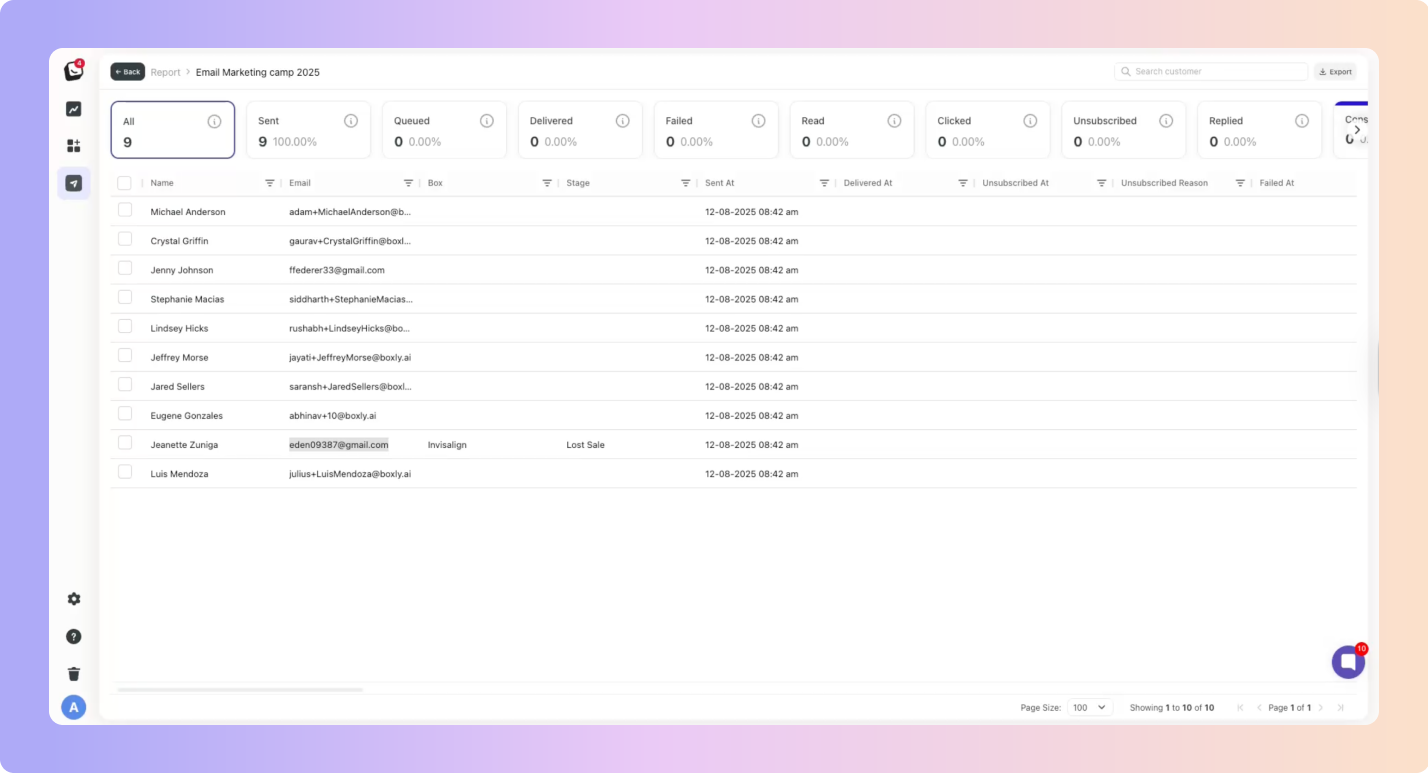
Each campaign will show:
Total Number of customers in your selected audience.
Number of customers the campaign has been sent to from your audience.
Number in Que - How many people will still receive the message.
Number of Read – How many people opened your message.
Number of campaigns Delivered
Number of Clicks – How many clicked on a link in your campaign.
Number of Unsubscribed – How many unsubscribed based on this campaign.
Number of Replies – Direct responses you received.
Number of Milestones Entered 
 Look for how many leads moved to the next stage in your pipeline after a campaign has been actioned.
For example: If you sent a campaign about “Free Consultation,” you can see how many leads were booked and moved into the Consultation Booked stage.
This ties into the review stage of your campaign building - when you selected the milestones to track. Whenever a lead moves through the milestones you’ve tracked your reporting will record the action.
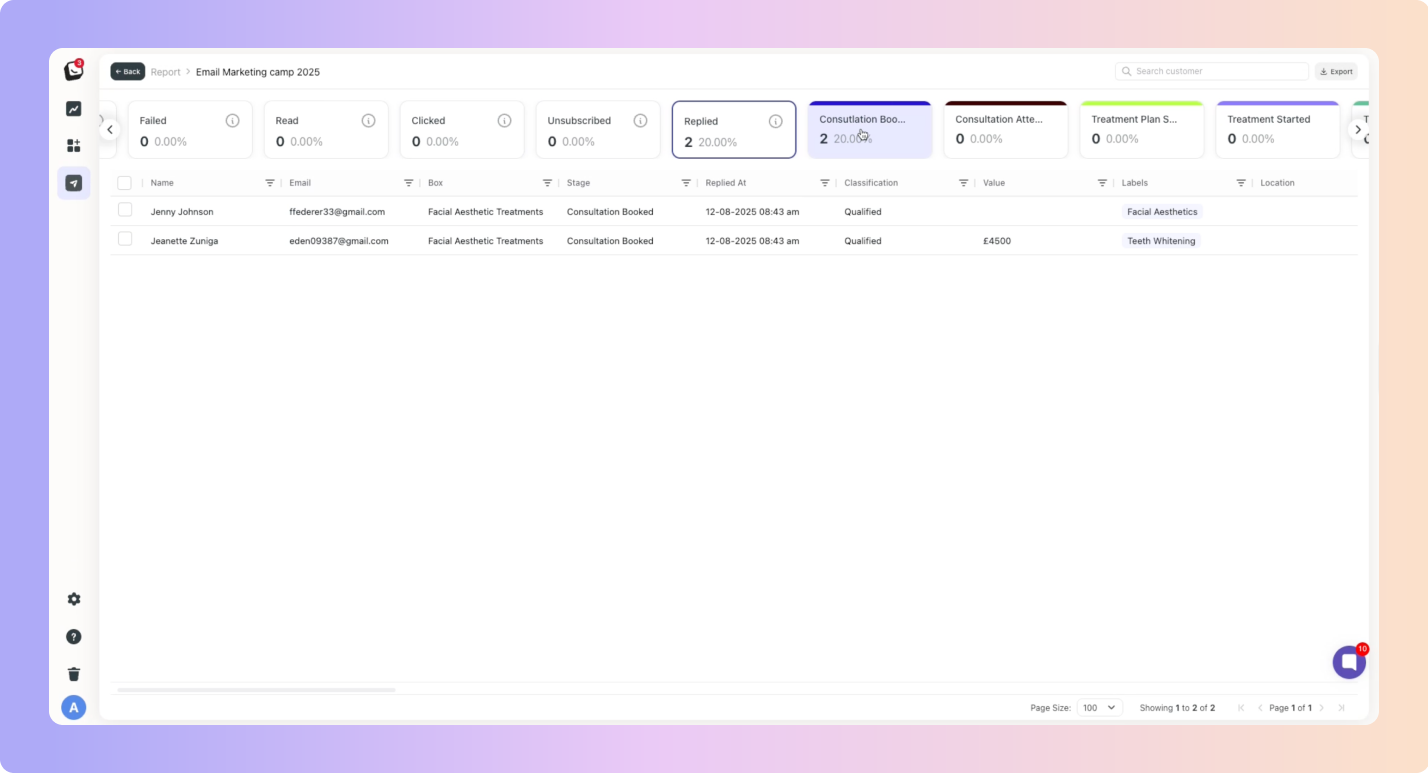
All actions taken on a lead that was part of a campaign will be recorded in the reporting of a campaign.
When a new lead is created from an imported contact list, the lead’s incoming channel will be listed as “Broadcast”. Existing leads replying won’t be added as new leads, the campaign will simply be added to their communication flow in their Boxly profile.
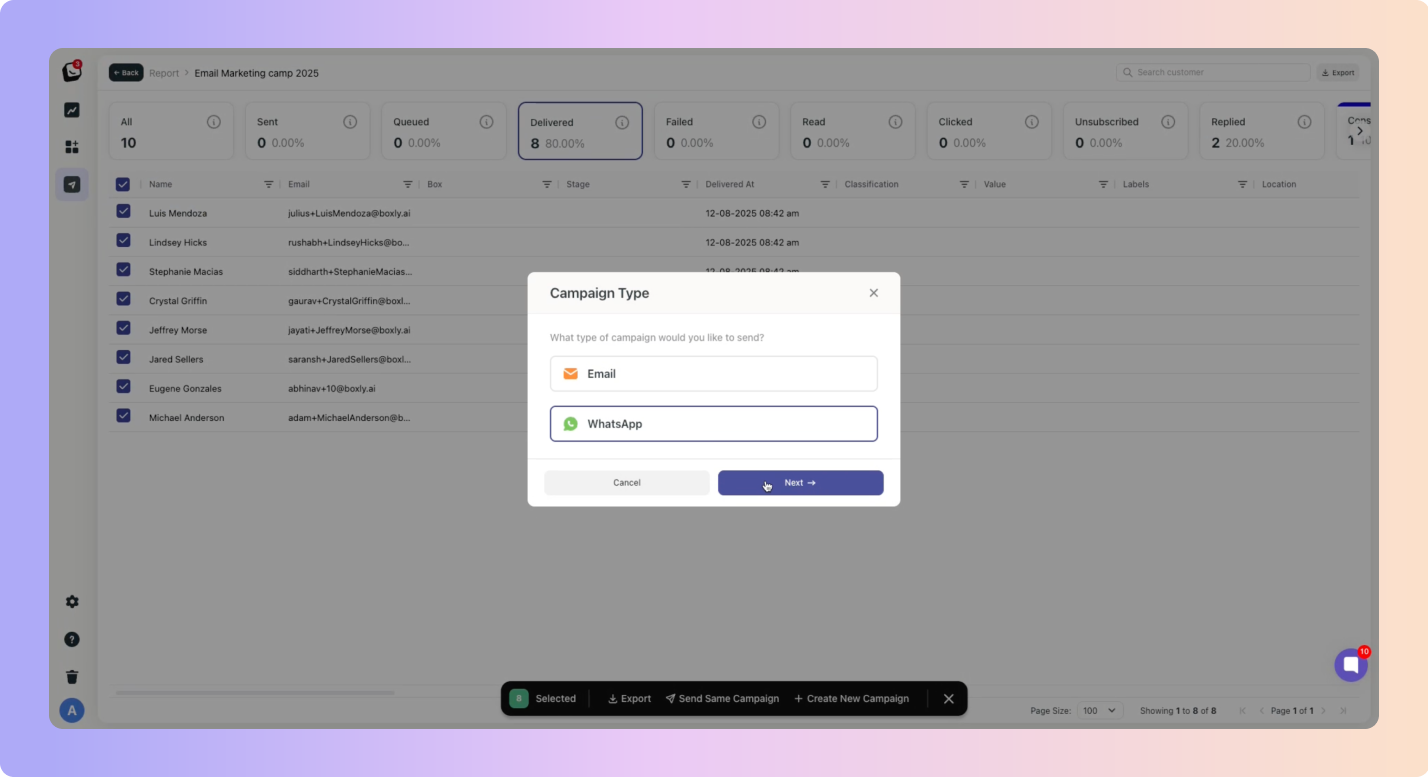
If you want to send the campaign to those who didn’t open the campaign, follow the steps below:
 Click on the Delivered ‘card’ to select only the contacts the campaign delivered too for the next run.
 Select (in the left multi-select blocks) the contacts you want to re-engage.
 Select Send same campaign or Create New campaign.
 Choose the type of campaign: email or WhatsApp you want to use, then click “Next”.
 Go through the same process as above for email and WhatsApp campaigns and then fire away!
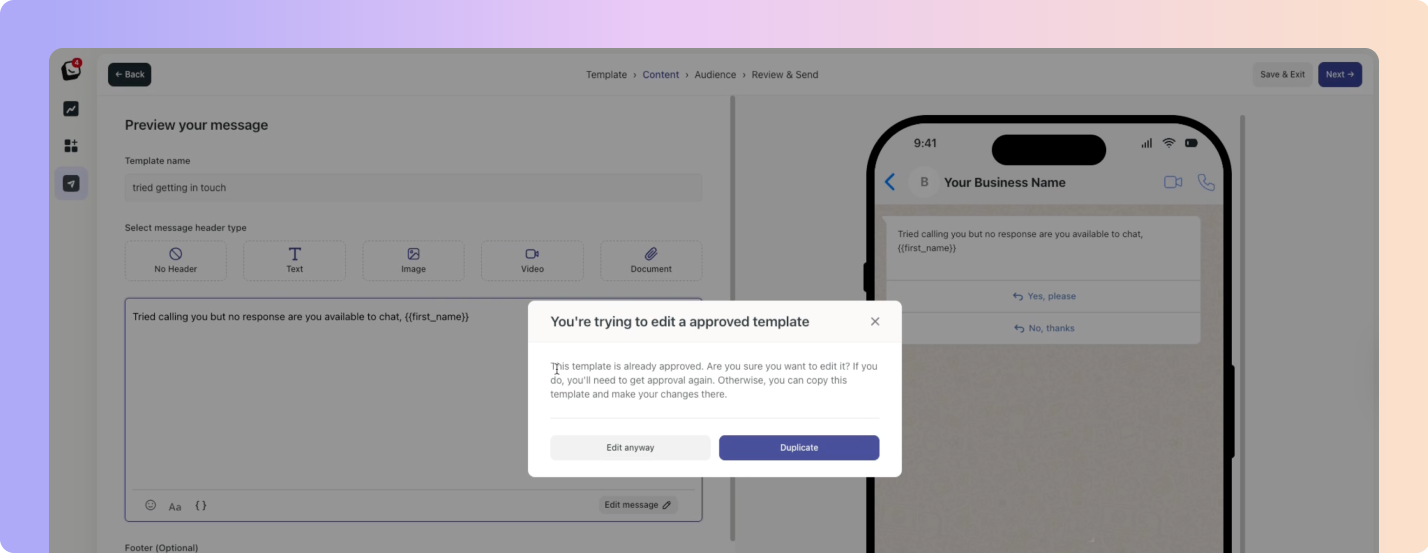
If you want to choose ”Send same campaign again”, and then want to edit the approved WhatsApp template, you can either make a Duplicate of the template or you’ll have to get approval for the new template.
Connect your Facebook Ads and Google Ads accounts to Boxly.
Monitor ad performance without switching between platforms.
See which ads generate leads and track their journey through your pipeline.
Make smarter ad spend decisions using clear ROI insights.
 Coming Soon …
 Build professional, branded landing pages directly in Boxly.
Choose from templates or start from scratch, no coding needed.
Integrate forms that send leads straight into Boxly.
Perfect for promotions, events, or targeted lead capture campaigns.
 All-in-one control: No more juggling between different apps.
 Better lead tracking: See exactly where each lead came from & what they’ve interacted with.
 Data-driven decisions: Use real results to guide your next marketing move.
Reporting
Get a full picture of your marketing efforts in one dashboard.
Compare campaign results.
Identify what’s working.
Campaigns will connect to your Milestones and Lead Sources ensuring you know when they hit those important moments and which campaigns lead to your leads turning into sales!
If it sounds too good to be true and you want to sign up right away, the first 50 people to join will get 30 days of Boxly Marketing Pro completely free.
Register Your Interest