If you're running ads or have landing pages & forms, you can set things up so Boxly captures those leads for you, easily & automatically!
Boxly can automatically collect these leads for you, and below we’ll walk you through the best ways to automatically integrate them into Boxly. We’ll ensure that all generated leads are efficiently captured, tracked, and labelled correctly within Boxly.
The preferred method is Forwarding Email Addresses - Leads are generated when your customers/clients fill out a contact form on a website or landing page.
These website forms and landing pages have an attached email address which is how the lead information ends up with you. Boxly takes that email address and redirects it into Boxly.
To send those leads into Boxly:
If you don't have access to the create a new webform address, ask your admin to follow the steps below
To create a new Forwarding Address: Go to your Channels > Webform channel
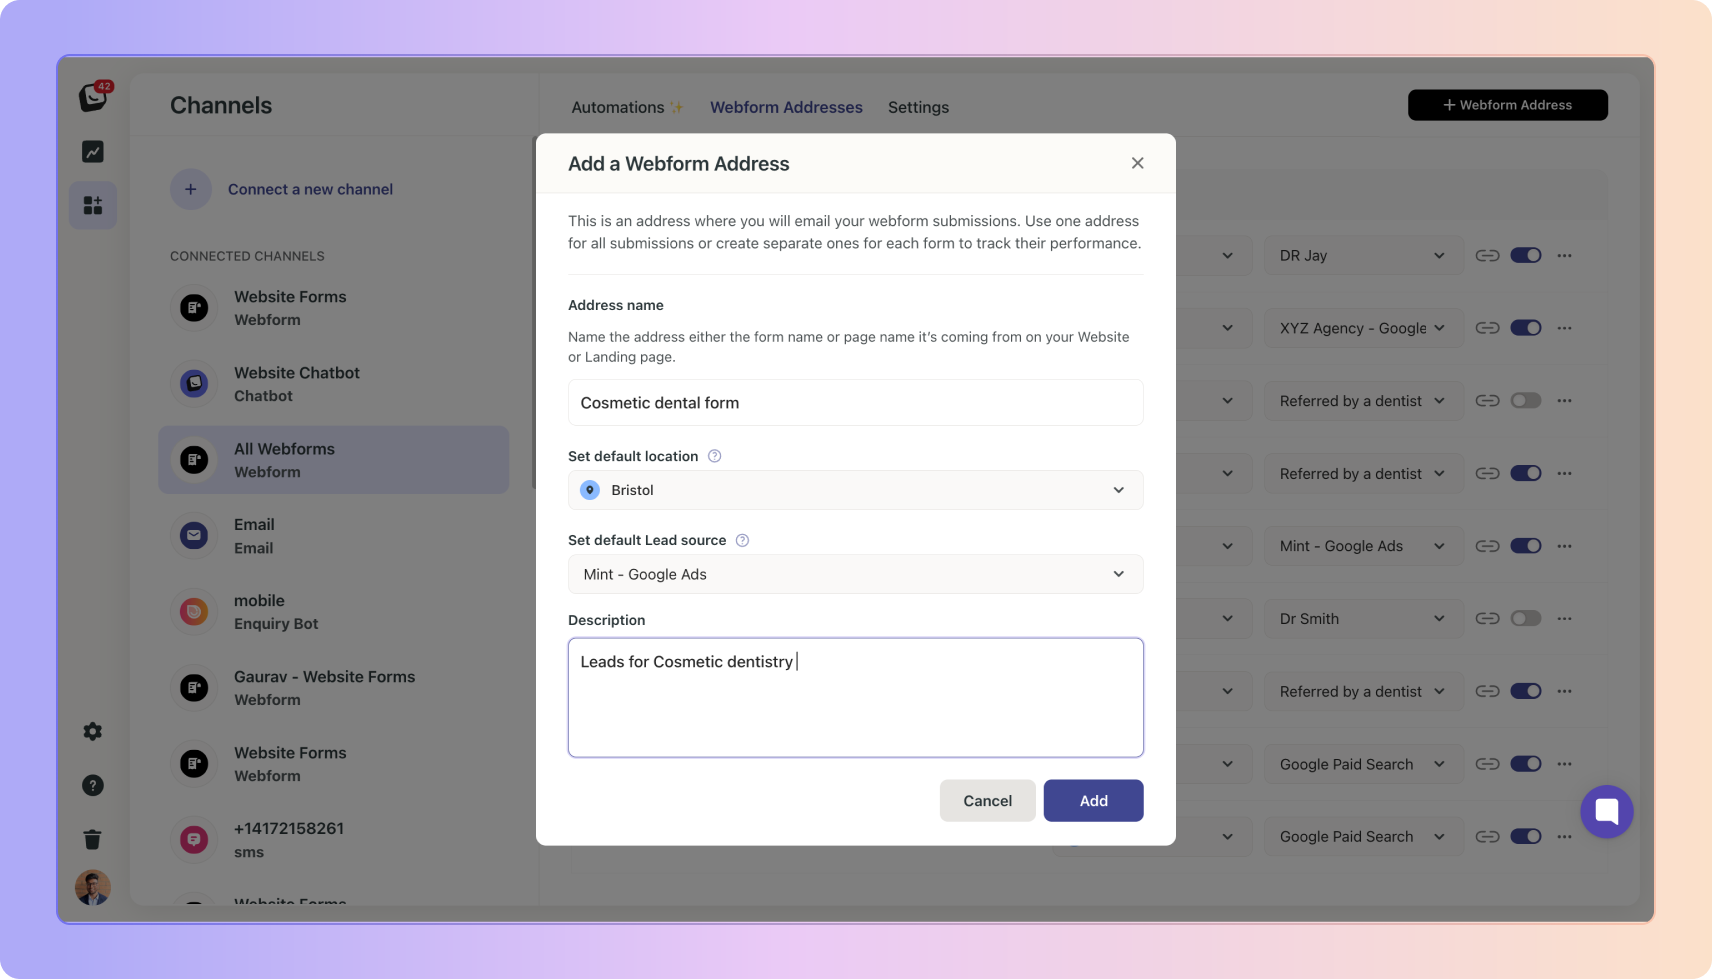
In the Webforms channel, make sure you’re in “Webform Addresses“ tab, and click “+ Webform Address” to create a new forwarding address
→ Enter all relevant info, including:
✅ The address name (name of the form or website you're creating a forwarding address for)
✅ Set a default location if needed
✅ Set a default lead source - For accurate reporting make sure to fill this out.
✅ Description of the kinds of leads and the link if it is a landing page - this will help us troubleshoot if there are issues in the future
Paste that email address into the “To” field of your form-notification email.

Send a test enquiry through the form. The lead should appear in Boxly within a minute.

What is Webform forwarding?
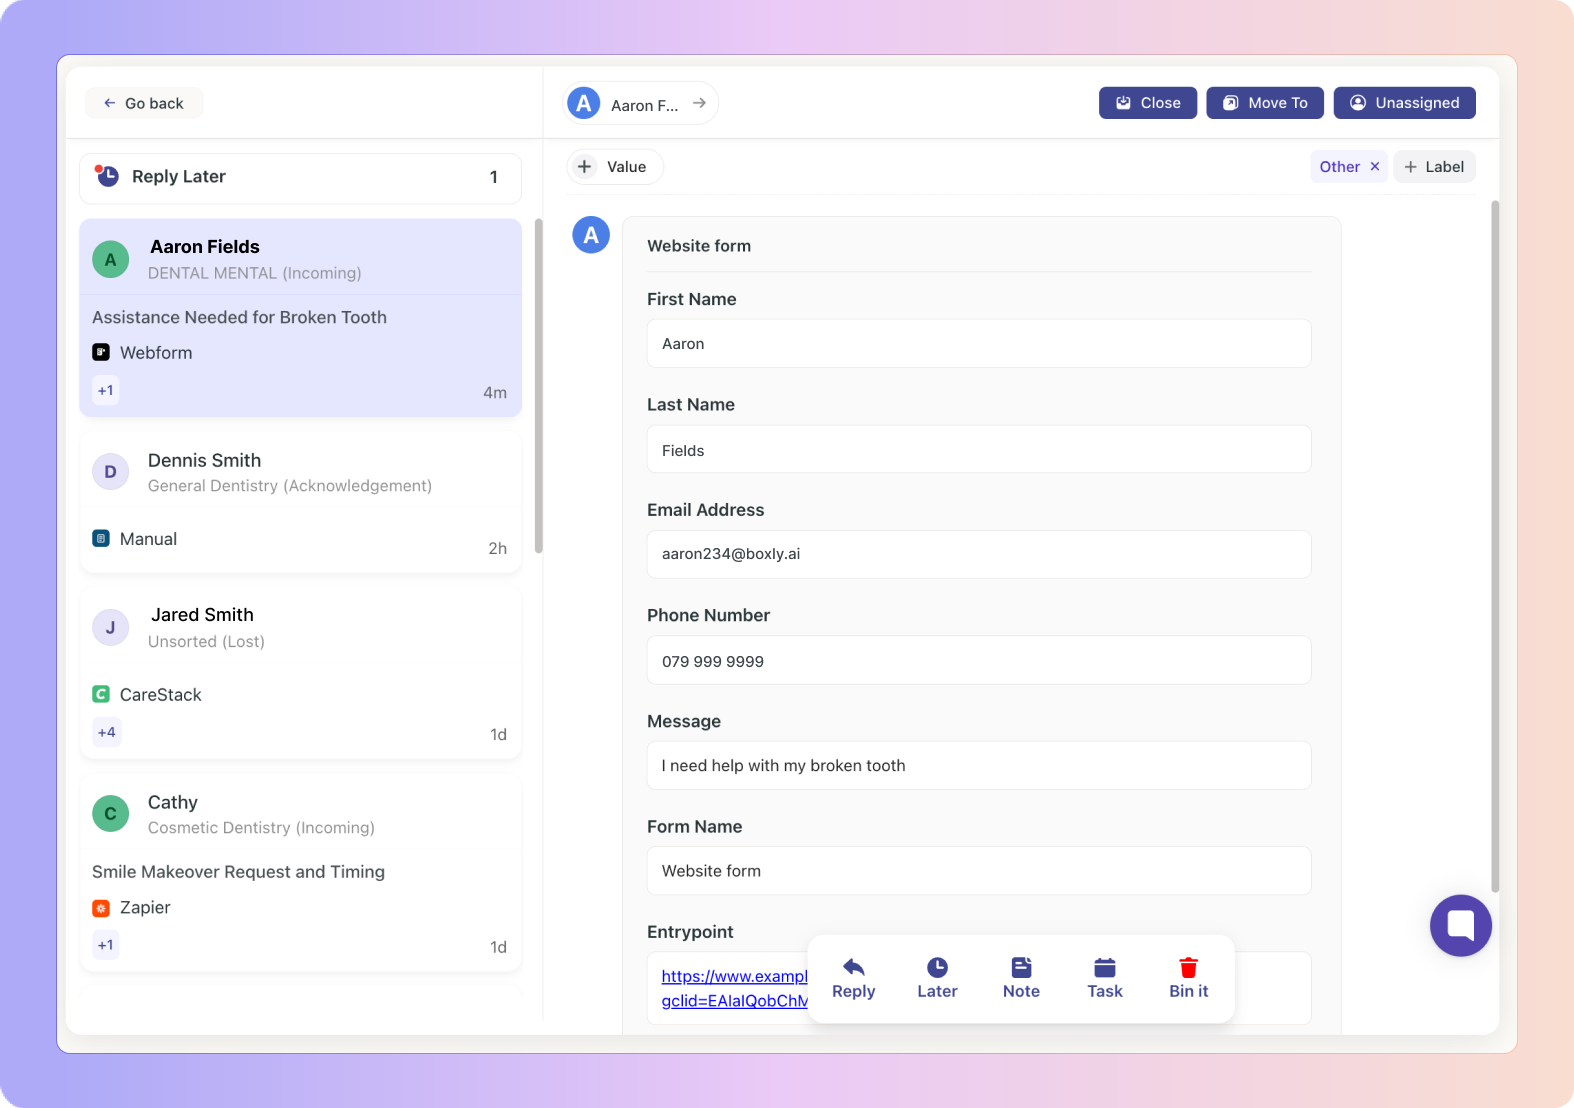
When someone submits a form on your website or landing page, Connect your Webforms allows you to easily (and automatically) get their info into Boxly as a new lead.
Click here to head over to the Webform forwarding article for more info on how this works.
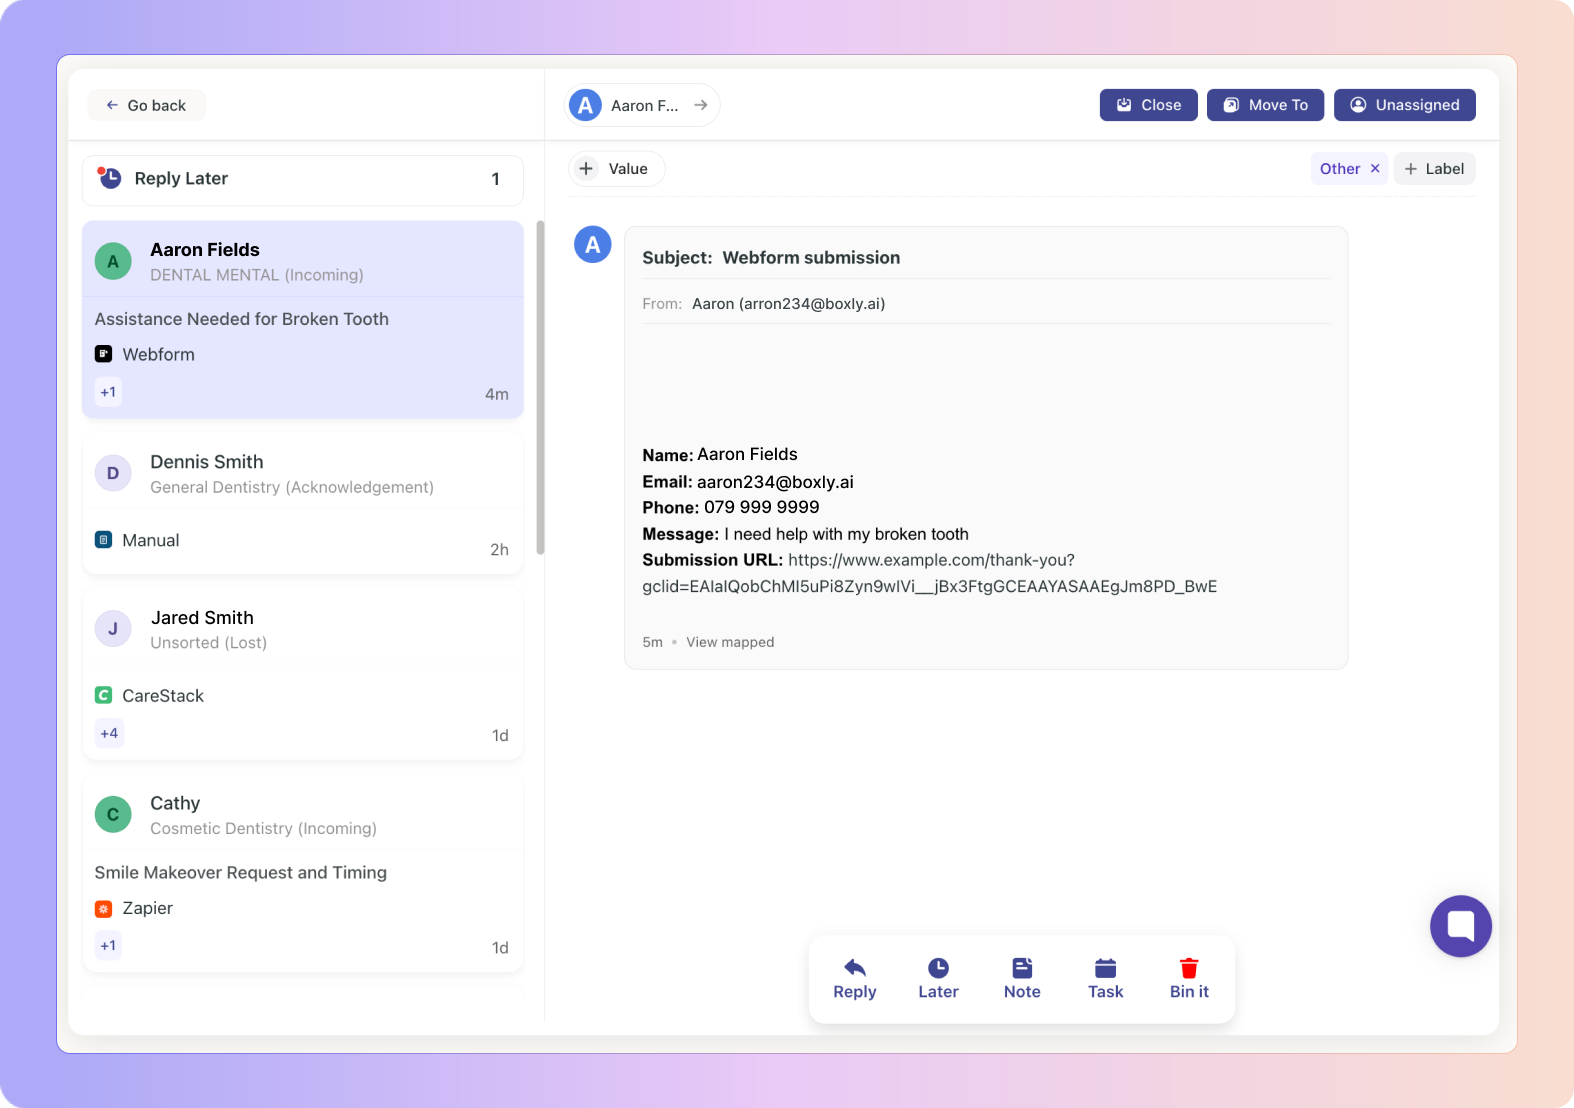
✅ All the information collected in the form like Name, email, phone, message
✅ Submission URL – the (web)page they were on when they submitted the form.
Make sure to include the full web address (URL) of the page the visitor was on when they clicked Send.This helps Boxly accurately tag the lead with the correct source. It’s essential because this is the only information we use to determine where the lead came from. The URL must be in a standard format, like:
https://your-site.com/page?gclid=…
✨ The submission URL is how Boxly figures out where the lead came from (like a Google ad or landing page). If it’s missing, Boxly can’t tag the lead source properly.

Name: Jane Doe
Email: [email protected]
Phone: 079 999 9999
Message: I'd like to book a teeth whitening consultation.
Submission URL: https://example.com/teeth-whitening?gclid=abc123
What is a Lead Source?
Lead sources are the origins through which leads first find your business.
These sources help you track where your leads are coming from.
Lead sources are crucial for understanding which marketing channels are driving leads and revenue for your business.
Click here to head over to the Lead Source article for more info!
Landing Page is Treatment-Specific:
If the form does not ask for the treatment type, a separate address is needed to track context.
Landing Page is Location-Specific:
If the form does not ask for the location, a separate address helps distinguish between locations.
Multiple Marketing Agencies Managing Ads:
If different agencies run ads for the same practice, separate addresses help track performance.
Automatic tagging
Boxly looks at the Submission URL (the page link that comes with every lead) and searches for familiar clues.
The examples below are your guide to understand what Boxly picks up on from the links (urls). For example, when Boxly ‘sees' gclid or utm_medium=cpc in a url Boxly knows it’s a Google Ad:
gclid or utm_medium=cpc → Google Ads
fbclid or utm_medium=ppc → Facebook / Instagram Ads
msclkid → Microsoft Ads
utm_medium=organic → Organic Search
utm_medium=social → Organic Social
When none of those clues are present Boxly records the lead as Direct Traffic.
Your leads (potential clients/customers) end up on your landing pages from specific ads, such as Google Ads or Facebook Ads. When they land on the page, they either fill out a webform or interact with a bot - webforms are more common.
✅ To help you track where form submissions are coming from, we allow you to create separate forwarding address.
✅ You can add and set a default lead source for form submissions.
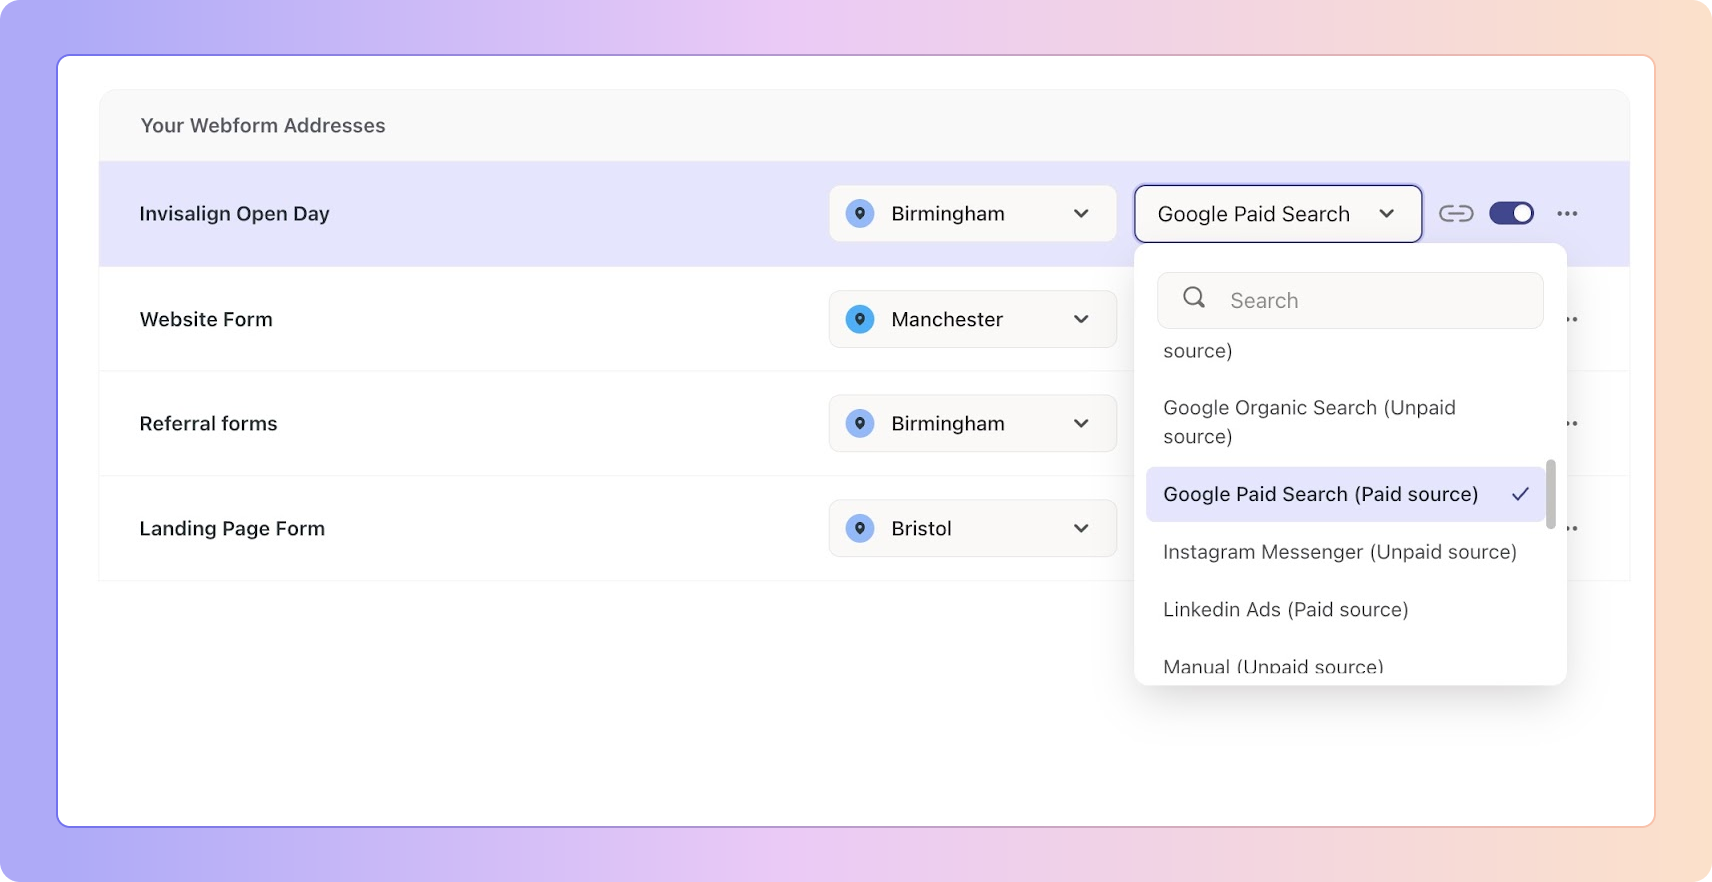
✅ For this example, you want to create a forwarding address for an Invisalign Open Day and the leads come must come from Google Paid Search:
Create the form as shown above
Select and set the lead source to "Google Paid Search."
This way, any leads from this specific forwarding address will automatically default to "Google Paid Search" (Paid Source).
If you use multiple marketing agencies, you can create a new lead source for the different agencies, such as "XYZ Agency - Google Paid Ads," and set it as the default lead source for the webform. Any leads from the forwarding address will default to "XYZ Agency - Google Paid Ads."
✅ How does a default source for a forwarding address help you?
Accurately track webform leads specific to a marketing agency or ad campaign.
Filter the leads in the reports based on the lead source, such as "XYZ Agency - Google Paid Ads," and see how many leads were generated by the marketing agency.
Filter leads in the list view and track leads generated during a specific time period.
Here’s what often happens:
✅ A patient sees your Invisalign Open-Day ad on Facebook.
✅ They fill in their name and phone number on the Facebook form and tap Submit.
✅ After that, they’re sent to your website, where they see another contact form or the bot
✅ Thinking it’s part of the same process, they enter & submit their details again.
Now, Boxly receives two leads from the same person:
One from the Facebook form
One from your website form
What to do:
If you’re using Facebook Lead Ads, it’s best to let the Facebook form be the only form.
Don’t send people to another contact form after they’ve already filled one out.
It keeps things simple, and avoids confusion for both your team and your clients/patients.
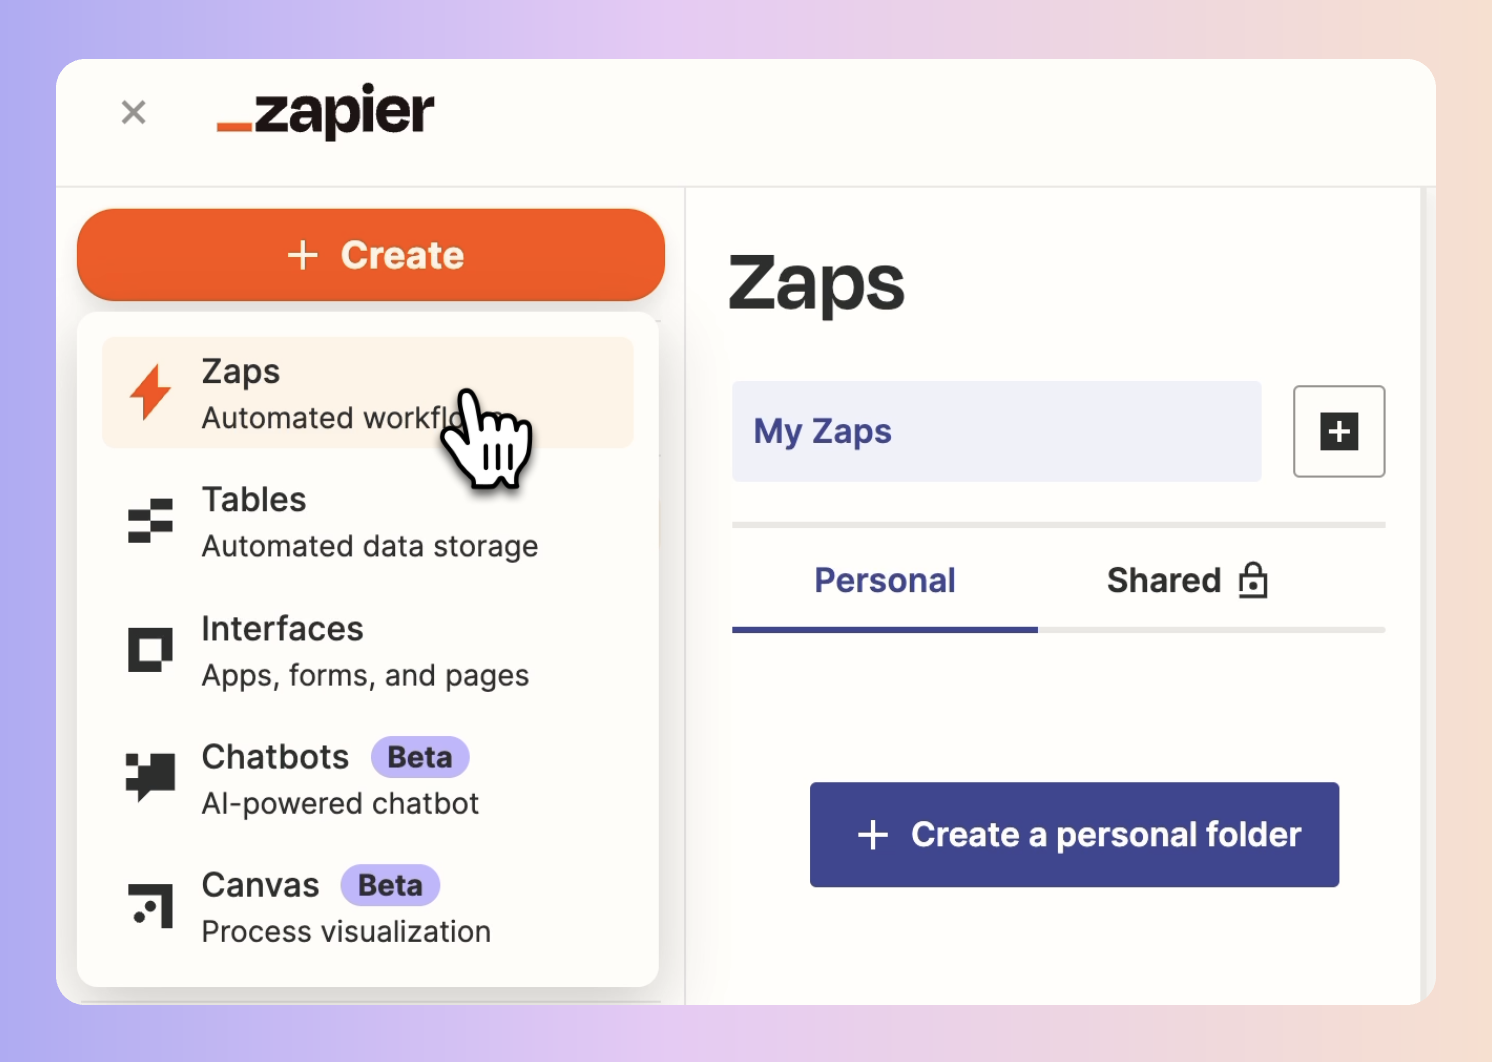
Create a Zap.
Choose your form app as the Trigger.
Choose “EnquiryBox” as the Action and login with the same email address you use for Boxly.
Map the Submission URL; include Name, Email, Phone and a Message if you have them.
Pick the Box and Stage where new leads should land.
Test the Zap, turn it on and confirm leads reach Boxly.
Get leads in and out of Boxly with Zapier
How to connect Boxly with Zapier
If Zapier leads show Direct Traffic, edit the Zap so that Submission URL is sent.
How It Works:
Facebook Lead Ads collect user details directly within Facebook, eliminating the need for an external form or landing page.
✅ Firstly Connect your Facebook Lead Ads with Boxly’s Facebook Lead Ad integration
Head over to the Connect Facebook Lead Ads article for the full run down as to how to connect your channel and bring Facebook Lead Ads into Boxly.
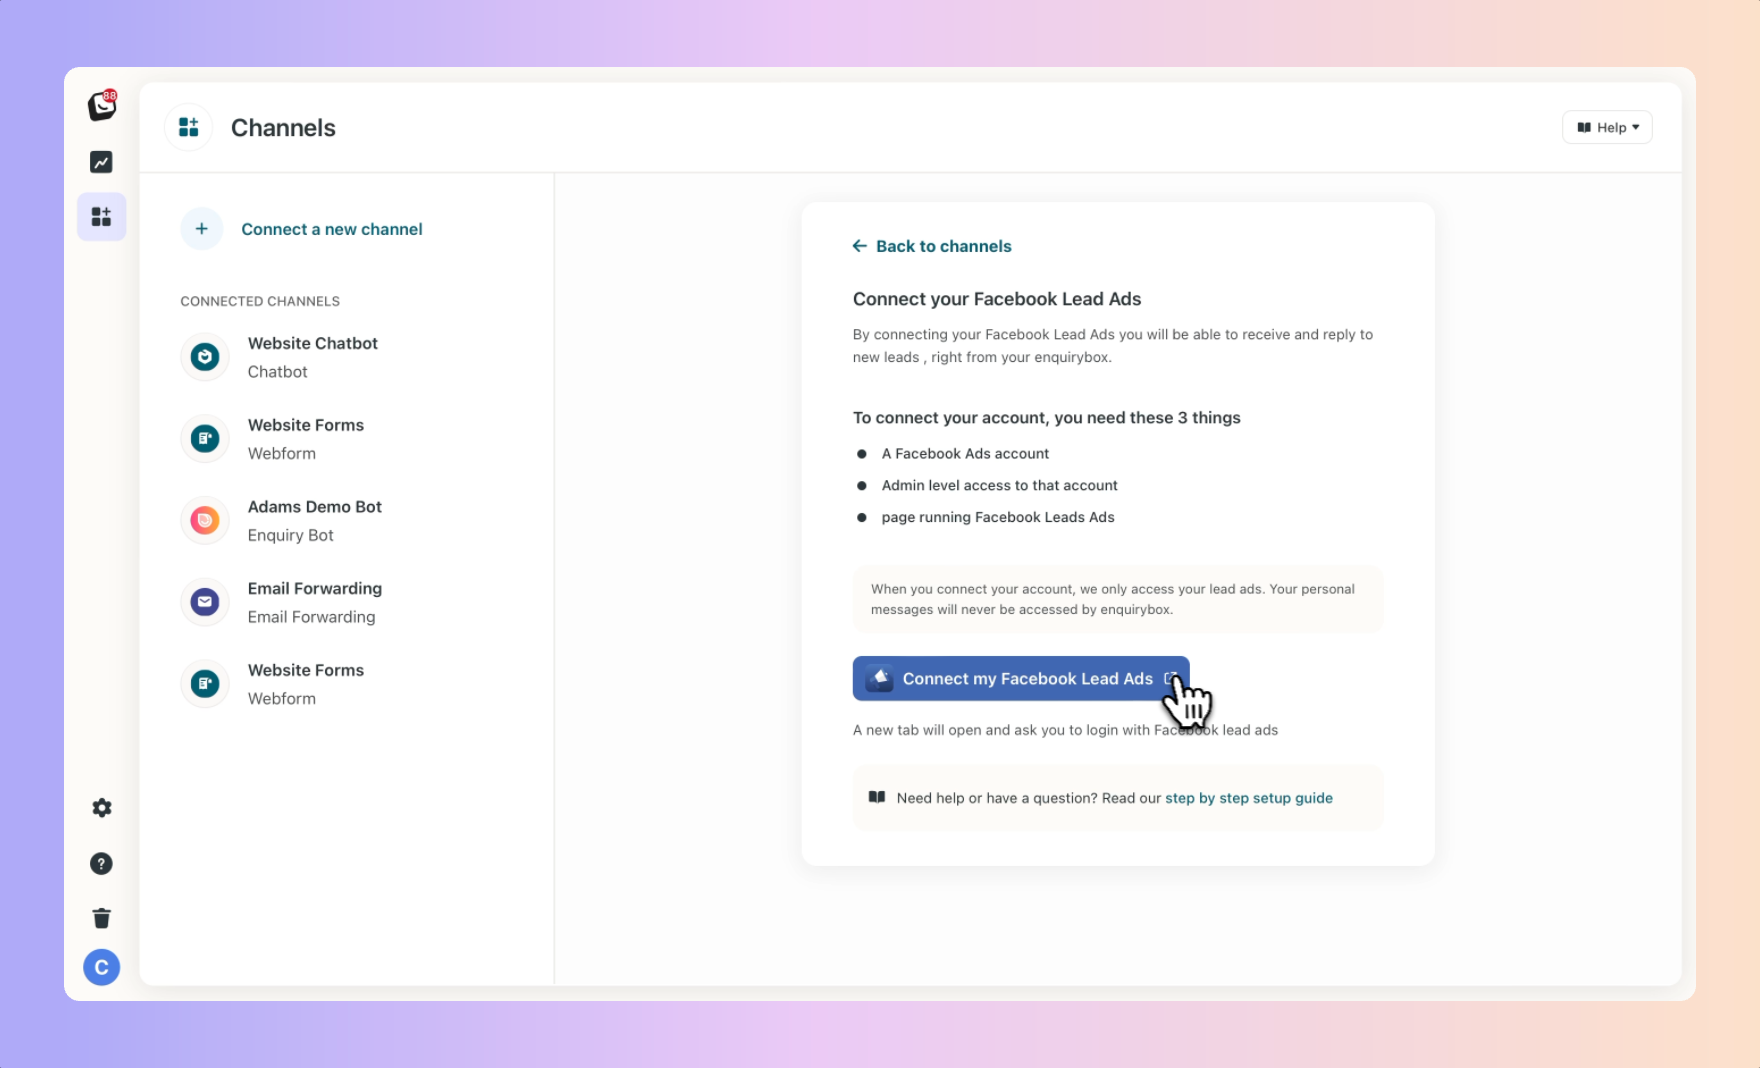
✅ To connect your channel successfully you must have admin access to the facebook account you’re connecting to Boxly.
✅ If you are struggling to connect or see the pages/businesses after logging in, then you most likely don’t have the needed permission.
To verify access, use the Facebook Lead Ads Testing Tool.
✅ Leads from Facebook Lead Ads are automatically categorised as Paid Ads › Facebook Lead Ads within Boxly for accurate tracking.
✅ Run the Facebook Lead Ads Testing Tool and submit a test lead.
Check that:
You connected with a Page Admin account.
The Business Manager owns the page and the ad account.
EnquiryBox (under Business Integrations) is allowed to manage leads.
The instant-form is published and linked to an active ad.
✅ Re-run the test after fixing any issues.
✅ Once the test works, send a live lead and confirm that it appears in Boxly.
Want to Track EnquiryBot Activity with Google Analytics? Here’s How!
Boxly works with Google Analytics (GA4) so you can keep track of how visitors use your EnquiryBot. This helps you see how many people are starting chats, giving their details, or dropping off.
Enquiry Started – When someone opens the chat and starts a conversation.
Enquiry Completed – When they reach the final message at the end of the chat.
If they leave halfway, this won’t show.
Email Captured – When they enter their email.
Phone Number Captured – When they enter their phone number.
Dismissed – When they close the chat without using it.
To enable tracking, send us your GA4 Measurement ID.
Steps to Find Your GA4 Measurement ID:
Sign in to your Google Analytics (GA4) account.
Go to: Admin → Property Column → Data Streams → Choose your website.
Copy your Measurement ID.
Send the Measurement ID to the Boxly team, and we’ll set it up for you!
Recommended Conversion Tracking Event
We recommend using "Email Captured" to track real leads.
That way, only people who actually give you their contact info are counted, preventing false positives.
Enabling “Google Ads conversion tracking” lets you see which ad clicks lead to real conversations in your EnquiryBot.
Follow the steps below & then send us two small pieces of information!
What you need first
1. Ensure that a Google Ads account with the Global Site Tag (gtag.js) already installed on your website.
2. A new Conversion Action in Google Ads, set to the category “Submit lead form.”
✅ Google provides a short wizard for this in Tools → Measurement → Conversions.
What to Send to Boxly Support
✅ Conversion ID – a ten-digit number shown in the Google Ads setup screen.
✅ Conversion Label – an alphanumeric string shown next to the Conversion ID.
Email these details to [email protected] or paste them into the chat bubble inside Boxly, and our team will connect the integration for you.
✨ After setup
When a visitor reaches your chosen goal, Boxly will send the conversion to Google Ads. Google may take up to 24 hours to display it in your Ads account.